To successfully store and grow Alocasia corms, keep them in a cool, dry place with good ventilation. Use a breathable container and avoid excess moisture to prevent rot. When planting, ensure well-draining soil and provide indirect light with consistent watering during the growing season.
*As an Amazon Associate we earn from qualifying purchases.
Alocasia plants, known for their striking foliage and unique shapes, are popular houseplants among gardening enthusiasts. They belong to the family Araceae and originate from tropical regions. The growth of Alocasia largely depends on its corms, which are bulb-like structures that store nutrients and energy for the plant.
Corms play a vital role in the life cycle of Alocasia. They serve as storage organs that allow the plant to survive periods of stress, such as drought or unfavorable growing conditions. Understanding how to care for these corms is crucial for anyone looking to cultivate healthy Alocasia plants.
Characteristics of Alocasia Corms
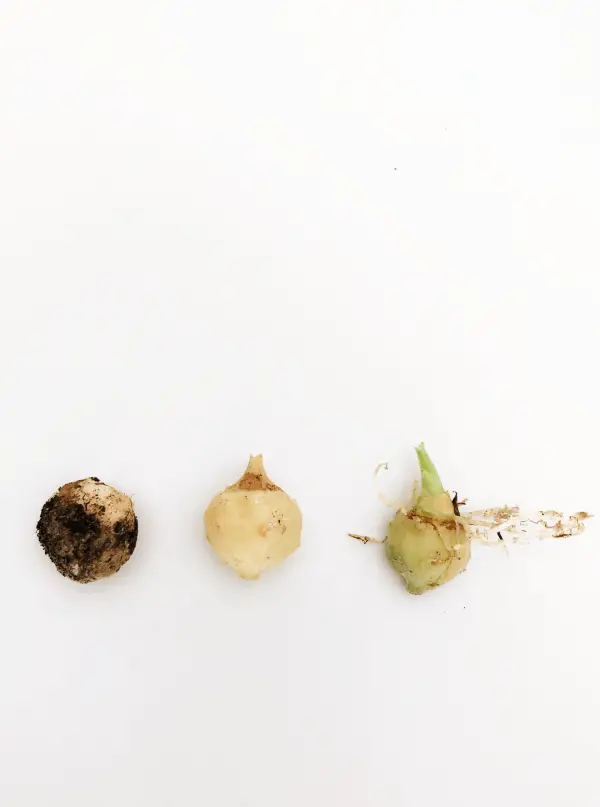
Corms are typically round or oval and can vary in size depending on the species of Alocasia. They are covered in a protective skin that helps retain moisture and prevent disease. Here are some key characteristics of Alocasia corms:
Shape: Generally rounded or oval, providing stability for the plant.
Size: Varies among species; larger corms generally produce bigger plants.
Surface: A protective skin covers the corm, aiding moisture retention.
Storage Tips for Alocasia Corms
Proper storage of Alocasia corms is essential, especially during dormancy. Here are some effective storage tips:
Choose the Right Location: Store corms in a cool, dark, and dry place. Ideal temperatures range from 60°F to 70°F (15°C to 21°C).
Avoid Excess Moisture: Excess moisture can lead to rot. Ensure that the storage area has good ventilation.
Use Breathing Containers: Place corms in mesh bags, paper bags, or cardboard boxes to allow airflow.
Check Regularly: Inspect the corms periodically for signs of mold or decay. Remove any damaged corms immediately to prevent spreading.
Preparing Corms for Planting
When it’s time to plant your stored Alocasia corms, proper preparation is essential for successful growth. Here are steps to get started:
Inspect the Corms: Before planting, inspect each corm for damage or rot. Healthy corms should be firm and free from soft spots.
Soak in Water: Soaking the corms in water for a few hours can help rehydrate them before planting.
Select Suitable Soil: Use a well-draining potting mix. A mix designed for orchids or a combination of potting soil, perlite, and sand works well.
Optimal Growing Conditions
Alocasia plants thrive under specific conditions that mimic their native tropical environment. Providing the right light, water, and humidity levels can significantly impact their growth.
Growing Factor
Optimal Condition
Light
Bright, indirect sunlight
Water
Keep the soil consistently moist but not soggy
Humidity
High humidity levels (50% or more)
By following these storage and growing tips, you can ensure that your Alocasia corms thrive and produce stunning foliage. The key is to mimic their natural habitat as closely as possible while providing care tailored to their specific needs.
Common Issues with Alocasia Corms
While caring for Alocasia corms can yield beautiful plants, several common issues may arise during their storage and growth. Understanding these challenges can help you take preventive measures and respond effectively.
Overwatering
One of the most significant problems faced by Alocasia plants is overwatering. This condition can lead to root rot, which ultimately affects the health of the corms. Signs of overwatering include:
Yellowing Leaves: Leaves may start to turn yellow, indicating stress.
Soggy Soil: The soil feels wet and does not dry out between waterings.
Mushy Corms: Corms may become soft and mushy due to excess moisture.
To prevent overwatering, always check the soil moisture before watering. A finger test can help; if the top inch of soil feels dry, it’s time to water.
Underwatering
Conversely, underwatering can also pose a threat to your Alocasia corms. Symptoms of underwatering include:
Crispy Edges: Leaves may develop brown, crispy edges.
Wilting: The plant may appear droopy or wilted.
Stunted Growth: The plant’s growth may slow or stop altogether.
To combat underwatering, establish a regular watering schedule based on the plant’s needs and environmental conditions. Adjust your watering routine during hotter months when evaporation is higher.
Pest Management for Alocasia Corms
Pests can significantly affect the health of Alocasia plants. Keeping an eye out for common pests is essential for maintaining vibrant corms and foliage. Here are some pests to watch for:
Common Pests
Aphids: Small, soft-bodied insects that cluster on new growth.
Spider Mites: Tiny pests that create fine webs on leaves and thrive in dry conditions.
Mealybugs: White, cotton-like pests that can be found in leaf joints and on stems.
If you notice any of these pests, it’s crucial to act quickly. Here are some effective pest control methods:
Manual Removal: For small infestations, use a damp cloth or a cotton swab dipped in alcohol to wipe pests from leaves.
Insecticidal Soap: Apply insecticidal soap or neem oil to affected areas for more extensive infestations.
Regular Inspections: Regularly check your plants to catch infestations early before they escalate.
Environmental Factors Affecting Growth
The environment plays a crucial role in the growth and health of Alocasia corms. Several factors should be considered to create an optimal growing environment.
Temperature
Alocasia plants thrive in warmer temperatures. The ideal temperature range is between 65°F and 80°F (18°C to 27°C). Temperatures below 50°F (10°C) can cause stress and hinder growth.
Humidity Levels
High humidity is essential for Alocasia plants. They naturally grow in humid environments, so aim for humidity levels above 50%. Here are some ways to increase humidity around your plants:
Use a Humidifier: Placing a humidifier near your plants can significantly boost humidity levels.
Misting: Lightly misting the leaves can help maintain moisture but should be done in moderation to avoid mold.
Pebble Trays: Place pots on trays filled with pebbles and water to create a micro-humid environment around the plants.
Nutrient Requirements
Nourishing Alocasia corms with the right nutrients is vital for robust growth. Here are key nutrients to consider:
Nitrogen: Essential for leaf growth and overall plant vigor.
Phosphorus: Supports root development and flowering.
Potassium: Enhances overall plant health and resistance to diseases.
A balanced liquid fertilizer can be applied every four to six weeks during the growing season. Be cautious not to over-fertilize, as this can lead to nutrient burn or other adverse effects on the corms.
Propagation is an exciting way to expand your Alocasia collection. Understanding the different techniques available can help you grow new plants from existing corms. Here are the most common methods of propagating Alocasia:
Division
One of the most effective ways to propagate Alocasia is through division. This method involves splitting a mature plant into smaller sections, each containing a corm and roots. Follow these steps for successful division:
Choose the Right Time: The best time to divide Alocasia is during the active growing season, typically in spring.
Remove the Plant: Carefully take the plant out of its pot, shaking off excess soil to expose the roots and corms.
Identify Sections: Look for areas where the plant has produced offsets or multiple corms. Each section should have at least one healthy corm and some roots.
Cut and Replant: Use a clean, sharp knife to cut the sections apart. Replant each section in its own pot with fresh, well-draining soil.
Offsets
Alocasia plants often produce offsets, which are small plants that grow near the base of the main plant. These can be removed and planted separately. Here’s how to propagate using offsets:
Locate Offsets: Look for small plants growing from the base of the mother plant.
Gently Separate: Carefully tug at the offset to separate it from the main plant without damaging the roots.
Replant: Plant the offset in a small pot with suitable soil mix and water lightly.
rous varieties of Alocasia, each with unique characteristics. Familiarizing yourself with different types can help you choose which ones to propagate or grow. Here are some popular varieties:
Alocasia Polly: Known for its striking arrow-shaped leaves with prominent veins, this variety is a favorite among collectors.
Alocasia Zebrina: This variety features distinctive zebra-patterned stems and large, glossy leaves.
Alocasia Macrorrhiza: Commonly known as Giant Taro, it produces large leaves that can grow up to three feet long.
Seasonal Care for Alocasia Corms
Caring for Alocasia corms requires adjusting your care routine according to seasonal changes. Each season presents unique challenges and opportunities for growth.
Spring Growth
Spring marks the beginning of the growing season for Alocasia. Here are some important care tips:
Increase Watering: As temperatures rise, increase your watering frequency to keep the soil consistently moist.
Fertilize: Start applying a balanced fertilizer every four to six weeks to support new growth.
Pest Monitoring: Keep a close eye out for pests as new growth emerges, and take action if needed.
Summer Maintenance
The summer months can be hot and humid, which is ideal for Alocasia. Consider these tips for optimal maintenance:
Maintain Humidity: Increase humidity levels if necessary, using misting or a humidifier.
Regular Pruning: Remove any yellow or damaged leaves to encourage new growth and improve air circulation.
Avoid Direct Sunlight: Ensure that your plants receive bright, indirect light to prevent leaf scorch.
Fall Transition
As fall approaches, prepare your Alocasia for dormancy. Here’s how:
Reduce Watering: Gradually decrease watering as growth slows down; allow the top inch of soil to dry out between waterings.
Stop Fertilizing: Cease fertilization, as plants require less nutrition during this period.
Pest Inspection: Continue monitoring for pests and treat infestations promptly.
Winter Care
During winter, Alocasia may enter a dormancy phase. Taking proper care during this time is crucial:
Avoid Overwatering: Scale back on watering significantly; only water if the soil feels dry at a depth of one inch.
Mist Occasionally: If indoor air is particularly dry, occasional misting may help maintain humidity levels.
Caring for Alocasia corms through different seasons ensures their health and vibrancy. By following these seasonal guidelines, you can enjoy lush foliage year-round.
ered the basics of caring for Alocasia corms, you may want to explore advanced techniques to enhance growth and ensure vibrant foliage. These tips can help you achieve even better results with your plants.
Temperature Regulation
Keeping a stable temperature is crucial for Alocasia health. If you notice your plants struggling, consider implementing the following:
Heat Mats: Use heat mats during the winter months to provide gentle warmth from below, which encourages root activity.
Thermostat-Controlled Environment: If possible, maintain a stable temperature using a thermostat in the area where your Alocasia is located.
Draft Protection: Ensure your plants are not placed near drafty windows or doors, as sudden temperature changes can stress them.
Soil Amendments
Alocasia benefits from a well-draining soil mix. Consider these amendments to enhance your potting mix:
Perlite: Mixing in perlite can improve drainage and aeration, reducing the risk of overwatering.
Coconut Coir: This organic material retains moisture while allowing excess water to escape, promoting healthy root development.
Orchard Bark: Adding small pieces of orchid bark can help create a loose mix that encourages airflow around the roots.
Using Grow Lights
If natural light is limited, consider using grow lights to supplement your Alocasia’s light requirements. Here are a few tips for using grow lights effectively:
Choose the Right Type: Full-spectrum LED grow lights are excellent for providing the necessary light spectrum for plant growth.
Proper Distance: Keep the lights about 12 to 18 inches above the plants to avoid burning the leaves while still providing adequate light.
Set a Timer: Use a timer to ensure your plants receive consistent light for 12 to 14 hours each day.
Regular Maintenance Practices
In addition to seasonal care, establishing a routine maintenance schedule can keep your Alocasia plants healthy:
Dusting Leaves: Regularly wipe down leaves with a damp cloth to remove dust, which can block sunlight and reduce photosynthesis.
Rotate Pots: Rotating pots every few weeks ensures even light exposure and promotes balanced growth.
Check Potting Mix: Every few months, check the potting mix for compacting. If it appears dense, consider repotting with fresh soil.
Final Thoughts
Caring for Alocasia corms requires patience and attention to detail. By understanding their specific needs and adapting your care practices throughout the seasons, you can cultivate stunning plants that thrive in various conditions. Remember that each Alocasia variety may have unique preferences, so take time to observe and adjust your methods accordingly.
The joy of growing Alocasia lies not only in their dramatic foliage but also in the satisfaction of nurturing life. Whether you are propagating new corms, addressing common issues, or enhancing their environment with advanced techniques, each step contributes to the overall success of your gardening journey. With this comprehensive guide, you are well-equipped to enjoy a flourishing collection of Alocasia plants.
The beauty of Alocasia plants extends beyond their striking appearance; they also bring life and vibrancy to any space. By applying these storage and growth tips, you can create an environment where your Alocasia corms can flourish and add charm to your home or garden.
I'm Amelia Clark , a seasoned florist and gardening specialist with more than 15 years of practical expertise. Following the completion of my formal education, I dedicated myself to a flourishing career in floristry, acquiring extensive understanding of diverse flower species and their ideal cultivation requirements. Additionally, I possess exceptional skills as a writer and public speaker, having successfully published numerous works and delivered engaging presentations at various local garden clubs and conferences. Check our Social media Profiles: Facebook Page, LinkedIn, InstagramTumblr
For anyone looking to cultivate a lush, tropical paradise at home, understanding effective propagation methods is essential. I’ve discovered that nurturing tropical plants can be incredibly...
The Money Tree plant, also known as Pachira aquatica, is not toxic to cats. Therefore, it is generally safe for pets. However, while ingestion may not cause harm, some cats might still experience...