Dischidia ovata care involves providing bright, indirect light and watering when the soil becomes dry. This tropical plant is easy to care for and is best placed in a location with high humidity, such as a bathroom or near a humidifier, to ensure optimal growth and appearance.
Additionally, regular fertilization can help promote healthy foliage and growth. Pruning can be done to maintain the desired shape and size, and propagating by stem cuttings is a recommended method for expanding your collection or sharing with others. With proper care and attention, dischidia ovata can be a beautiful addition to any indoor plant collection.
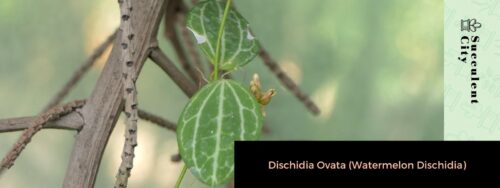
Credit: succulentcity.com
Why Dischidia Ovata Is The Perfect Indoor Plant
Dischidia ovata, commonly known as the watermelon dischidia, is an exquisite indoor plant that can truly bring life and beauty to any space. With its unique characteristics and numerous benefits, it is no wonder that dischidia ovata is considered the perfect indoor plant.
Let’s explore why this stunning plant deserves a place in every indoor garden.
Table of Contents
Benefits Of Having Dischidia Ovata As An Indoor Plant:
- Improves indoor air quality: Dischidia ovata has the remarkable ability to filter and purify the air, removing toxins and releasing oxygen. This makes it an excellent choice for those looking to enhance the air quality in their homes or offices.
- Low maintenance: One of the greatest advantages of dischidia ovata is its low maintenance nature. It is a resilient plant that requires minimal care, making it perfect for busy individuals or those new to plant parenting. With the right amount of light, water, and occasional fertilization, this plant will thrive effortlessly.
- Natural humidifier: Dischidia ovata has unique water-storing leaves that release moisture into the surrounding air. As a result, it acts as a natural humidifier, increasing humidity in dry indoor environments. This feature is especially beneficial during the winter months when the air tends to be dry due to heating systems.
- Stress relief and relaxation: Research has shown that spending time near plants can reduce stress and promote a sense of calm. Dischidia ovata, with its lush green foliage and soothing presence, can create a tranquil atmosphere within any indoor space, promoting relaxation and well-being.
Unique Characteristics Of Dischidia Ovata That Make It Stand Out:
- Watermelon-like appearance: One of the most distinctive features of dischidia ovata is its watermelon-like leaves. The leaves are thick, round, and green with lighter green variegation, resembling the pattern of a watermelon. This unique aesthetic adds a touch of whimsy and visual interest to any indoor plant collection.
- Epiphytic nature: Dischidia ovata is an epiphytic plant, meaning it naturally grows on other plants or trees in its native habitat. This characteristic allows it to adapt well to various growing conditions and makes it a perfect choice for those seeking a captivating and unusual addition to their indoor garden.
- Misting roots: Unlike traditional plants that rely on soil for nutrition, dischidia ovata has evolved to absorb water and nutrients through aerial roots. These roots have the ability to absorb moisture from the air, making misting a preferred method of watering. This unique adaptation adds to the plant’s overall charm and makes it a fascinating plant to care for.
How Dischidia Ovata Enhances Indoor Beauty:
- Cascading vines: Dischidia ovata features trailing vines that gracefully cascade down, adding a touch of elegance to any indoor space. Whether placed in a hanging basket or allowed to trail over a shelf, these vines create a visually captivating display that can transform the aesthetic of a room.
- Versatile style: With its compact size, dischidia ovata can fit well in various types of containers, making it a versatile option for indoor plant enthusiasts with different interior design preferences. Whether styled in a minimalist modern pot or a rustic terracotta planter, dischidia ovata effortlessly enhances the beauty of its surroundings.
- Perfect for any room: This indoor plant’s ability to tolerate a wide range of lighting conditions makes it suitable for any room in the house. Whether it’s placed near a bright window or in a low-light corner, dischidia ovata remains resilient and visually appealing, providing a touch of nature and freshness to any space.
As you can see, dischidia ovata offers a host of benefits and unique characteristics that make it an exceptional choice for indoor plant enthusiasts. From improving air quality to adding beauty and tranquility to your indoor space, this remarkable plant is truly a must-have for any plant lover.
So why wait? Bring home a dischidia ovata and experience the magic it brings to your indoor garden.
Choosing The Right Environment For Your Dischidia Ovata
Caring for your dischidia ovata involves creating the perfect environment for it to thrive. This includes understanding the optimal temperature and humidity levels, selecting the right location within your home, and providing proper lighting. Let’s dive into each of these factors to ensure your dischidia ovata thrives in its new home.
Understanding The Optimal Temperature And Humidity Levels For Dischidia Ovata
Maintaining the right temperature and humidity levels is crucial for the health of your dischidia ovata. Here are some key points to keep in mind:
- Temperature: Dischidia ovata prefers temperatures between 65°f and 80°f (18°c to 27°c). Avoid exposing it to extreme temperature fluctuations or drafts, as they can stress the plant.
- Humidity: This plant thrives in moderate to high humidity levels. Aim to keep the humidity around 50% to 60%. If your home tends to be dry, consider using a humidifier or placing a tray of water near the plant to increase humidity.
Selecting The Right Location For Your Dischidia Ovata Within Your Home
Finding the ideal spot in your home for your dischidia ovata will contribute to its overall health and growth. Consider the following points when selecting a location:
- Indirect sunlight: Dischidia ovata prefers bright, indirect sunlight. Avoid placing it in direct sunlight, as it can scorch the leaves.
- East or west-facing windows: Placing your plant near an east or west-facing window can provide the perfect balance of light without exposing it to intense afternoon sun.
- Avoid cold drafts: Ensure the location you choose is free from cold drafts, which can harm your plant. Keep it away from air conditioning vents or open windows during the winter months.
Tips For Providing Proper Lighting To Your Dischidia Ovata
Proper lighting is essential for the growth and well-being of your dischidia ovata. Follow these tips to ensure your plant receives the right amount of light:
- Indirect light: Dischidia ovata thrives in bright, indirect light. Place it near a window that receives filtered sunlight or invest in sheer curtains to diffuse the intensity of direct sunlight.
- Rotate the plant: To ensure even growth, rotate your dischidia ovata every few weeks. This will prevent it from leaning towards the light source and promote balanced growth.
- Supplement with artificial light: If your home lacks adequate natural light, consider using grow lights to supplement the lighting needs of your dischidia ovata. Led grow lights are energy-efficient and provide the right spectrum for plant growth.
Remember, providing the right environment for your dischidia ovata is crucial for its overall health and happiness. By understanding the optimal temperature and humidity levels, selecting the right location within your home, and providing proper lighting, you’ll set the stage for a thriving and vibrant plant.
Essential Care Tips For Thriving Dischidia Ovata
Watering Techniques For Dischidia Ovata: Finding The Perfect Balance
Proper watering is crucial for the health and growth of your dischidia ovata. While it’s important to provide consistent moisture, overwatering can lead to root rot and other issues. Here are some essential watering techniques to help you find the perfect balance:
- Check the soil moisture: Before watering, check the moisture level of the soil by inserting your finger about an inch into the soil. If it feels dry, it’s time to water. If it’s still moist, allow it to dry out a bit more before watering again.
- Watering frequency: Dischidia ovata prefers slightly moist soil, but it’s important not to overdo it. Water your plant when the top inch of soil has dried out completely. Usually, this means watering once every 7-10 days, depending on the humidity in your environment.
- Watering method: Use a watering can with a narrow spout or a spray bottle to water your dischidia ovata gently. This will prevent excessive water from pooling on the leaves or in the plant’s crevices.
- Drainage is key: Ensure that the pot has good drainage holes to allow excess water to escape. Standing water can quickly lead to root rot and other problems. If your dischidia ovata is in a decorative container without drainage holes, make sure to remove any water that accumulates in the saucer after watering.
- Observe your plant: Pay attention to how your dischidia ovata responds to watering. If the leaves start to droop or turn yellow, it may be a sign of overwatering. On the other hand, if the leaves shrivel or become wrinkled, it may indicate underwatering.
Nurturing The Soil And Fertilizing Dischidia Ovata Effectively
Providing the right nutrients and maintaining well-draining soil is essential for the health and vitality of your dischidia ovata. Here are some key points to consider when nurturing the soil and fertilizing your plant effectively:
- Choosing the right soil: Dischidia ovata thrives in well-draining soil that retains some moisture. Choose a high-quality potting mix that contains a blend of peat moss, perlite, and vermiculite. This will ensure good aeration and prevent waterlogged roots.
- Fertilizing frequency: Dischidia ovata benefits from regular feeding during the growing season (spring and summer). Use a balanced liquid fertilizer diluted to half strength and apply it monthly. During the dormant period (fall and winter), reduce or eliminate fertilization.
- Applying fertilizers: When applying fertilizer, make sure to saturate the soil evenly. Avoid getting fertilizer on the leaves or stems as it can cause burns. Regularly flush the soil with plain water to prevent salt buildup from excessive fertilization.
- Organic options: If you prefer organic fertilizers, consider using compost tea or fish emulsion. These natural alternatives provide valuable nutrients without the risk of chemical burns.
- Watch for signs of nutrient deficiency: Keep an eye out for any yellowing or stunted growth, as these could indicate a nutrient deficiency. Adjust your fertilization routine accordingly to meet the plant’s needs.
Pruning And Propagating Dischidia Ovata For Healthier Growth
Pruning and propagating your dischidia ovata are essential tasks to promote healthier growth and maintain the plant’s shape. Here are some important points to keep in mind when pruning and propagating your plant:
- Pruning for shape: Dischidia ovata tends to grow long trailing vines. Regular pruning helps maintain a tidy appearance and encourages bushier growth. Trim back any excessively long or leggy stems, focusing on retaining the plant’s desired shape.
- Pruning tools: Use clean, sharp pruning shears or scissors to make clean cuts. This reduces the risk of damaging the plant and helps prevent the spread of diseases.
- Propagating through stem cuttings: Dischidia ovata can be easily propagated through stem cuttings. Select a healthy stem and make a clean cut just below a leaf node. Place the cutting in a container with moistened potting mix or water until roots develop.
- Encouraging rooting: To encourage root development, provide a warm and humid environment for the stem cuttings. You can cover the cutting with a plastic bag or place it in a propagator to create a mini greenhouse effect.
- Transplanting rooted cuttings: Once the stem cuttings have developed a good root system, transplant them into individual pots filled with well-draining potting mix. Make sure to keep the soil slightly moist and avoid overwatering.
By following these essential care tips for your dischidia ovata, you can ensure its thriving growth and enjoy a beautiful and vibrant plant. Remember to adjust your care routine based on the specific needs and conditions of your dischidia ovata to optimize its overall health and well-being.
Troubleshooting Common Issues With Dischidia Ovata
Dischidia ovata, commonly known as the watermelon dischidia, is a charming houseplant that requires minimal care and attention. However, like any other plant, it can encounter some common issues that may affect its growth and overall health. In this section, we will discuss how to identify and treat pests that may affect dischidia ovata, how to deal with common diseases and infections, and how to address issues like leaf discoloration or wilting.
Identifying And Treating Pests That May Affect Dischidia Ovata
Pests can pose a threat to the well-being of your dischidia ovata. It’s important to identify and eliminate them promptly to prevent any severe damage. Here are some key points to consider in pest management:
- Mealybugs: These tiny, cotton-like insects can be spotted on the leaves and stems of your plant. To get rid of them, wipe the affected areas with a cotton swab soaked in rubbing alcohol. Regularly inspect your plant for any signs of infestation.
- Spider mites: These arachnids can cause leaves to turn yellow and develop a stippled appearance. Use a strong stream of water to wash them off the leaves. You can also introduce natural predators like ladybugs to control their population.
- Scale insects: These insects attach themselves to the stems and leaves, appearing as small bumps. Gently scrub them away using a soft brush or cloth soaked in soapy water. Avoid using any harsh chemical pesticides as they can harm the plant.
Dealing With Common Diseases And Infections Of Dischidia Ovata
Dischidia ovata is generally a hardy plant, but it can succumb to certain diseases and infections. Here’s what you need to know:
- Powdery mildew: This fungal infection manifests as a white, powdery coating on the leaves. To treat it, remove the affected parts and improve air circulation around the plant. Ensure that you water the plant at the base and not over the leaves.
- Root rot: Overwatering or poorly draining soil can lead to root rot, causing the plant’s roots to turn brown and mushy. To prevent this, ensure that the soil is well-draining and adjust your watering schedule accordingly.
- Leaf spot: Leaf spot disease appears as brown or black spots on the leaves. Remove the affected leaves and avoid direct water contact with the foliage. Maintain good air circulation and avoid overcrowding your plants to prevent the spread of the disease.
Addressing Common Issues Like Leaf Discoloration Or Wilting
Leaf discoloration and wilting are common issues that may arise with your dischidia ovata. Here are a few points to keep in mind:
- Light and temperature: Ensure that your plant is receiving adequate light, but avoid placing it in direct sunlight. Dischidia ovata thrives in bright, indirect light and temperatures between 65-85°f (18-29°c).
- Watering: Overwatering can lead to root rot, while underwatering can cause leaf wilting and discoloration. Keep the soil slightly moist, but not soggy. Allow the top inch of the soil to dry out before watering again.
- Nutrition: Fertilize your dischidia ovata during its active growing season (spring and summer) with a balanced liquid fertilizer diluted to half strength. Avoid over-fertilization as it can damage the plant.
By following these troubleshooting tips, you can ensure that your dischidia ovata remains healthy and vibrant. Regularly inspect your plant for any signs of pests or diseases, and address any issues promptly to keep your plant thriving.
Dischidia Ovata Decor Ideas For Your Living Space
Looking to add a touch of greenery to your living space? Look no further than dischidia ovata, a charming plant that not only adds a pop of color but is also low-maintenance and perfect for indoor settings. In this section, we will explore creative ways to showcase dischidia ovata in your home, including combining it with other indoor plants for stunning displays, as well as diy projects and unique containers that will truly highlight the beauty of this plant.
Creative Ways To Showcase Dischidia Ovata In Your Home:
- Hanging baskets: Suspended from the ceiling, hanging baskets allow dischidia ovata’s cascading vines to create a visually stunning display.
- Wall-mounted planters: Transform a plain wall into a living work of art by mounting dischidia ovata on a vertical planter, adding a touch of nature to your indoor space.
- Terrariums: Create your own mini ecosystem by planting dischidia ovata in a glass terrarium, combining it with other air plants for a visually appealing display.
- Macrame plant hangers: Embrace the boho trend by hanging your dischidia ovata in a macrame plant hanger, adding a touch of texture and style to your living space.
- Bookshelf display: Arrange different varieties of dischidia ovata on your bookshelf, using various heights and textures to create an eye-catching botanical display.
- Kitchen window sill: Place your dischidia ovata on the kitchen window sill, allowing it to bask in the sunlight while adding a touch of greenery to your culinary space.
Combining Dischidia Ovata With Other Indoor Plants For Stunning Displays:
- Succulent companions: Pair dischidia ovata with succulents like echeveria or haworthia for a drought-tolerant and visually pleasing arrangement.
- Ferns and mosses: Create a lush and tropical display by combining dischidia ovata with ferns and mosses, adding depth and texture to your indoor jungle.
- Trailing plants: Pair dischidia ovata with trailing plants like string of pearls or pothos for a cascading effect, adding visual interest to your plant display.
Diy Projects And Unique Containers For Your Dischidia Ovata:
- Fairy garden: Create a whimsical mini garden by planting dischidia ovata in a shallow container, adding miniature figurines and accessories for a magical touch.
- Teacup planters: Give your dischidia ovata a vintage twist by planting it in charming teacups or small ceramic pots, adding a touch of elegance to your living space.
- Upcycled containers: Get creative by repurposing old mason jars, tin cans, or even wine bottles as planters for your dischidia ovata, adding a unique and eco-friendly touch to your decor.
Remember, dischidia ovata’s unique cascading vines and beautiful foliage make it a versatile plant for various decor styles. So get creative, experiment with different display options, and let your imagination run wild as you showcase this stunning plant in your home.
Frequently Asked Questions About Dischidia Ovata Care
**how to care for your dischidia ovata: frequently asked questions**
Taking care of a dischidia ovata, also known as a watermelon dischidia, requires some specific knowledge to ensure it thrives in your home. In this section, we’ll answer some frequently asked questions about caring for dischidia ovata, including watering frequency, light requirements, and signs of over or under watering.
How Often Should I Water My Dischidia Ovata?
When it comes to watering your dischidia ovata, it’s important to strike the right balance. Here are some key points to keep in mind:
- Watering frequency: Allow the top layer of soil to dry out before watering again. Overwatering can lead to root rot, so it’s crucial to avoid waterlogged soil.
- Seasonal adjustments: During the growing season, which typically occurs in spring and summer, you may need to water more frequently. However, reduce watering in winter when growth slows down.
- Checking moisture levels: Before watering, use your finger to check the moisture level of the soil. If it feels dry up to an inch deep, it’s time to water. Remember, it’s always better to underwater than overwater your dischidia ovata.
Can Dischidia Ovata Tolerate Low Light Conditions?
Dischidia ovata can tolerate low light conditions, but it will thrive best in bright, indirect light. Here are some key points to consider:
- Ideal lighting conditions: Place your dischidia ovata near a north or east-facing window where it can receive bright, indirect light. If you don’t have access to natural light, you can also use fluorescent lights as a substitute.
- Avoid direct sunlight: While dischidia ovata can handle some direct sunlight, prolonged exposure to intense rays can scorch its leaves. Be mindful of this and provide sufficient shade during the hottest parts of the day.
- Adapting to low light: If you choose to keep your dischidia ovata in low light conditions, it may grow slower and require less water. However, it’s essential to monitor the soil moisture levels closely to prevent underwatering.
What Are The Signs Of Overwatering Or Underwatering Dischidia Ovata?
It’s vital to strike a balance between under and overwatering your dischidia ovata. Here are some signs to watch out for:
**signs of overwatering**:
- Yellowing or browning leaves
- Mushy or rotting stems
- Foul smell emanating from the soil, indicating root rot
- Mold or fungus growth on the soil surface
**signs of underwatering**:
- Wilted or droopy leaves
- Dry and crispy leaves
- Stunted growth or slow growth rate
- Soil pulling away from the edges of the pot
Remember, it’s crucial to adjust your watering routine to suit the specific needs of your dischidia ovata. Observing the signs and signals it displays will help you make informed decisions on when and how much to water.
Now that you have a better understanding of watering frequency, light requirements, and signs of over or under watering, you’re well-equipped to care for your dischidia ovata.
Frequently Asked Questions For Dischidia Ovata Care
How Often Should I Water My Dischidia Ovata Plant?
Water your dischidia ovata plant when the top inch of the soil feels dry to the touch. Avoid overwatering, as it can lead to root rot. Allow the water to drain through the pot’s holes completely and only water again when the soil is dry.
What Are The Light Requirements For Dischidia Ovata?
Dischidia ovata plants thrive in bright indirect light. Place them near a window with filtered sunlight or provide them with bright artificial light. Avoid direct sunlight as it can scorch the leaves.
How Often Should I Fertilize My Dischidia Ovata Plant?
Fertilize your dischidia ovata plant once a month during the growing season (spring and summer). Use a balanced, water-soluble fertilizer diluted to half the recommended strength. Do not fertilize during the winter months when the plant is in its dormant phase.
How Do I Propagate Dischidia Ovata?
To propagate dischidia ovata, take stem cuttings with a few leaves attached. Dip the cut end in rooting hormone and plant it in a well-draining potting mix. Keep the soil moist and provide indirect light. In a few weeks, roots will develop, indicating successful propagation.
What Is The Best Temperature Range For Dischidia Ovata?
Dischidia ovata prefers temperatures between 60°f to 75°f (15°c to 24°c). Avoid exposing it to cold drafts or extreme temperatures. Provide a consistent temperature and avoid sudden fluctuations to ensure the plant’s health and growth.
How Do I Prevent Pests On My Dischidia Ovata Plant?
To prevent pests on your dischidia ovata, regularly inspect the plant for signs of infestation such as webs or discolored leaves. Wipe the leaves with a damp cloth to remove dust and pests. If needed, use an organic insecticidal soap to control common pests like spider mites or mealybugs.
Conclusion
To ensure the thriving growth of your dischidia ovata, implementing proper care is crucial. By following the guidelines discussed in this blog post, you can create optimum conditions for your plant’s health and well-being. Start by providing a well-draining soil mix and choosing the right location that offers bright, indirect light.
Regular watering is essential, but be mindful of not overwatering as this can lead to root rot. Pruning and propagating will help maintain the plant’s shape and promote new growth. Additionally, periodic fertilization will provide the necessary nutrients for vibrant foliage.
Remember to keep an eye out for any signs of pests or diseases and take appropriate measures promptly. By mastering these care practices, you can enjoy the beauty of your dischidia ovata and create a healthy environment for it to thrive.
Happy gardening!