Garlic growth stages can be perfected with professional techniques. Learn how to grow garlic like a pro.
Table of Contents
Growing garlic can be a rewarding experience for both avid gardeners and beginners. This versatile plant not only adds flavor to a wide variety of dishes but also has numerous health benefits. Whether you have a spacious backyard or a small balcony, you can easily grow garlic with a little planning and care.
But where do you start? This article will guide you through each stage of garlic growth, from preparing the soil to harvesting the bulbs. By following these simple steps, you can cultivate healthy garlic plants and enjoy a bountiful harvest. So, let’s dive in and learn how to grow garlic like a pro.
Benefits Of Growing Garlic Like A Pro
Garlic has long been a staple in culinary dishes worldwide. But did you know that growing garlic like a pro can enhance its flavor, boost its health benefits, and even save you money in the long run? Discover the benefits of growing garlic like a pro below:
Enhances Flavor In Culinary Dishes:
- Freshness: Growing garlic allows you to enjoy the unmatched freshness of homegrown produce.
- Robust taste: When you grow garlic like a pro, you’ll be rewarded with a more pungent and flavorful taste, elevating your culinary creations to new heights.
- Versatility: From roasted vegetables to savory sauces, garlic adds depth and enhances the overall taste profile of numerous dishes.
Boosts Health Benefits:
- Antioxidant powerhouse: Garlic is known for its rich antioxidant content, which helps combat free radicals and supports a healthy immune system.
- Heart health: By growing garlic like a pro, you can take advantage of its potential to lower blood pressure and cholesterol levels.
- Anti-inflammatory properties: The compounds found in garlic have anti-inflammatory effects, which may offer protection against certain chronic diseases.
Saves Money In The Long Run:
- Cost-effective: Growing garlic at home cuts down on your grocery bills and provides a sustainable source of fresh garlic for your culinary endeavors.
- Year-round supply: With proper storage techniques, homegrown garlic can last for months, ensuring a continuous supply even during off-seasons or times of price fluctuations.
Growing garlic like a pro not only enriches the flavor of your dishes but also promotes health and saves you money. So why not take your culinary skills to the next level and embark on the satisfying journey of growing garlic in your own backyard?
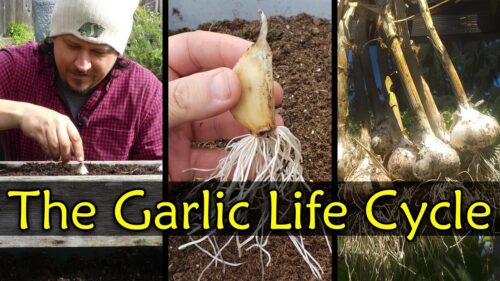
Understand The Life Cycle Of Garlic
Overview Of The Different Growth Stages
Garlic is a versatile and delicious herb that can add flavor to various dishes. Growing garlic requires a thorough understanding of its life cycle and the different stages it goes through. By familiarizing yourself with these stages, you can ensure that you provide the proper care and harvest your garlic at the perfect time.
So, let’s delve into the various growth stages of garlic:
Importance Of Knowing The Growth Stages For Proper Care And Harvesting
Understanding the growth stages of garlic is crucial for its proper care and harvesting. By knowing when to perform specific tasks, you can optimize the growth and yield of your garlic crop. Here’s why knowing the growth stages is important:
- Planting: When planting garlic, it is essential to choose the right time, as well as the correct variety. By understanding the growth stages, you can ensure that you plant your garlic bulbs at the optimal time, allowing them to establish strong roots and grow into healthy plants.
- Vegetative growth: At this stage, garlic plants focus on the growth of leaves and stems. Knowing this stage is crucial for providing the necessary care, including watering, fertilizing, and protecting the plants from pests or diseases.
- Bulb formation: This stage is where the magic happens. Garlic bulbs start to form, and understanding this stage will help you provide the appropriate conditions, such as proper soil moisture, temperature, and nutrient levels, to ensure the development of full-size bulbs.
- Maturation: When your garlic plants reach this stage, the leaves begin to dry out, indicating that the bulbs are nearing maturity. Harvesting at the right time is crucial to prevent the bulbs from splitting or rotting.
- Harvesting: Harvesting garlic is undoubtedly an exciting moment. Knowing when to harvest is vital to obtain flavorful and well-preserved bulbs. By observing the growth stages and keeping an eye on the foliage and bulb wrappers, you can harvest your garlic at the perfect time for optimal flavor and storage potential.
Understanding the life cycle of garlic and the different growth stages it goes through is crucial for successful cultivation. By providing proper care and harvesting at the right time, you can achieve a bountiful harvest of delicious garlic bulbs to enhance your culinary adventures.
Pre-Planting Preparation
Garlic Growth Stages: How To Grow It Like A Pro
Garlic is a flavorful and versatile herb that can enhance any dish. Whether you’re an experienced gardener or just starting out, growing garlic can be a rewarding and satisfying experience. To ensure successful garlic growth, it is essential to prepare the planting area properly.
In this section, we will discuss the pre-planting preparation steps to help you grow garlic like a pro.
Choosing The Right Garlic Variety:
- Research different garlic varieties suitable for your region.
- Select a variety that suits your taste preferences and culinary needs.
- Consider factors like hardneck or softneck varieties, size of cloves, and storage qualities.
Soil Preparation And Amendments:
- Choose a sunny location with well-draining soil for planting garlic.
- Test the soil ph and aim for a range of 6.0 to 7.0.
- Remove any weeds, rocks, or debris from the planting area.
- Loosen the soil to a depth of at least 8 inches using a garden fork or tiller.
- Incorporate organic matter, such as compost, to improve soil fertility and moisture retention.
Importance Of Proper Spacing And Planting Depth:
- Garlic cloves need adequate space to grow and develop properly.
- Plant cloves about 6 inches apart and ensure each clove’s base is at least 2 inches below the soil surface.
- Planting cloves too shallow or too deep can affect garlic bulb formation.
- Proper spacing and planting depth allow air circulation and help prevent diseases.
By following these pre-planting preparation steps, you are setting the stage for healthy garlic growth. Remember to choose the right garlic variety, prepare the soil diligently, and provide proper spacing and planting depth. With the right foundation in place, you’ll be on your way to growing garlic like a pro.
Happy planting!
Stage 1: Planting Garlic Cloves
Garlic Growth Stages: How To Grow It Like A Pro
Garlic is not only a versatile ingredient in the kitchen, but it also adds beauty to any garden. Growing garlic may seem intimidating, but with the right knowledge and techniques, you can confidently grow it like a pro. We will guide you through the different stages of garlic growth, starting with the first stage: planting garlic cloves.
Selection And Preparation Of Healthy Cloves:
- Choose high-quality garlic cloves: Select plump and firm cloves, preferably from an organic source or a reputable nursery. Avoid cloves that are soft, moldy, or discolored.
- Break the bulbs carefully: Gently separate the cloves from the garlic bulb just before planting. Be cautious not to damage the cloves as this can affect their ability to grow.
- Remove any damaged or shriveled cloves: Discard any cloves that appear unhealthy or damaged. It is crucial to use only the healthiest cloves for planting to maximize your chances of a successful harvest.
Correct Planting Technique For Optimum Growth:
- Choose the right time: Garlic is typically planted in the fall, around 4 to 6 weeks before the ground freezes. This timing allows the cloves to develop roots before winter while preventing excessive top growth.
- Prepare the soil: Garlic prefers loose, well-drained soil. Clear the area of weeds and debris, and amend the soil with organic matter such as compost or aged manure to improve its fertility.
- Plant cloves at the right depth: Plant the cloves with the pointed end facing up, about 2 inches deep and 4 inches apart. Ensure that the cloves are positioned firmly in the soil, avoiding any air pockets.
- Space rows adequately: Leave around 8 to 12 inches of space between rows to allow ample airflow and sunlight penetration. This helps prevent diseases and promotes healthy growth.
Mulching And Watering Tips For Successful Germination:
- Mulch for insulation: After planting, apply a layer of organic mulch, such as straw or chopped leaves, around 2 to 4 inches thick. This serves as insulation, protecting the cloves from extreme temperature fluctuations during winter.
- Monitor soil moisture: Keep the soil consistently moist but not waterlogged. Check the soil moisture level regularly, especially during dry periods, and adjust your watering accordingly.
- Avoid overhead watering: To prevent fungal diseases, it is best to avoid overhead watering. Instead, direct the water at the base of the plants, using a drip irrigation system or a soaker hose.
Remember, proper cloves selection, correct planting techniques, and appropriate mulching and watering are crucial for successful garlic germination. Stay tuned for our next stage: “garlic growth stages: stage 2 – early growth and maintenance” for more tips on nurturing your growing garlic plants.
With these essential techniques in mind, you’ll be on your way to harvesting your own delicious, homegrown garlic like a pro!
Stage 2: Vegetative Growth
Garlic Growth Stages: How To Grow It Like A Pro
Garlic is a versatile and flavorful ingredient that brings a unique taste to dishes. Growing garlic at home can be a rewarding experience, from planting the cloves to harvesting the bulbs. As you embark on this journey, understanding the different growth stages of garlic is crucial for a successful harvest.
In this section, we will explore the second stage of garlic growth: vegetative growth. Let’s dive in and learn how to nurture your garlic plants to ensure healthy leaf development.
Recognizing The Emergence Of Garlic Shoots
At this stage, you will witness the first signs of life as delicate green shoots emerge from the soil. These shoots are the initial growth of your garlic plant and indicate that your cloves have taken root and are sprouting.
It’s exciting to see these shoots pushing their way through the earth, and it’s essential to provide them with the care they need to thrive. Here are some key points to keep in mind:
- Ensure proper spacing: Garlic plants should be spaced about six inches apart to allow ample room for each plant to grow and develop. Proper spacing helps prevent overcrowding and enhances air circulation, reducing the risk of fungal diseases.
- Maintain soil moisture: Keep the soil evenly moist throughout the vegetative growth stage. Garlic plants require regular watering, especially during dry spells. It’s crucial to prevent the soil from drying out completely, as this can hinder leaf development.
- Avoid overwatering: While garlic plants need adequate moisture, overwatering can be detrimental. Excessively damp soil can lead to rots and fungal diseases. Aim for balanced soil moisture by providing water when the top inch of soil becomes slightly dry.
Providing Adequate Sunlight And Water For Healthy Leaf Development
Healthy leaf development is crucial during the vegetative growth stage. Robust leaves provide the necessary energy for the plant’s growth and bulb formation. Here are some essential factors to consider:
- Sunlight requirements: Garlic plants thrive in full sun, requiring at least six to eight hours of direct sunlight per day. Place them in an area with maximum sun exposure to ensure optimal leaf development.
- Fertilization: Supplement the soil with a balanced fertilizer to provide essential nutrients for overall plant health. Opt for organic options, such as compost or well-decomposed manure, to nourish the garlic plants gradually.
- Mulching benefits: Applying a layer of organic mulch, such as straw or dried leaves, around the garlic plants helps retain soil moisture, suppress weed growth, and regulate soil temperature. Mulching also aids in maintaining healthy leaf growth.
Addressing Common Issues Such As Yellowing Leaves Or Pests
While proper care can promote healthy leaf development, garlic plants may still encounter issues along the way. Here are some common problems you may encounter during the vegetative growth stage and how to address them:
- Yellowing leaves: Yellowing leaves can be a sign of nutrient deficiencies, overwatering, or pest infestations. Ensure your plants are receiving adequate sunlight, water, and nutrients. If pests are the culprit, employ organic pest control methods or consult a gardening expert.
- Pests: Garlic plants are susceptible to pests like aphids, nematodes, and onion flies. Regularly inspect your plants for signs of infestation, and promptly take action. You can use organic pest repellents, such as neem oil or garlic spray, to deter pests.
Remember, healthy leaf development during the vegetative growth stage is essential for successful garlic cultivation. By recognizing the emergence of shoots, providing adequate sunlight and water, and addressing common issues promptly, you’ll be on your way to growing garlic like a pro.
Stay tuned for the next stage in our blog post series, where we’ll delve into the exciting world of garlic bulb formation.
Stage 3: Bulb Formation
Understanding The Signs Of Bulb Formation
Bulb formation is a crucial stage in the growth of garlic. This stage signifies the development of the garlic bulb, which is ultimately what we are aiming for when growing garlic. To ensure that you can recognize the signs of bulb formation, here are some key points to be aware of:
- Appearance: As the garlic plants continue to grow, you’ll notice that the bulbs begin to swell. The cloves within the bulb will become more distinct, and the outer layers may start to dry out and become papery.
- Height of the leaves: The leaves of garlic plants typically reach their full height just before bulb formation. Once they have reached their maximum height, it is a good indication that the bulbs are in the process of forming.
- Leaf color: The leaves may start to yellow and die back slightly during bulb formation. This is a natural occurrence as the plant’s energy is redirected towards bulb development.
Managing Fertilizer And Watering During This Crucial Stage
Proper management of fertilizer and watering is essential during the stage of bulb formation. Here are some guidelines to help you ensure that your garlic bulbs develop to their full potential:
- Fertilizer: At this stage, it is crucial to provide the garlic plants with the nutrients they need. Apply a balanced fertilizer that is high in potassium to promote bulb growth. Avoid using excessive nitrogen, as it can lead to larger leaf growth at the expense of bulb development.
- Watering: To support bulb formation, maintain consistent soil moisture levels. Be mindful not to overwater, as garlic plants prefer slightly drier conditions. Aim to water deeply but infrequently, ensuring that the soil drains well between waterings.
Tips For Preventing Diseases And Pests That Can Affect Bulb Development
Ensuring that your garlic bulbs develop without any hindrance from diseases or pests is vital for a successful harvest. Here are some valuable tips to prevent common issues during the bulb formation stage:
- Disease prevention: Rotate your garlic crops annually to minimize the buildup of soil-borne diseases. Additionally, avoid planting garlic in areas with poor drainage, as excessive moisture can lead to the development of fungal diseases. Regularly inspect the plants for signs of disease, such as yellowing or wilting leaves, and take appropriate action if necessary.
- Pest control: Garlic bulbs are susceptible to attacks from pests such as aphids, onion maggots, and thrips. Use organic methods such as insecticidal soaps or neem oil to control pests. Additionally, consider interplanting garlic with companion plants that repel pests, such as marigolds or chives.
By understanding the signs of bulb formation, managing fertilizer and watering appropriately, and implementing measures to prevent diseases and pests, you can ensure that your garlic bulbs develop to their full potential. Take these steps, and you’ll be well on your way to growing garlic like a pro!
Stage 4: Harvesting And Curing
Determining The Right Time To Harvest Garlic Bulbs
Once you have nurtured your garlic plants through the previous growth stages, it’s time to reap the rewards of your hard work. Harvesting garlic at the optimal time ensures the bulbs develop their full flavor and storage potential. Here are some guidelines to determine when it’s the right time to harvest your garlic bulbs:
- Observe the leaves: Keep an eye on the leaves of your garlic plants. As your garlic bulbs mature, the plants start to show signs of aging. Look for yellowing or browning of the lower leaves. Once about half of the leaves have turned yellow or brown, it’s a good indicator that your garlic bulbs are ready for harvest.
- Assess the bulb size: Another way to determine if your garlic bulbs are mature is by checking their size. Carefully dig up a sample bulb to assess its size. Bulbs that have reached a decent size, with plump cloves is a sign that they are ready to be harvested. Remember, garlic bulbs will continue to grow if left in the ground, so ensure that the majority of them have reached the desired size.
- Perform the “pop” test: For those seeking a more hands-on approach, the “pop” test can be a reliable indicator of garlic bulb maturity. Simply remove a bulb from the soil and gently press your thumb against the base of the stem where it connects to the bulb. If the cloves break apart from the stem with a distinct popping sound, your garlic bulbs are ready to be harvested.
Proper Techniques For Harvesting Without Damaging The Bulbs
Now that you have determined the ideal time to harvest your garlic bulbs, it’s crucial to employ proper techniques to ensure minimal damage during the harvest process. Here are some tips to help you harvest your garlic like a pro:
- Loosen the soil: Before extracting the garlic bulbs, use a garden fork or shovel to gently loosen the soil around the plants. This will help prevent any accidental bruising or cutting of the bulbs during the extraction process.
- Lift the bulbs carefully: To harvest the garlic bulbs, gently lift them from the soil, taking care not to tug or yank forcefully. Avoid pulling the garlic plants by their stems, as this may result in stem detachment or damage to the bulbs.
- Shake off excess soil: Once the garlic bulbs are out of the ground, gently shake off any loose soil clinging to them. Avoid rinsing the bulbs with water to prevent potential moisture-related issues during the curing process.
Curing And Storing Garlic For Long-Term Use
Curing garlic after harvest is essential for extending its shelf life and ensuring optimal flavor development. Follow these steps for proper garlic curing and storage:
- Bundle the garlic: After shaking off excess soil, group your garlic bulbs in small bundles, tying their stems together with twine or string. Aim for bundles of 4-6 garlic plants to promote good airflow and prevent molding.
- Hang the bundles: Find a well-ventilated area, such as a garage or covered porch, where you can hang the garlic bundles. Securely hang them upside down, allowing air circulation around each bulb. Ensure the garlic is protected from direct sunlight and excessive moisture.
- Allow curing for 2-4 weeks: Let the garlic bulbs hang and cure for 2-4 weeks, depending on the humidity levels in your area. During this period, the garlic bulbs will dry out, and their flavors will intensify.
- Trim and store: Once the curing period is complete, remove the dried roots and trim the stems to about an inch above the bulbs. Store your cured garlic bulbs in a cool, well-ventilated place, away from direct sunlight. A mesh bag or a cardboard box with holes is ideal for garlic storage.
By following these proper harvesting, curing, and storage techniques, you can ensure your garlic bulbs remain flavorful and ready for long-term use in your kitchen.
Tips For Successful Garlic Growth
Garlic is a versatile and aromatic plant that can bring flavor and health benefits to your meals. To ensure successful garlic growth, there are certain tips and practices you should follow. In this section, we’ll look at companion plants that can benefit garlic growth, regular maintenance practices, and common mistakes to avoid for novice garlic growers.
Companion Plants That Can Benefit Garlic Growth:
- Alliums: Planting other alliums such as onions, chives, and shallots near garlic can help repel pests and improve overall plant health.
- Legumes: Legumes like beans and peas can fix nitrogen in the soil, which is beneficial for garlic’s growth and development.
- Herbs: Growing herbs like chamomile, mint, and thyme near garlic can deter pests and promote healthy root growth.
Regular Maintenance Practices To Ensure Healthy Plants:
- Proper watering: Garlic requires consistent moisture, especially during its growing period. Keep the soil evenly moist, but avoid overwatering to prevent rot.
- Mulching: Apply a layer of organic mulch around garlic plants to retain moisture, suppress weeds, and protect the bulbs.
- Feeding: Fertilize garlic plants with a balanced organic fertilizer, rich in nitrogen, phosphorus, and potassium, to provide essential nutrients.
- Weed control: Keep the garlic beds free from weeds that can compete for nutrients and hinder garlic growth.
- Trimming scapes: Remove the garlic scapes, the curly stems that emerge, to redirect energy towards bulb growth.
Common Mistakes To Avoid For Novice Garlic Growers:
- Planting expired cloves: Ensure using healthy and viable cloves from a reputable source to maximize garlic’s growth potential.
- Improper soil preparation: Garlic prefers well-draining soil. Amend heavy clay soil with organic matter like compost to improve its texture and drainage.
- Inadequate spacing: Plant garlic cloves with sufficient spacing to allow proper bulb development and airflow. Cramped plants are more susceptible to diseases.
- Over-fertilization: Excessive use of fertilizers can burn the plants and negatively impact their growth. Follow the recommended dosage and avoid applying during the last few weeks of growth.
- Harvesting too early: Patience is key when it comes to garlic. Wait until the lower leaves turn yellow to brown before harvesting for optimal bulb size and flavor.
By implementing these tips, you can enhance the growth and yield of your garlic plants. Remember to choose companion plants wisely, maintain the proper care routines, and avoid common mistakes for a successful garlic harvest. Happy gardening!
Troubleshooting Common Garlic Growth Issues
Recognizing Signs Of Nutrient Deficiencies:
- Yellowing leaves: This is a common sign of nitrogen deficiency. The lower leaves turn yellow while the upper ones remain green.
- Stunted growth: Lack of phosphorus can lead to slow growth and smaller bulbs.
- Purple discoloration: A deficiency in phosphorus can cause purple coloration on the leaves.
- White or pale yellow leaves: Potassium deficiency can cause the edges of the leaves to turn white or pale yellow.
- Poor bulb development: Calcium deficiency can result in misshapen bulbs or poor development.
- Tips of leaves turning brown: Magnesium deficiency can cause the tips of the leaves to turn brown.
Identifying And Treating Common Garlic Diseases:
- White rot: Affected plants show wilting, yellowing, and death of foliage, while the bulb remains firm.
- Downy mildew: This disease causes yellowing of leaves and a fuzzy growth on the undersides.
- Fusarium wilt: Leaves show yellowing and wilting, while the stem displays a brown discoloration.
- Botrytis rot: Infected bulbs develop fuzzy gray or brown patches and can develop a musty smell.
- Penicillium decay: Infected bulbs have green mold growth, accompanied by soft decay.
- Root rot: Symptoms include yellowing of leaves, stunted growth, and rotting roots.
Dealing With Pests That Can Threaten Garlic Plants:
- Onion thrips: These tiny insects cause silvering or bronzing of leaves and can damage the bulbs.
- Nematodes: Infected plants may show stunted growth, yellowing, or wilting.
- Garlic root maggot: The larvae feed on the roots, causing young plants to wilt and older ones to yellow and die.
- Armyworms: These pests chew the foliage, leaving irregularly shaped holes that can reduce plant vigor.
- Aphids: These small insects suck sap from the leaves, causing yellowing, curling, and distortion.
- Slugs and snails: These mollusks leave trails of slime and chew irregular holes in the leaves.
Remember, proper identification of nutrient deficiencies, diseases, and pests is crucial for effective treatment and prevention. Act promptly to ensure the health and productivity of your garlic plants.
Frequently Asked Questions For Garlic Growth Stages: How To Grow It Like A Pro
What Are The Different Stages Of Garlic Growth?
Garlic goes through three main growth stages: sprouting, vegetative growth, and bulb formation. During sprouting, the garlic bulb starts to produce shoots above the soil. In the vegetative growth stage, the plant focuses on growing leaves and developing a strong root system.
Finally, bulb formation occurs when the plant diverts its energy towards forming the garlic cloves.
How Long Does It Take For Garlic To Reach Maturity?
The time it takes for garlic to reach maturity varies depending on the variety and growing conditions. On average, it takes around 9 to 10 months for garlic to fully mature. However, some varieties may reach maturity as early as 6 months or as late as 12 months.
What Are The Ideal Growing Conditions For Garlic?
Garlic thrives in cool weather and requires well-drained soil with a ph between 6 and 7. It should be planted in an area that receives full sun for at least 6 hours a day. Proper air circulation is also essential to prevent diseases.
Ensure to provide consistent moisture, but not excessive water, throughout the growing season.
When Is The Best Time To Plant Garlic?
For most regions, the best time to plant garlic is in the fall, around 4 to 6 weeks before the first frost date. Planting in the fall allows the cloves to establish strong root systems before winter. However, in warmer climates, garlic can be planted in early spring.
How Should Garlic Be Harvested?
Garlic is ready for harvest when the foliage begins to turn brown and die back. Dig gently around the bulbs, taking care not to damage them. Once dug up, gently brush off excess soil and then cure the garlic by drying it in a well-ventilated area for 2 to 3 weeks.
Finally, trim the roots and store the cured garlic in a cool, dark place.
Can I Grow Garlic In Containers?
Yes, garlic can be grown in containers. Choose a container that is at least 12 inches deep and wide enough to accommodate the number of garlic cloves you plan to plant. Fill the container with well-draining soil and plant the cloves at a depth of 2 inches.
Place the container in a sunny location and ensure to provide adequate water throughout the growing season.
Conclusion
Growing garlic can be a rewarding endeavor, and knowing the different growth stages is crucial for success. From planting the cloves to harvesting the bulbs, each stage requires special care and attention. By understanding when and how to water, fertilize, and protect your garlic plants, you can ensure a bountiful harvest.
Firstly, selecting the right variety of garlic is essential. Choose a variety that is well-suited to your climate and growing conditions. Secondly, plant the cloves in well-drained soil and keep them moist, but not waterlogged. As the garlic starts to grow, make sure to remove any weeds that may compete for nutrients.
During the growth stages, it’s important to provide adequate nutrition for your garlic plants. This can be achieved through regular fertilization with a balanced organic fertilizer. As the garlic matures, it will go through the bulbing stage, where the bulbs develop and grow larger.
It’s crucial to monitor the plants closely during this time and provide proper care to ensure healthy bulb development. Finally, when the leaves start to dry out and turn yellow, it’s time to harvest your garlic. Carefully dig up the bulbs and allow them to cure before storing them for future use.
By following these tips and understanding the different growth stages of garlic, you can become a pro at growing this versatile and delicious herb. So get started, and enjoy the satisfaction of harvesting your own homegrown garlic!