Building raised garden beds with legs is a fun and useful project for anyone who likes to plant. These raised beds have many perks, such as being easier to get in and out of and lasting longer. In this detailed guide, we’ll show you how to use cedar wood to build your own raised garden beds with legs. Whether you have gardened before or not, this step-by-step guide will give you the steps and tools you need to build strong, long-lasting buildings that will make your garden look better and make it easier to use.
Materials and Tools :
Materials:
- Cedar wood boards (1×6 and 1×2): The cost will depend on the length and quantity of boards required for your desired size of the garden bed.
- Self-tapping deck screws (1¼ inch): The cost will depend on the number of screws needed.
- Wood glue: The cost will depend on the size of the bottle or container.
- Brad nails: The cost will depend on the quantity needed.
- Measuring tape: If you don’t already have one, you may need to purchase it separately.
- Weed barrier: The cost will depend on the size and type of weed barrier.
Tools:
- Drill: If you don’t already have one, you may need to purchase it separately.
- Saw: If you don’t already have one, you may need to purchase it separately.
Additional Costs:
- Soil: You will need to purchase soil specifically suited for raised garden beds.
- Plants: The cost will depend on the type and quantity of plants you choose to grow.
To get an accurate estimate of the cost, you should check the prices of the materials and tools at your local hardware store or online retailers. Additionally, consider any additional costs for soil and plants.
Table of Contents
How to Build Raised Garden Beds with Legs
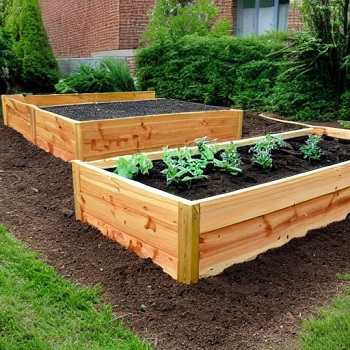
Building a raised garden bed on legs out of cedar wood is a great way to make a structure for your garden that will last for a long time. Cedar wood is naturally resistant to weather, which makes it a great choice for projects that will be outside. Based on the information in the book, I will show you step-by-step how to build a raised flower bed out of cedar wood in this answer.
To begin, gather the necessary materials and tools for the project. You will need cedar wood boards, preferably 1×6 and 1×2 in size, self-tapping deck screws (1¼ inch), a drill, a saw, wood glue, brad nails, a measuring tape, and a weed barrier. You will find all the product links in the below article.
Here is a step-by-step process for building a raised garden bed using cedar wood:
- Cut the lumber: Start by making the necessary cuts for the planter box frame and the planter box lid. The specific dimensions will depend on your desired size for the garden bed.
- Create ledges: Attach 1×2 boards to the bottom of two longer 1×6 boards to create ledges. Ensure that the boards are centered and use self-tapping deck screws to attach them securely. It is recommended to use six screws per board for maximum support.
- Assemble the planter boxes: Mark 3/8 of an inch in from both edges of the shorter 1×6 boards (for the sides) and pre-drill two pilot holes on each side. Attach one of the shorter boards with the pilot holes perpendicular to the end of one of the longer boards with the ledge, using deck screws. Repeat this step on the opposite side to create the first planter box. For the second planter box, follow the same process but without attaching the ledges.
- Construct the wood legs: Attach one 1×4 piece to another 1×4 board using wood glue and brad nails to create one leg. Repeat this step to create a total of four legs.
- Attach the top planter box frame: Attach the top planter box frame (without ledges) to the top of two legs using deck screws. Make sure to position the screws from the inside corner to avoid visible screw holes from the outside.
- Stack and attach the bottom planter box: Stack the bottom planter box under the top planter box and attach it to the wood legs using screws. Ensure that the side with the ledge is facing the bottom of the planter box.
- Add bottom wood slats and top trim: Measure the inside width of the planter box and cut six 1×6 boards to size, leaving a quarter-inch gap for easy installation. Lay these boards on top of the ledge, spacing them out about 3/4 of an inch apart. Secure each board with brad nails into the ledge. For the top edges, use the remaining 1×2 boards cut to size as trim and attach them with brad nails.
- Prepare the garden bed: Lay a weed barrier at the bottom of the planter box to prevent soil from coming out of the slats. Fill the planter box with soil specifically suited for raised garden beds.
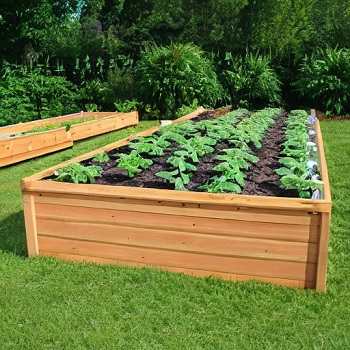
- Start planting: Once the raised garden bed is assembled and filled with soil, you can start planting your desired herbs, flowers, or vegetables. Consider planting herbs like lavender, basil, and mint, as mentioned in the text, or choose plants that suit your preferences and gardening goals.
By following these steps, you can use cedar wood to build raised garden beds with legs. Make sure to change the sizes and measures to fit your needs and the space you have. Enjoy making your garden and using the fresh herbs and flowers you grow in it every day in your cooking.
You can also watch this video I talked in above Steps :
Cost of Building a Raised Garden Bed with Legs
The cost of building a raised garden bed with legs using cedar wood will depend on the size of the bed and the cost of materials. Cedar wood is a popular choice for outdoor projects because it is naturally weather-resistant and durable. According to a Forbes, cedar boards can cost between $5 and $12 per 12-foot board, depending on the quality, treatment layers, and local availability, check price in amazon. Other materials needed for the project include self-tapping deck screws, wood glue, brad nails, a measuring tape, and a weed barrier.
Using Titebond II Premium Wood Glue, which is a one-part wood glue that passes the ANSI Type II water-resistance specification. Amazon offer this product for around $10 for an 18 fl. oz. bottle. Check price in Amazon.
A weed barrier is also recommended to prevent soil from coming out of the slats. Amazon offer a variety of weed barrier options, with prices ranging from $10 to $200. Check Price in Amazon.
Brad nails and self-tapping deck screws are also needed for the project. The Home Depot and Lowe’s offer a variety of options, with prices ranging from $2 to $50.
Overall, the cost of building a raised garden bed with legs using cedar wood will depend on the size of the bed and the cost of materials. Based on the search results, the cost of materials alone can range from $20 to $300, depending on the quality and quantity of materials used.

FAQs on Building Raised Garden Beds with Legs
What do you put in the bottom of a raised garden bed with legs?
There are different opinions on what to put in the bottom of a raised garden bed. Some gardeners recommend adding a few cross boards on the bottom and then attaching quarter-inch hardware cloth to the bottom. On top of that, landscape fabric is installed. Others use wood for the bottom, which is heavier but sturdier and less likely to rupture. Some gardeners also use sticks or logs to fill the bottom of their raised garden beds, following the Hugelkultur method. However, fresh wood chips are not recommended because they can draw a lot of nitrogen from the soil, which can make the soil unideal for your vegetable plants.
How deep should a raised bed with legs be?
What should be at the base of a raised garden bed is a topic of debate. Some gardeners advise placing a couple cross planks on the bottom and then fastening hardware cloth that is 1/4 inch thick to the bottom. Also inserted is landscaping fabric. Some people choose wood for the bottom since it is heavier but more durable and less prone to break. Following the Hugelkultur approach, some gardeners additionally load the bottom of their raised garden beds with sticks or logs. However, it is not advisable to use new wood chips since they may remove a lot of nitrogen from the soil, making it unsuitable for your vegetable plants.
Should you drill holes in the bottom of raised garden bed?
Yes, drilling holes in the bottom of your raised garden bed is necessary to allow for drainage. Without drainage holes, plants will be exposed to too much water, which will cause their roots to get clogged with water, decay, and eventually kill the plants. Drill drainage holes down the bottom of your garden bed at regular intervals, ideally every 6 inches (15.2 cm).
Can I put wood chips in the bottom of my raised beds?
Fresh wood chips aren’t a good choice since they may remove a lot of nitrogen from the soil, which might make the soil unsuitable for your veggie plants. In addition, wood chips will decompose quite rapidly (faster than sticks) and cause the soil in your raised beds to settle unevenly.
What direction should raised beds face?
Your raised bed’s orientation will depend on the plants you want to cultivate. For low-growing crops, a north-south orientation that allows direct sunshine to reach both sides of the bed is ideal. An east-west orientation is ideal for taller crops like pole beans, peas, and tomatoes. If you want to add any smaller plants, think about placing them on the south side of the raised bed so they may compete for some sunlight.
Conclusion
If you follow the step-by-step steps in this guide, you can use cedar wood to build raised garden beds with legs. The raised form not only makes gardening more easy, but it also makes sure that your garden beds will last and be strong. With your new raised garden beds, you can start a fun journey of growing different herbs, flowers, or veggies while making your outdoor space look nicer. Gather the tools and ingredients you’ll need, and get ready to build your own raised garden paradise. Enjoy the process and the many benefits that will come from your yard when it grows.
Read Next: How to Water Your Houseplants: Guide For New Gardeners