To plant an elephant ear bulb, choose a location with rich, well-draining soil and dig a hole twice the size of the bulb. Fill the hole with soil, ensuring the top of the bulb is level with the ground.
Water thoroughly after planting. Planting elephant ear bulbs requires careful consideration of the soil and positioning. With its large, striking foliage, the elephant ear plant adds a tropical touch to any garden or landscape. To ensure successful growth, it is important to choose a suitable location with fertile, well-draining soil.
Additionally, digging a hole that is twice the size of the bulb will provide ample space for the bulb to establish roots. By following these steps and providing proper care, you can enjoy the beauty of the elephant ear plant in your outdoor space.
Choosing The Right Elephant Ear Bulb
Are you ready to add a touch of tropical flair to your garden with elephant ear plants? Before you start planting, it’s important to choose the right elephant ear bulb. Here are some key considerations to help you make an informed decision:
Different Types Of Elephant Ear Bulbs
There are several varieties of elephant ear bulbs available, each with its own unique characteristics. Here are a few popular options to consider:
Table of Contents
- Giant elephant ears (alocasia spp. ): These bulbs produce large, heart-shaped leaves that can reach impressive sizes, making them a striking addition to any garden.
- Colocasia esculenta: Also known as taro, this variety features bold, arrowhead-shaped leaves that come in a range of vibrant colors, including green, purple, and black.
- Caladium: While technically not a true elephant ear, caladium bulbs offer beautiful foliage that resembles the shape and color patterns of elephant ears. They come in various shades of green, pink, and white.
Identifying The Ideal Bulb For Your Climate
To ensure the success of your elephant ear plants, it’s important to consider your climate and choose a bulb that is well-suited for your region. Here are some factors to keep in mind:
- Hardiness zone: Check the hardiness zone of your area to determine which elephant ear bulbs are best suited for your climate. Some varieties thrive in warm, tropical regions, while others can withstand colder temperatures.
- Sunlight requirements: Different elephant ear bulbs have varying sunlight preferences. Some varieties prefer full sun, while others thrive in partial shade. Consider the natural light conditions in your garden before selecting a bulb.
- Moisture needs: Elephant ear plants generally prefer moist soil, but some varieties are more tolerant of drought conditions. If you live in an area with limited rainfall, choose a bulb that can withstand dry spells.
Considerations When Purchasing Elephant Ear Bulbs
When purchasing elephant ear bulbs, it’s important to keep a few additional considerations in mind. Here are some tips to help you make the right choice:
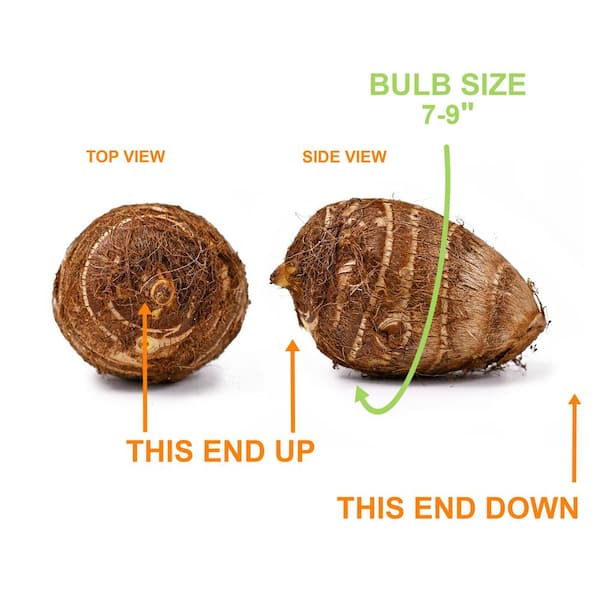
- Bulb size: The size of the bulb will determine the size of the plant it produces. Larger bulbs generally yield bigger, more mature plants, while smaller bulbs may take longer to establish and grow.
- Bulb quality: Inspect the bulbs for any signs of damage, disease, or mold. Choose bulbs that are firm, plump, and free from blemishes.
- Supplier reputation: Purchase bulbs from reputable suppliers or nurseries to ensure you’re getting high-quality, disease-free plants.
- Storage conditions: If purchasing bulbs online or storing them for a period of time before planting, make sure they are stored in a cool, dry place to prevent any damage or premature sprouting.
By carefully considering the different types of elephant ear bulbs, identifying the ideal bulb for your climate, and keeping key purchasing considerations in mind, you can choose the perfect elephant ear bulb for your garden. Remember to follow proper planting guidelines to set your new bulbs up for success.
Happy gardening!
Preparing The Soil And Planting Location
Selecting The Right Planting Location:
- Elephant ear bulbs thrive in warm, sunny locations, so it’s crucial to choose a suitable spot for planting. Consider the following factors when selecting a location:
- Light requirements: Elephant ear plants prefer partial to full sun, so choose a spot that receives at least 4-6 hours of sunlight each day.
- Size and growth habit: Elephant ears can grow quite large, so make sure the chosen location has enough space to accommodate their size and height.
- Soil drainage: These plants prefer well-drained soil. Avoid areas prone to waterlogging or that retain excessive moisture.
- Protection from wind: Elephant ears have large leaves that can be susceptible to wind damage. Select a location that is sheltered from strong winds.
Soil Preparation For Elephant Ear Bulbs:
- Proper soil preparation is essential for the successful growth of elephant ear bulbs. Follow these steps to ensure your bulbs have the best start:
- Clear the area: Remove any weeds or vegetation from the planting area to prevent competition for nutrients and space.
- Loosen the soil: Use a garden fork or tiller to loosen the soil to a depth of about 12-14 inches. This will create a loose and airy environment for the bulbs to establish their roots.
- Amend the soil: Incorporate organic matter such as compost or well-rotted manure into the soil. This will improve drainage, fertility, and moisture retention.
- Testing the soil ph: Use a soil testing kit to determine the ph level of your soil. Elephant ears prefer a slightly acidic to neutral ph range of 6.0-7.0.
- Adjusting soil ph: If the soil ph is too acidic, add lime to raise it. If it’s too alkaline, add sulfur or peat moss to lower it. Aim for the optimal ph range mentioned earlier.
- Mix in slow-release fertilizer: Blend a slow-release fertilizer into the soil to provide a steady supply of nutrients throughout the growing season.
Remember, by selecting the right planting location and preparing the soil appropriately, you can create a conducive environment for your elephant ear bulbs to thrive and flourish.
Planting And Care Instructions
Elephant ear bulbs are not only visually stunning but also easy to plant and care for. With the right planting techniques and proper care, you can enjoy the beauty of these tropical plants in your garden or indoor space. Here are essential instructions to help you grow healthy and thriving elephant ear bulbs:
Digging The Planting Hole To The Correct Depth
- Choose a location with well-draining soil and dig a hole that is two to three times the diameter of the bulb.
- The hole should be deep enough to accommodate the bulb, usually around six to eight inches deep.
- Ensure there is enough space between bulbs, approximately 1 to 3 feet apart, depending on the variety.
Properly Placing And Orienting The Bulb In The Hole
- Place the bulb in the hole with the pointed end facing up and the rounded end down.
- Position the bulb with its eyes, or growing points, pointing upwards.
- Gently backfill the hole with soil, firming it around the bulb to provide stability.
Watering And Mulching The Planted Bulb
- After planting, thoroughly water the bulb to settle the soil and remove any air pockets.
- Apply a layer of organic mulch, such as bark or straw, around the base of the plant to help retain moisture and suppress weed growth.
- Ensure the mulch is spread evenly, keeping it a few inches away from the bulb to prevent rotting.
Providing Necessary Sunlight And Temperature Conditions For Growth
- Elephant ear bulbs thrive in bright, indirect sunlight but can tolerate some shade.
- Aim for at least four to six hours of sunlight per day.
- Maintain a temperature between 65°f and 75°f (18°c to 24°c) for optimal growth.
Fertilizing And Watering Schedule For Elephant Ear Bulbs
- Regularly fertilize the bulbs with a balanced, water-soluble fertilizer every four to six weeks during the growing season.
- Follow the instructions on the fertilizer packaging to determine the correct amount and frequency for your specific product.
- Water the bulbs consistently, keeping the soil evenly moist but not waterlogged. Adjust watering frequency based on climate conditions and the needs of the plant.
Protecting The Bulb From Pests And Diseases
- Monitor the plant regularly for common pests like aphids, spider mites, and slugs.
- Use natural or organic pest control methods, such as insecticidal soap or neem oil, to keep infestations under control.
- Ensure good air circulation around the plant to prevent the development of fungal diseases.
By following these planting and care instructions, you can ensure the successful growth and long-term health of your elephant ear bulbs. Enjoy their striking foliage and create a tropical oasis in your garden or home.
Maintenance And Growth Of Elephant Ear Bulbs
Caring for elephant ear bulbs is essential to ensure their healthy growth and vibrant foliage. Regular maintenance tasks such as weeding, monitoring growth, propagating through division, and troubleshooting common problems can contribute to the overall success of your elephant ear planting.
In this section, we will cover these important aspects in detail.
Regular Weeding And Removing Of Spent Leaves:
- Remove any weeds around the elephant ear plant to prevent competition for nutrients and space.
- Gently pull out spent leaves by hand to maintain a neat appearance and encourage new growth.
- Clear away debris and fallen leaves to reduce the risk of pests or diseases.
Monitoring The Growth And Development Of The Plant:
- Keep an eye on the size of the elephant ear plant as it matures.
- Regularly check for signs of leaf discoloration, spotting, or wilting, which may indicate potential problems.
- Measure the height and width of the plant to track its progress.
Propagating Elephant Ear Bulbs Through Division:
- Divide the bulbs when they become overcrowded or after a few years to promote healthy growth.
- Carefully dig up the bulbs, ensuring you do not damage the roots or shoots.
- Gently separate the bulbs, making sure each division has healthy shoots and roots.
- Replant the divisions in suitable locations, providing adequate space and nutrients for each new plant.
Dealing With Common Problems And Troubleshooting Tips:
- Overwatering can lead to root rot, so ensure the soil drains well and only water when the top inch is dry.
- Elephant ear plants are susceptible to certain pests like aphids and spider mites. Regularly inspect the leaves for any signs of infestation and treat accordingly.
- If the leaves show signs of nutrient deficiency, apply a balanced fertilizer according to the package instructions.
- Protect the plants from excessive wind or direct sunlight, as this can damage the leaves.
Remember, taking proper care of your elephant ear bulbs is vital for their growth and survival. By following these maintenance tips and promptly addressing any issues, you can ensure a thriving and visually appealing display of elephant ear plants in your garden.
Harvesting And Storage
Knowing When To Harvest The Elephant Ear Bulbs
To ensure the success of your elephant ear bulbs, it is important to know the right time to harvest them. Here are some signs to look for:
- Foliage starts to yellow and die back: As the growing season comes to an end, the leaves of the elephant ear plant will begin to turn yellow, indicating that it is time to harvest the bulbs.
- Cooler fall temperatures: Cooler temperatures in the fall also signal that it is time to dig up the bulbs. Ideally, wait until after the first frost before harvesting.
- Lifting of the soil: Another clue that it is time to dig up the bulbs is when the soil around the plant starts to lift. This means that the bulbs are growing and expanding, ready to be stored for the winter.
Properly Digging Up And Storing The Bulbs For Winter
Once you have determined that it is time to harvest your elephant ear bulbs, follow these steps to properly dig them up and store them for the winter:
- Cutting back foliage: Start by cutting back the foliage of the plant to about 6 inches above the ground. This will make it easier to access the bulbs.
- Gently loosen the soil: Use a garden fork or shovel to gently loosen the soil around the bulbs. Be careful not to damage the bulbs in the process.
- Lift the bulbs: Once the soil is loosened, carefully lift the bulbs out of the ground. Gently shake off any excess soil, but do not wash the bulbs.
- Curing the bulbs: Before storing the bulbs, allow them to dry out in a well-ventilated area for a few days. This will help prevent rot during storage.
- Removing foliage and roots: After the bulbs have dried, remove any remaining foliage and roots. This will minimize the risk of disease and pests during storage.
- Storage containers: Place the bulbs in a cardboard box, paper bag, or mesh bag for storage. Avoid using plastic bags, as they can trap moisture and lead to rot.
- Storage conditions: Store the bulbs in a cool, dry location with a temperature between 50-60°f (10-15°c). Check on them periodically to ensure they are not rotting or drying out.
- Labeling: It is helpful to label the storage container with the variety or type of elephant ear bulbs, as well as the date of harvest.
- Avoiding extreme temperatures: Do not store the bulbs in areas that are subject to freezing temperatures, as this can cause damage. Similarly, avoid storing them in areas that are too warm, as they may start to sprout prematurely.
Preparing The Bulbs For Replanting In The Spring
When spring arrives and it is time to replant your elephant ear bulbs, follow these steps to prepare them:
- Inspect the bulbs: Before planting, inspect the stored bulbs for any signs of damage or disease. Discard any bulbs that show rot or other issues.
- Soaking the bulbs: To wake up the bulbs and promote healthy growth, gently soak them in lukewarm water for a couple of hours before planting.
- Preparing the planting area: Choose a location with well-draining soil and partial shade for your elephant ear bulbs. Dig a hole large enough to accommodate the bulb.
- Planting depth: Place the bulb in the hole with the pointed side facing up. Cover the bulb with soil, leaving the top exposed. The general rule of thumb is to plant the bulb at a depth that is two to three times the size of the bulb itself.
- Watering and mulching: After planting, water the bulb thoroughly to settle the soil. Mulch around the plant to help retain moisture and prevent weed growth.
- Providing proper care: Throughout the growing season, ensure that the elephant ear plant receives adequate water, sunlight, and fertilizer. Monitor for pests and diseases, addressing any issues promptly.
By following these steps for harvesting, storing, and replanting elephant ear bulbs, you can enjoy the beauty of these tropical plants year after year. Happy gardening!
Frequently Asked Questions (Faqs)
Can Elephant Ear Bulbs Be Grown In Containers?
- Yes, elephant ear bulbs can be successfully grown in containers, making them a versatile option for those with limited garden space or who want to create a striking focal point in their patio or balcony.
- Containers should be at least 12 inches in diameter and have drainage holes to prevent waterlogging.
- Choose a well-draining potting mix and position the container in a location that receives partial shade to full sun.
- Remember to water regularly, keeping the soil moist but not waterlogged, and fertilize monthly during the growing season for optimal growth and foliage development of the elephant ear plant.
How Long Does It Take For Elephant Ear Bulbs To Sprout?
- Elephant ear bulbs typically take around 4 to 6 weeks to sprout, depending on the variety and growing conditions.
- It’s essential to provide the bulbs with a warm and humid environment to encourage sprouting.
- Plant the bulbs indoors in pots or trays filled with a well-draining potting mix around 6 to 8 weeks before the last frost date.
- Maintain a temperature of around 70 to 80°f (21 to 27°c) and keep the soil consistently moist.
- Once sprouts emerge, gradually acclimate them to the outdoor conditions by exposing them to direct sunlight for a few hours each day before transplanting them into their permanent location.
Can Elephant Ear Bulbs Survive In Colder Climates?
- While elephant ear bulbs are tropical plants that thrive in warm climates, some varieties can still survive in colder regions with proper care.
- In colder climates, it’s recommended to grow elephant ear bulbs as annuals or dig up and store the bulbs indoors during the winter months.
- Before the first frost, carefully dig up the bulbs, remove any excess soil, and allow them to dry for a few days.
- Place the bulbs in a dry, cool location (around 50 to 55°f or 10 to 13°c) and store them in peat moss or vermiculite until the following spring.
- Replant the bulbs outdoors after the danger of frost has passed, and temperatures have warmed.
What Are The Best Companion Plants For Elephant Ear Bulbs?
- Elephant ear bulbs can create a stunning focal point in gardens, and pairing them with suitable companion plants can enhance their beauty.
- Here are some excellent companion plants to consider:
- Banana trees: Pairing elephant ears with banana trees can create a lush tropical vibe in the garden.
- Canna lilies: The vibrant flowers of canna lilies complement the bold foliage of elephant ear plants.
- Caladiums: Planting caladiums alongside elephant ears provides a colorful contrast with their various leaf patterns.
- Begonias: The versatile and shade-tolerant begonias make a great companion for elephant ear bulbs.
- Ferns: Add a touch of elegance to the garden by interspersing ferns with elephant ear plants.
- Keep in mind that companion plants should have similar light and moisture requirements to ensure they thrive together. Regularly water and maintain the garden to create a visually stunning combination of plants.
By following these guidelines, you can successfully grow elephant ear bulbs in containers, understand their growth timeline, care for them in colder climates, and choose complementary plants to create an enchanting garden display. Experiment with various combinations and enjoy the beauty and elegance that elephant ear bulbs bring to your outdoor space.
Frequently Asked Questions Of How To Plant An Elephant Ear Bulb
How Deep Should You Plant An Elephant Ear Bulb?
An elephant ear bulb should be planted about 4 inches deep into the soil. This depth ensures proper root development and stability for the plant as it grows.
How Do You Know If An Elephant Ear Bulb Is Alive?
To check if an elephant ear bulb is alive, gently squeeze the bulb and look for firmness. A healthy bulb will be firm to the touch, while a soft or mushy bulb indicates decay or rot. Additionally, look for new shoots or sprouts emerging from the bulb, which is a sign of life.
Can You Plant Elephant Ear Bulbs In Containers?
Yes, elephant ear bulbs can be planted in containers. Choose a large container that provides enough space for the bulb and its roots to grow. Use well-draining potting soil and ensure the container has drainage holes to prevent waterlogging. Place the container in a location that receives bright but indirect sunlight.
When Is The Best Time To Plant Elephant Ear Bulbs?
The best time to plant elephant ear bulbs is in the spring when the soil has warmed up and the risk of frost has passed. This allows the bulbs to establish roots and grow during the growing season. Planting in early spring also ensures the bulbs have enough time to develop before winter arrives.
How Often Should You Water Elephant Ear Bulbs?
Elephant ear bulbs require consistently moist but well-drained soil. Water the bulbs when the top inch of soil feels dry to the touch. Avoid overwatering, as it can lead to root rot. Adjust watering frequency based on environmental conditions and the moisture needs of the specific elephant ear variety being grown.
Conclusion
Planting an elephant ear bulb doesn’t have to be intimidating. By following the steps outlined in this blog post, you can confidently bring this tropical beauty into your garden. Remember to choose a suitable location that provides the right amount of sunlight and well-draining soil.
Prepare the bulb by removing any damaged or rotten parts. Dig a hole and place the bulb with the pointed end facing up. Gently cover it with soil and water thoroughly. As the bulb establishes its roots, make sure to provide regular care and maintenance, such as watering, fertilizing, and protecting it from extreme weather conditions.
With patience and proper care, your elephant ear bulb will grow into a stunning plant that will add a touch of exotic beauty to your landscape. So go ahead, get your hands dirty, and enjoy the rewarding experience of planting an elephant ear bulb.