Hydrangeas have become one of the most popular flowering plants in gardens and backyards around the world. Their beautiful blooms and vibrant colors make them a favorite among gardeners. However, it can be quite disheartening to see their leaves start to turn black and wilt. This could be caused by a variety of reasons, from pests and diseases to poor soil quality or environmental stressors. If you are experiencing this problem with your hydrangea leaves, don’t worry! In this post, we will cover the top 10 causes of blackening leaves and provide you with some tips on how to revive them. We’ll take you through the steps you need to take to identify the underlying issue and provide some practical solutions to help you get your hydrangeas looking healthy and vibrant again.
1. Introduction to common issues with hydrangea leaves
Hydrangeas are beloved for their stunning blooms and lush foliage, but it can be disheartening to see their leaves turn black or wilt. However, before you panic, it’s important to understand that these issues are not uncommon and can often be easily resolved. In this section, we will explore the various causes of blackening hydrangea leaves and provide you with effective solutions to revive them.
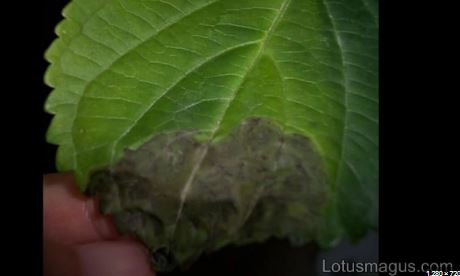
One common issue that many gardeners encounter is black spots or patches on hydrangea leaves. This can be caused by a fungal disease called leaf spot, which thrives in humid and wet conditions. Overhead watering, poor air circulation, and overcrowding can contribute to the development of this fungal infection. Another possible cause of blackening leaves is powdery mildew, a white fungal growth that eventually turns black and can lead to leaf distortion and premature leaf drop.
Table of Contents
In addition to fungal infections, hydrangea leaves can also turn black due to environmental stressors. Excessive exposure to intense sunlight can scorch the leaves, causing them to blacken and wither. Similarly, extreme temperatures, both hot and cold, can also cause leaf discoloration and damage.
Nutritional deficiencies can also manifest as blackening leaves. Hydrangeas require certain essential nutrients, such as iron and magnesium, to thrive. Lack of these nutrients can result in chlorosis, a condition where the leaves turn pale yellow and eventually blacken.
Lastly, pests such as aphids, spider mites, and scale insects can infest hydrangeas and cause damage to the leaves. These tiny creatures feed on the plant sap, leading to leaf discoloration and distortion.
Now that we have introduced some of the common issues that can cause blackening hydrangea leaves, it’s time to delve into each problem in detail and provide you with practical solutions to revive your beloved hydrangeas. By identifying the root cause of the problem and taking appropriate action, you can restore the beauty and health of your hydrangea foliage, ensuring a vibrant and thriving garden.
2. Understanding the blackening of hydrangea leaves
When you notice blackening on your hydrangea leaves, it’s essential to understand the underlying causes to effectively revive your plants. Blackening can occur due to various factors, and identifying the root cause is crucial for proper troubleshooting.
One common cause of blackening leaves is powdery mildew, a fungal disease that thrives in humid conditions. Powdery mildew appears as a white or gray powdery coating on the leaves, which eventually turns black. To combat this issue, ensure proper air circulation around your hydrangeas, avoid overhead watering, and consider applying fungicides specifically designed to target powdery mildew.
Another potential culprit for blackening leaves is a bacterial infection called bacterial leaf spot. This infection often starts as small black spots that gradually enlarge and merge, leading to extensive blackening of the leaves. To address bacterial leaf spot, remove and destroy infected foliage, ensure proper spacing between plants, and practice good hygiene by avoiding overhead irrigation.
Overwatering can also result in blackening leaves, as excessive moisture can lead to root rot. When the roots are unable to absorb nutrients properly, the leaves may turn black and wilt. To prevent overwatering, ensure your hydrangeas are planted in well-draining soil and adopt a watering routine that allows the soil to dry out slightly between waterings.
Inadequate nutrition can contribute to blackening leaves as well. A deficiency in essential nutrients like iron or manganese can cause chlorosis, where the leaves turn yellow and then black. To rectify this, consider using a balanced fertilizer specifically formulated for hydrangeas to ensure they receive the necessary nutrients.
Furthermore, environmental factors such as extreme temperatures, excessive sunlight, or frost can stress the hydrangea plant, resulting in blackening leaves. Providing adequate shade during scorching summers or protecting the plant from frost can help prevent leaf damage.
Pest infestations, such as aphids or spider mites, can also lead to blackening leaves. These pests suck the sap from the leaves, causing them to wither and turn black. Employing organic pest control methods or introducing natural predators can effectively manage these infestations.
Lastly, physical damage, such as cuts or bruises, can cause blackening of hydrangea leaves. It is essential to handle the plants carefully and avoid any unnecessary injuries.
Understanding the various causes of blackening leaves on hydrangeas is the first step towards troubleshooting and reviving your plants. By addressing the specific issue and implementing appropriate solutions, you can help your hydrangeas regain their health and beauty.
3. Cause 1: Fungal infections and diseases
Fungal infections and diseases can be a common cause of blackening on hydrangea leaves. These infections can be caused by various types of fungi, such as powdery mildew, botrytis blight, or cercospora leaf spot. These fungi thrive in humid and moist environments, which is why hydrangeas, with their large leaves and dense foliage, are susceptible to these issues.
One of the most noticeable signs of fungal infections is the appearance of black spots or patches on the leaves. As the infection progresses, the blackening can spread, causing the leaves to turn completely black and wilt. If left untreated, these infections can weaken the plant and hinder its overall health and vitality.
To combat fungal infections and revive your hydrangea leaves, there are a few steps you can take. First, it’s important to identify the specific fungal infection affecting your plant. This can be done by examining the blackened leaves closely and comparing them to reference images or consulting with a horticulturist or local gardening center.
Once the fungal infection is identified, treatment options can be implemented. The most common approach is to apply a fungicide specifically formulated for the particular fungus causing the issue. These fungicides can be purchased at garden centers and should be applied according to the instructions provided.
In addition to fungicide treatment, it is essential to improve the overall growing conditions for your hydrangeas. Ensure proper air circulation around the plant by pruning any overcrowded branches or foliage. Avoid overhead watering, as this can create a humid environment conducive to fungal growth. Instead, water at the base of the plant, preferably in the morning, allowing the leaves to dry out during the day.
Furthermore, maintaining good hygiene practices in your garden can help prevent the spread of fungal infections. Remove and dispose of any infected leaves, stems, or debris, as they can harbor fungal spores. Regularly clean and sterilize your gardening tools to prevent the inadvertent transmission of pathogens.
By addressing fungal infections promptly and implementing preventative measures, you can revive your hydrangea leaves and ensure the continued health and beauty of your plants. Remember that consistent monitoring, proper care, and timely intervention are key to troubleshooting and maintaining healthy hydrangeas.
4. Cause 2: Overwatering or poor drainage
Overwatering or poor drainage can wreak havoc on your hydrangea leaves, causing them to blacken and deteriorate. When the roots of your hydrangea are constantly sitting in waterlogged soil, they struggle to absorb oxygen, leading to suffocation and root rot.
One of the first signs of overwatering or poor drainage is the appearance of blackened or darkened leaves. These leaves may also become slimy or mushy to the touch. Additionally, you may notice a foul smell emanating from the soil, indicating the presence of stagnant water and decaying roots.
To revive your hydrangea and prevent further damage, it is crucial to address the issue of overwatering or poor drainage promptly. Here are a few steps you can take:
1. Assess the drainage: Examine the soil and ensure that it is well-draining. If it retains water excessively, consider amending the soil with organic matter such as compost or perlite to improve drainage.
2. Adjust watering practices: Allow the soil to dry out between watering sessions. Hydrangeas prefer moist, but not soggy, soil. Use your finger to check the moisture level at least an inch below the surface before watering again.
3. Consider the container: If your hydrangea is potted, ensure that it has proper drainage holes at the bottom. If not, transfer it to a container that allows excess water to escape easily.
4. Create a raised bed: If you have consistently poor drainage in your garden soil, consider creating a raised bed for your hydrangea. This will provide better control over the moisture levels and prevent waterlogging.
5. Prune affected leaves: Remove any blackened or diseased leaves, making clean cuts just above a leaf node. This will promote new growth and prevent the spread of any fungal or bacterial infections.
By addressing the issue of overwatering or poor drainage promptly and implementing these steps, you can revive your hydrangea and ensure its leaves regain their healthy green color. Remember, prevention is key, so strive to provide your hydrangea with the optimal growing conditions to avoid future problems.
5. Cause 3: Insufficient watering or drought stress
Insufficient watering or drought stress can be a common cause of blackening hydrangea leaves. These beautiful flowering plants require a consistent and adequate water supply to thrive. When they don’t receive enough water, their leaves can start to turn black and wilt.
One way to determine if your hydrangeas are suffering from insufficient watering is to check the soil moisture level. Stick your finger about an inch into the soil around the plant’s base. If it feels dry, it’s a clear indication that your hydrangeas need more water.
To revive your hydrangeas and prevent further blackening of the leaves, it’s crucial to adjust your watering routine. Ensure that your hydrangeas receive a deep watering at least once a week, providing enough moisture to reach the plant’s root zone. This will help the roots stay hydrated and prevent drought stress.
Additionally, consider mulching around the base of your hydrangeas. A layer of organic mulch, such as wood chips or shredded leaves, can help retain moisture in the soil and reduce evaporation. This will promote a more consistent moisture level and help prevent blackening of the leaves.
When watering, it’s important to avoid overwatering as well. Hydrangeas prefer well-draining soil, and excessive moisture can lead to root rot and other issues. Make sure to monitor the moisture level regularly and adjust your watering schedule accordingly.
In summary, insufficient watering or drought stress can cause blackening of hydrangea leaves. By providing adequate and consistent moisture, adjusting your watering routine, and using mulch to retain moisture, you can revive your hydrangeas and prevent further leaf damage. Remember, maintaining proper hydration is key to keeping your hydrangeas healthy and vibrant.
6. Cause 4: Nutrient deficiencies or imbalances
Nutrient deficiencies or imbalances can significantly impact the health and appearance of your hydrangea leaves. When your plants lack essential nutrients, it can lead to a variety of issues, including blackening of the leaves.
One common nutrient deficiency in hydrangeas is iron chlorosis, which occurs when the soil lacks sufficient iron. This can result in the leaves turning yellow or even developing black spots. Similarly, a nitrogen deficiency can cause the leaves to turn dark and eventually blacken.
On the other hand, nutrient imbalances can also contribute to leaf blackening. Excessive amounts of certain nutrients, such as phosphorus or potassium, can disrupt the uptake of other essential elements, leading to leaf discoloration.
To address nutrient deficiencies or imbalances, it’s crucial to conduct a soil test to determine the specific nutrient issues your hydrangeas are facing. Based on the results, you can then apply appropriate fertilizers or soil amendments to restore the proper nutrient levels.
For iron chlorosis, you can use iron chelate or iron sulfate to provide the necessary iron to your plants. Nitrogen deficiencies can be remedied by applying a nitrogen-rich fertilizer, such as ammonium sulfate, in the recommended dosage.
Remember to follow the instructions provided by the fertilizer manufacturer and avoid over-fertilization, as this can cause further damage to your hydrangeas. Regularly monitoring your plants’ nutrient levels and providing balanced nutrition will help prevent leaf blackening and promote overall plant health.
7. Cause 5: Sunburn or excessive sun exposure
Sunburn or excessive sun exposure can be a common cause of blackening on hydrangea leaves. While hydrangeas thrive in bright, indirect light, prolonged exposure to intense sunlight can cause damage to their delicate foliage.
When hydrangea leaves are exposed to excessive sunlight, they may appear scorched or develop blackened patches. This occurs as a result of the sun’s ultraviolet (UV) rays damaging the plant cells and disrupting their normal functioning.
To revive hydrangeas affected by sunburn or excessive sun exposure, it is crucial to provide them with some relief from the intense sunlight. Here are a few steps you can take:
1. Create shade: If your hydrangeas are in a location with direct sunlight, consider creating some shade using umbrellas, shade cloths, or by moving them to a spot with partial shade during the hottest parts of the day.
2. Water regularly: Hydrangeas are thirsty plants, and they require an adequate water supply to combat the effects of sunburn. Ensure that the soil is consistently moist, but not waterlogged, by watering deeply and regularly. Mulching around the base of the plant can also help retain moisture.
3. Avoid watering during peak sunlight: Watering your hydrangeas during the early morning or late evening hours can help prevent water droplets on the leaves from magnifying the sun’s rays, thus reducing the risk of additional damage.
4. Prune affected leaves: If you notice blackened or scorched leaves, carefully prune them back to healthy tissue. This will not only improve the plant’s appearance but also promote new growth.
Remember, prevention is key when it comes to protecting your hydrangeas from sunburn. Consider planting them in locations with partial shade or providing them with natural protection from nearby trees or structures. By taking proactive measures and providing the necessary care, you can help your hydrangeas recover from sunburn and enjoy healthy, vibrant foliage once again.
8. Cause 6: Pests and insect infestations
Pests and insect infestations can wreak havoc on your hydrangea leaves, causing them to blacken and deteriorate. These tiny creatures, such as aphids, mites, caterpillars, and beetles, can feed on the leaves, sucking out the sap and leaving behind damage.
One of the first signs of a pest problem is the presence of small holes, chewed edges, or discolored spots on the leaves. You may also notice sticky residue or webbing on the plant, indicating the presence of aphids or spider mites.
To combat pests and prevent further damage to your hydrangeas, it is crucial to take prompt action. Here are a few steps you can take:
1. Identify the specific pest: Different pests require different treatment methods. By identifying the pest, you can choose the most effective solution.
2. Manual removal: For larger pests like caterpillars or beetles, you can manually remove them from the plant by handpicking or using a gentle spray of water.
3. Insecticidal soaps or oils: These natural solutions can be effective in controlling pests like aphids and mites. Follow the instructions on the product label and apply the solution to the affected leaves.
4. Neem oil: Consider using neem oil, a botanical pesticide, which is effective against a wide range of pests. Dilute the neem oil according to the instructions and spray it on the leaves, ensuring thorough coverage.
5. Beneficial insects: Introducing beneficial insects like ladybugs or lacewings can help control pest populations naturally. These predatory insects feed on common garden pests and can help keep them in check.
Remember to monitor your plants regularly for any signs of pest activity and take action as soon as possible. Healthy and well-maintained hydrangeas are often more resistant to pests, so ensure that your plants receive proper care, including regular watering, adequate sunlight, and appropriate fertilization.
By addressing pest infestations promptly and implementing effective pest control measures, you can revive your hydrangea leaves and restore the beauty of your plants.
9. Cause 7: Environmental factors and extreme weather
Environmental factors and extreme weather can greatly affect the health and appearance of hydrangea leaves. These beautiful plants are sensitive to their surroundings and can easily succumb to damage caused by harsh environmental conditions.
One common issue that arises is the blackening of hydrangea leaves due to excessive sun exposure. When exposed to intense sunlight for prolonged periods, the leaves can develop burn marks or even turn completely black. This occurs because the plants are unable to handle the heat and UV radiation, causing cellular damage.
Another environmental factor that can lead to blackening of hydrangea leaves is extreme cold. During frosty winter months, the leaves may freeze and turn black as a result. This can be especially problematic for hydrangea varieties that are not well-adapted to colder climates.
Additionally, excessive rainfall or improper drainage can cause waterlogged soil, leading to root rot. When the roots are unable to receive proper oxygen, the plant’s overall health can deteriorate, resulting in blackened leaves and stunted growth.
To revive hydrangea leaves affected by environmental factors and extreme weather, it is crucial to take appropriate measures. Providing shade during the hottest parts of the day can help protect the leaves from excessive sun exposure. Using shade cloths or placing the plants in areas with partial shade can mitigate the risk of leaf blackening.
In colder regions, it is advisable to cover the hydrangeas with burlap or other protective materials to shield them from frost and freezing temperatures. This can prevent the leaves from turning black and help preserve the plant’s vitality.
Ensuring proper drainage is also essential to prevent waterlogged soil. Amending the soil with organic matter and creating a well-draining environment can help prevent root rot and maintain healthy leaves.
Regular monitoring of weather conditions and taking precautions accordingly can make a significant difference in the overall health and appearance of hydrangea leaves. By addressing environmental factors and extreme weather, you can successfully troubleshoot blackening leaves and revive your hydrangea plants.
10. Reviving blackened hydrangea leaves: Tips and solutions
Reviving blackened hydrangea leaves can be a challenging task, but with the right tips and solutions, you can restore the vibrant health of your beloved plants. Blackening of hydrangea leaves can occur due to various reasons, such as nutrient deficiencies, diseases, pests, or environmental factors. Here are some effective ways to revive blackened hydrangea leaves and bring them back to their former glory:
1. Identify the cause: Before taking any action, it’s crucial to identify the underlying cause of the blackening. This can help you address the root of the problem and implement the appropriate solution.
2. Ensure proper watering: Hydrangeas require consistent and adequate watering. Ensure that the soil is moist but not waterlogged. Avoid overwatering, as it can lead to root rot and blackening of the leaves.
3. Check for nutrient deficiencies: Blackened leaves can be a sign of nutrient deficiencies, such as iron or magnesium. Conduct a soil test to determine the nutrient levels and provide the necessary amendments to restore the plant’s health.
4. Prune damaged foliage: Remove the blackened leaves and any diseased or damaged parts of the plant. This will not only improve the overall appearance but also promote new growth.
5. Protect from pests: Inspect your hydrangeas for common pests like aphids, mites, or fungal infections. Treat the affected areas with appropriate insecticides or fungicides to eliminate the pests and prevent further damage.
6. Provide adequate sunlight: Hydrangeas thrive in partial shade or filtered sunlight. Ensure they receive the appropriate amount of sunlight based on their specific variety. Insufficient light can weaken the plant, making it more susceptible to leaf blackening.
7. Mulch to retain moisture: Apply a layer of organic mulch around the base of the hydrangea to help retain moisture, regulate soil temperature, and prevent weed growth. This will create a favorable environment for healthy foliage growth.
8. Adjust soil pH: Hydrangea leaf color can be influenced by soil pH. If your hydrangeas are not exhibiting the desired leaf color, you can adjust the soil pH accordingly. Acidic soil produces blue flowers, while alkaline soil results in pink flowers.
9. Apply balanced fertilizer: Boost the overall health of your hydrangeas by providing them with a balanced fertilizer. This will ensure they receive the necessary nutrients to recover from leaf blackening and promote vigorous growth.
10. Monitor and maintain: Regularly monitor your hydrangea plants for any signs of blackening or other issues. Address problems promptly to prevent further damage and maintain the overall health of your plants.
By following these tips and solutions, you can revive blackened hydrangea leaves and create a thriving, beautiful garden filled with healthy and vibrant hydrangea plants. Remember, patience and consistent care are key to bringing your hydrangeas back to life.
11. Preventive measures and care for healthy hydrangea leaves
Preventive measures and proper care are essential for maintaining healthy hydrangea leaves. By implementing these measures, you can protect your plants from common issues and ensure their leaves remain vibrant and disease-free.
1. Adequate watering: Hydrangeas require consistent moisture, especially during hot summer months. Ensure they receive enough water without overwatering, as excessive moisture can lead to root rot and leaf issues.
2. Well-draining soil: Hydrangeas thrive in well-draining soil that allows excess water to flow away. Amend heavy clay soil with organic matter to improve drainage and prevent waterlogged roots.
3. Mulching: Apply a layer of mulch around the base of your hydrangeas to retain moisture, regulate soil temperature, and prevent weed growth. Use organic mulch like wood chips or bark to provide nutrients as it decomposes.
4. Balanced fertilization: Feed your hydrangeas with a balanced slow-release fertilizer in early spring to promote healthy growth and abundant blooms. Avoid excessive nitrogen fertilizers that can result in lush foliage but fewer blooms.
5. Proper pruning: Regular pruning is crucial for maintaining the shape and health of your hydrangea plants. Remove dead or diseased wood, thin out crowded branches, and shape the plant after the blooming period.
6. Sunlight exposure: Hydrangeas prefer partial shade or filtered sunlight. Excessive exposure to direct sunlight can scorch their leaves and result in wilting. Find the ideal location in your garden that offers the right balance of light and shade.
7. Pest control: Monitor your hydrangeas for common pests like aphids, spider mites, or powdery mildew. Use organic insecticides or gentle pest control methods to prevent infestations and keep the leaves healthy.
8. Air circulation: Good air circulation around your hydrangea plants reduces the risk of fungal diseases. Avoid overcrowding and ensure there is ample space between plants for proper airflow.
9. Winter protection: Depending on the hydrangea variety and your climate, consider providing winter protection like mulching or covering the plants with burlap to shield them from harsh temperatures and frost damage.
10. Regular inspection: Regularly inspect your hydrangea leaves for any signs of discoloration, spots, or pests. Early detection and prompt action can prevent further damage and help revive the leaves quickly.
By implementing these preventive measures and providing proper care, you can enjoy healthy and vibrant hydrangea leaves throughout the growing season. Remember to adjust your care routine based on the specific needs of your hydrangea variety and local climate conditions.
12. Conclusion and final thoughts
In conclusion, troubleshooting blackened hydrangea leaves can be a daunting task, but armed with the knowledge of the various causes and their respective remedies, you can bring your beloved plants back to life. Remember that prevention is key, so maintaining proper watering, soil pH, and providing adequate sunlight and nutrition is crucial in keeping your hydrangeas healthy.
However, if you do notice blackening leaves, don’t panic. Take the time to assess the situation and identify the underlying cause. Whether it’s due to overwatering, fungal infections, nutrient deficiencies, or even pests, there is always a solution. By implementing the appropriate remedies such as adjusting watering schedules, applying fungicides, or adding the necessary nutrients, you can revive your hydrangeas and restore their vibrant beauty.
Additionally, it’s important to note that some varieties of hydrangeas are naturally prone to blackening leaves, especially towards the end of the growing season. This is a normal part of their life cycle, and as long as the rest of the plant appears healthy, there is no cause for concern.
In your journey of troubleshooting hydrangea leaf blackening, patience and perseverance are key. It may take time to identify and address the underlying issues, but with proper care and attention, you can ensure the longevity and vitality of your hydrangea plants.