Spider plants are a popular choice for many plant enthusiasts, mainly because of their easy-to-care-for nature and their ability to purify the air. However, despite their reputation for being low maintenance, they can still be prone to a few problems that can cause brown leaves. Brown leaves can be an indicator of a variety of issues, such as overwatering, underwatering, pests, diseases, or other environmental factors. If you’re struggling with a spider plant that has brown leaves, don’t worry! In this blog post, we will cover the ten most common causes of brown leaves on spider plants, and we’ll provide you with the foolproof solutions you need to nurse your plant back to health. By the end of this article, you’ll be able to troubleshoot the issue and get your spider plant looking as healthy as ever!
1. Introduction to Spider Plants and their common issues
Spider plants, scientifically known as Chlorophytum comosum, are beloved houseplants known for their striking foliage and air-purifying abilities. These easy-to-care-for plants have become a staple in many households, adding a touch of greenery and vibrancy to any space.
However, despite their reputation for being low-maintenance, spider plants can occasionally face some common issues that may lead to brown leaves and diminish their overall health. Whether you’re a seasoned plant parent or a beginner, it’s crucial to understand these problems and have effective solutions at hand to keep your spider plant thriving.
Table of Contents
One of the most common issues faced by spider plant owners is the occurrence of brown leaves. These unsightly brown patches can be caused by a variety of factors, including improper watering, inadequate light exposure, low humidity levels, or even pest infestations. It’s essential to identify the root cause of the problem to implement the appropriate remedies and prevent further damage.
In this comprehensive guide, we will delve into the world of spider plants and explore the common issues that can lead to brown leaves. We will provide you with ten foolproof solutions to revive and maintain the health of your spider plant, ensuring its lush green foliage remains a source of joy and beauty in your home.
Whether you’re struggling with brown leaves or simply want to preemptively tackle potential problems, this article will equip you with the knowledge and strategies needed to become a spider plant superhero. So, let’s dive in and unravel the secrets to troubleshooting and caring for your beloved spider plants!
2. Understanding the significance of brown leaves in Spider Plants
Spider plants are known for their lush green foliage, so when brown leaves start appearing, it can be a cause for concern. However, it’s important to understand that brown leaves in spider plants can have various meanings and significance.
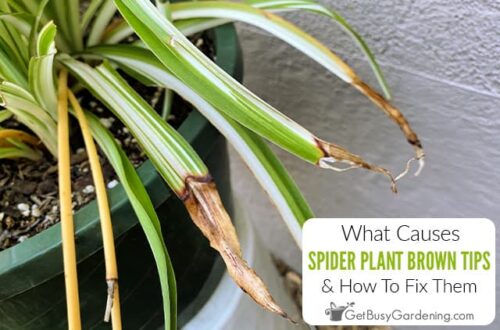
Firstly, brown tips or edges on spider plant leaves are often a result of low humidity levels. Spider plants thrive in environments with moderate to high humidity, so if the air is too dry, the leaves may develop brown edges. To combat this, you can mist the leaves regularly or place a humidifier near the plant to increase moisture in the air.
Another common reason for brown leaves is overwatering or underwatering. Spider plants prefer to be kept slightly moist but not soggy. If the soil is consistently wet or if the plant is allowed to dry out excessively between waterings, the leaves may turn brown. It’s crucial to find the right balance and ensure proper drainage to prevent waterlogged roots.
Additionally, brown leaves can be a sign of nutrient deficiency. Spider plants need a balanced fertilizer to thrive, and lack of essential nutrients can lead to brown or yellow leaves. Consider using a diluted, balanced fertilizer regularly to provide the necessary nutrients for healthy growth.
Pests such as spider mites or mealybugs can also cause brown spots or discoloration on spider plant leaves. Inspect the plant closely for any signs of infestation and take appropriate measures to eliminate the pests, such as using natural or chemical insecticides.
Lastly, brown leaves can be a natural part of the plant’s growth cycle. Older leaves naturally turn brown and die off over time to make way for new growth. If only the older leaves are affected and the rest of the plant looks healthy, it’s likely just a natural process.
Understanding the significance of brown leaves in spider plants is crucial for effective troubleshooting. By addressing the underlying causes, such as low humidity, improper watering, nutrient deficiencies, pests, or natural aging, you can take the necessary steps to revive your spider plant and keep its foliage vibrant and green.
3. Identifying the possible causes of brown leaves
If you’ve noticed brown leaves on your spider plant, it’s essential to identify the possible causes to address the issue effectively. Brown leaves can indicate various problems, and understanding the root cause is the first step in troubleshooting.
1. Overwatering: One common cause of brown leaves is overwatering. Spider plants prefer well-draining soil, and excessive watering can lead to root rot, causing the leaves to turn brown.
2. Underwatering: On the other hand, underwatering can also result in brown leaves. Spider plants require regular watering to thrive, and if they don’t receive enough moisture, the leaves can dry out and turn brown.
3. Direct sunlight: Spider plants prefer indirect or filtered sunlight. Exposing them to direct sunlight for extended periods can cause the leaves to scorch and turn brown.
4. Low humidity: Spider plants thrive in environments with moderate humidity. If the air is too dry, especially during winter months or in air-conditioned spaces, the leaves can become brown and crispy.
5. Nutrient deficiencies: Lack of essential nutrients, such as nitrogen, potassium, or magnesium, can cause brown spots or edges on the leaves. It’s important to ensure your spider plant receives proper fertilization.
6. Pest infestation: Spider mites and mealybugs are common pests that can infest spider plants, leading to brown leaves. Check for signs of pests, such as webs or tiny insects, and take appropriate measures to eliminate them.
7. Chemical exposure: Exposure to chemicals, such as chlorine from tap water or household cleaning agents, can cause browning of spider plant leaves. Consider using filtered or purified water and avoid spraying any chemicals near your plant.
8. Temperature extremes: Spider plants prefer temperatures between 60-75°F (15-24°C). Extreme heat or cold can cause stress and result in brown leaves.
9. Transplant shock: If you recently repotted your spider plant, it may experience transplant shock, leading to browning of leaves. Give it some time to adjust to its new environment.
10. Aging leaves: Lastly, it’s important to remember that brown leaves can also be a natural part of the plant’s life cycle. As spider plant leaves age, they may turn brown and eventually die off. Regularly removing old leaves can help maintain the plant’s overall health.
By identifying the possible causes of brown leaves on your spider plant, you can take appropriate actions to address the issue and ensure its continued growth and vitality.
4. Solution 1: Adjusting the lighting conditions
Spider plants are known for their resilience and ability to adapt to different lighting conditions. However, brown leaves can indicate that the current lighting conditions are not suitable for your spider plant. To address this issue, you can make adjustments to provide the ideal lighting environment for your plant.
Firstly, it’s important to identify whether your spider plant is receiving too much or too little light. If the leaves are turning brown and crispy, it may be a sign of too much direct sunlight. Spider plants prefer bright, indirect light, so consider moving your plant to a spot where it receives filtered or diffused light.
On the other hand, if your spider plant is placed in a dimly lit area and the leaves are turning brown, it might be a sign of insufficient light. In this case, you can move your plant closer to a window or provide supplemental lighting using grow lights. Aim to provide your spider plant with about 12-14 hours of light per day.
Another factor to consider is the distance between your spider plant and the light source. If the leaves are browning, it could indicate that the plant is too close to a bright light source, such as a window or artificial light. Move the plant slightly further away to provide the right balance of light intensity.
Remember to observe your spider plant closely after making these adjustments. It may take some time for the plant to recover and for new healthy growth to appear. Be patient and monitor the plant’s response to the changes you’ve made.
By adjusting the lighting conditions to meet the specific needs of your spider plant, you can help prevent brown leaves and promote healthy growth. Providing the right amount and quality of light will ensure that your spider plant thrives and remains a vibrant addition to your indoor space.
5. Solution 2: Evaluating and adjusting watering practices
Proper watering practices are crucial when it comes to maintaining the health of your spider plant. Brown leaves can often be a result of either overwatering or underwatering. To troubleshoot this issue, it is essential to evaluate and adjust your watering practices accordingly.
Firstly, assess the moisture level of the soil before watering. Stick your finger about an inch into the soil and check if it feels dry or slightly moist. If it feels dry, it’s time to water the plant. However, if it feels moist, hold off on watering for a little longer as the plant is still adequately hydrated.
When watering your spider plant, ensure that you do not overdo it. These plants prefer slightly moist soil, but waterlogged conditions can lead to root rot and brown leaves. Allow the top few inches of soil to dry out between waterings to prevent water from accumulating in the pot.
On the other hand, if you notice that the soil is consistently dry and the leaves are turning brown, you may be underwatering your spider plant. Increase the frequency of watering and ensure that the entire root ball receives sufficient moisture during each watering session.
Another factor to consider is the drainage of your plant’s pot. If excess water is unable to escape, it can cause waterlogging and lead to brown leaves. Ensure that your pot has drainage holes and use a well-draining soil mix to promote adequate water flow.
Additionally, environmental factors such as temperature and humidity can affect the watering needs of your spider plant. During hot and dry weather, you may need to water more frequently, while in cooler and more humid conditions, you can reduce the watering frequency.
Remember, each plant is unique, and its watering requirements may vary. Take the time to observe your spider plant and adjust your watering practices based on its specific needs. By finding the right balance between underwatering and overwatering, you can help your spider plant thrive, ensuring lush green leaves instead of unsightly brown ones.
6. Solution 3: Addressing issues related to humidity
Spider plants are incredibly resilient and versatile, but sometimes they can still encounter issues. One common problem that many spider plant owners face is brown leaves, which can be caused by various factors, including humidity levels.
Spider plants thrive in environments with moderate humidity levels, so if the air in your home is too dry or too humid, it can negatively impact the health of your plant. When the air is overly dry, the moisture in the leaves evaporates quickly, leading to brown, crispy edges. On the other hand, excessive humidity can create a breeding ground for fungal infections and rot, resulting in brown spots and wilted leaves.
To address issues related to humidity, there are several solutions you can try. Firstly, if your home is too dry, consider using a humidifier to increase the moisture in the air. This can benefit not only your spider plant but also your overall indoor air quality. Alternatively, you can place a tray filled with water near the plant or use a pebble tray to create a localized humid microclimate.
If the air is too humid, you can improve ventilation by opening windows or using a fan to promote air circulation. Additionally, avoid overwatering your spider plant as excess moisture in the soil can contribute to increased humidity levels.
Another effective solution is to group your spider plants together. When plants are grouped, they create a microclimate with higher humidity levels through transpiration. This can create a more favorable environment for your spider plant to thrive.
Lastly, consider misting your spider plant’s leaves regularly. This mimics the natural humidity found in their native tropical environments and can help keep their leaves hydrated and healthy.
Remember, finding the right balance of humidity is crucial for the optimal growth of your spider plant. By addressing and adjusting humidity-related issues, you can prevent brown leaves and ensure your spider plant remains vibrant and beautiful.
7. Solution 4: Examining the soil and repotting the plant if necessary
Examining the soil and repotting the plant if necessary can be a crucial step in reviving your spider plant. Over time, the soil can become compacted and depleted of nutrients, leading to brown leaves and stunted growth. Repotting allows you to refresh the soil and provide your spider plant with a healthier environment to thrive in.
To start, gently remove the spider plant from its current pot, being careful not to damage the roots. Inspect the roots for any signs of rot or overcrowding. Healthy roots should be white or light-colored, firm, and plump. If you notice any mushy or blackened roots, trim them off with clean scissors or pruning shears.
Next, choose a slightly larger pot with drainage holes to accommodate the plant’s growth. Fill the pot with a well-draining soil mix, such as a combination of potting soil, perlite, and peat moss. This will ensure proper drainage and prevent waterlogged roots.
Place the spider plant in the new pot, ensuring that the crown of the plant (where the leaves emerge) sits at the same level as before. Gently backfill the pot with the soil mix, pressing it down lightly to eliminate any air pockets.
After repotting, give the plant a thorough watering to settle the soil around the roots. Allow any excess water to drain out completely before placing the pot back in its desired location. It’s important to avoid overwatering, as this can lead to root rot and more brown leaves.
Keep a close eye on your spider plant in the following weeks, monitoring its progress. If the brown leaves persist or new growth doesn’t appear, it may indicate a more significant issue that requires further troubleshooting.
Remember, repotting should be done when necessary, typically every 1-2 years or when the plant has outgrown its current pot. By providing your spider plant with fresh, nutrient-rich soil and adequate space for its roots to grow, you can help rejuvenate its health and bring back its vibrant green foliage.
8. Solution 5: Identifying and treating pests or diseases
Spider plants are generally hardy and resilient, but occasionally they can fall victim to pests or diseases that can cause their leaves to turn brown. Identifying and promptly treating these issues is crucial to ensure the health and vitality of your spider plant.
One common pest that can afflict spider plants is spider mites. These tiny creatures are barely visible to the naked eye but can wreak havoc on your plant. Signs of spider mite infestation include fine webbing on the leaves, yellow or brown spots, and stunted growth. To combat spider mites, you can gently wipe the leaves with a damp cloth to remove them physically. Alternatively, you can use insecticidal soap or neem oil to control the infestation.
Another pest that may attack spider plants is mealybugs. These small, cotton-like insects often cluster in the nooks and crannies of the plant, sucking sap and causing damage. To address mealybug infestations, you can dab them with a cotton swab dipped in rubbing alcohol or use a horticultural oil spray to suffocate and eliminate them.
In addition to pests, spider plants can also be susceptible to diseases such as root rot or leaf spot. Root rot occurs when the plant is overwatered, leading to the roots becoming waterlogged and eventually rotting. To prevent root rot, ensure that the plant is potted in well-draining soil and avoid overwatering. If root rot has already set in, you may need to repot the plant in fresh, dry soil and trim away any affected roots.
Leaf spot, on the other hand, manifests as brown or black spots on the leaves, often caused by fungal infections. To combat leaf spot, remove the affected leaves and maintain good air circulation around the plant to prevent further spread. Fungicidal sprays may also be used to treat severe cases.
Regularly inspecting your spider plant for signs of pests or diseases and taking immediate action is crucial for its overall health. By identifying the specific issue and applying the appropriate treatment, you can effectively address brown leaves and ensure your spider plant thrives in all its green glory.
9. Solution 6: Ensuring proper air circulation and ventilation
Proper air circulation and ventilation are crucial for the health of your spider plant. When the air becomes stagnant, it can lead to a buildup of moisture and humidity, creating an ideal environment for fungal growth and causing the leaves to turn brown.
To ensure adequate air circulation, there are a few simple steps you can take. First, make sure your spider plant is not placed in a cramped or enclosed space. It should have enough room around it for air to flow freely. Avoid placing it near drafty windows or doors, as this can result in temperature fluctuations that can stress the plant.
If you notice that the air in your home or office is particularly stagnant, consider using fans or opening windows to improve ventilation. This can help to prevent moisture from accumulating around the plant and reduce the risk of fungal infections.
Another effective method to improve air circulation is by gently moving the leaves of your spider plant with your hand. This mimics the natural movement caused by wind, which encourages stronger stems and better airflow throughout the plant.
Additionally, you can place a small fan near your spider plant on a low setting, ensuring that it is not directly blowing on the plant. This gentle breeze will stimulate air movement and prevent stagnant conditions.
Remember to avoid placing your spider plant near air conditioning vents or heating sources, as extreme temperature changes can also lead to brown leaves. By ensuring proper air circulation and ventilation, you can create a healthier environment for your spider plant, reducing the likelihood of brown leaves and promoting its overall vitality.
10. Solution 7: Adjusting the temperature and environment
The environment in which your spider plant thrives plays a crucial role in its overall health and vitality. If you notice brown leaves on your spider plant, it could be an indication that the temperature and environmental conditions need to be adjusted.
Spider plants prefer moderate temperatures between 65-75°F (18-24°C). Extreme temperatures can cause stress to the plant, leading to brown leaves. If your spider plant is exposed to drafts or direct sunlight, it may also result in browning foliage.
To provide the optimal temperature and environment for your spider plant, consider the following solutions:
1. Temperature control: Ensure that the room temperature remains within the recommended range. Avoid placing your spider plant near heating or cooling sources, such as radiators or air conditioning units.
2. Indirect sunlight: Spider plants thrive in bright, indirect light. Avoid placing them in direct sunlight, as it can scorch the leaves and cause browning. Find a well-lit spot that receives filtered sunlight throughout the day.
3. Humidity levels: Spider plants appreciate slightly higher humidity levels. If your home has dry air, consider using a humidifier or placing a tray of water near the plant to increase moisture in the air. This can prevent the leaves from drying out and browning.
4. Proper ventilation: Good airflow is essential for the health of your spider plant. Make sure the area where your plant is located has proper ventilation to prevent stagnant air, which can contribute to leaf browning.
5. Avoid drafts: Spider plants are sensitive to drafts, especially cold ones. Keep your plant away from drafty windows, doors, or air vents.
By adjusting the temperature and providing an optimal environment, you can help your spider plant recover from browning leaves and promote healthier growth. Remember to monitor the changes and give your plant time to adapt to its new conditions. With a little care and attention, your spider plant will thrive and add a touch of greenery to your space once again.
11. Solution 8: Providing appropriate nutrition and fertilization
To keep your spider plant thriving and vibrant, it’s essential to provide it with appropriate nutrition and fertilization. Like any living organism, plants need a balanced diet to grow and flourish. This is especially true for spider plants, as they can be sensitive to nutrient deficiencies, which can manifest as brown leaves.
One way to ensure your spider plant receives the proper nutrients is by using a well-balanced fertilizer. Look for a fertilizer specifically formulated for houseplants or one that is high in nitrogen, phosphorus, and potassium (NPK). These are the primary macronutrients that plants require for healthy growth.
When applying fertilizer to your spider plant, it’s crucial to follow the instructions provided by the manufacturer. Over-fertilizing can lead to burn and damage the plant’s roots. Typically, it’s recommended to dilute the fertilizer in water and apply it every four to six weeks during the growing season (spring and summer). During the dormant season (fall and winter), reduce or halt fertilization as the plant’s growth slows down.
In addition to using a balanced fertilizer, you can also supplement your spider plant’s nutrition through organic methods. Consider using compost or organic matter to enrich the soil. This can provide a steady release of nutrients over time and improve the overall health of your plant.
Remember to keep an eye on your spider plant’s leaves and adjust the fertilization routine accordingly. If you notice browning or yellowing leaves, it may indicate a nutrient deficiency or excess. Adjust the fertilizer amount or frequency accordingly to find the right balance for your plant.
By providing appropriate nutrition and fertilization, you can help your spider plant regain its vitality and prevent further browning of the leaves. Remember to combine this solution with other troubleshooting techniques to address any underlying issues affecting your plant’s health. With a little care and attention, your spider plant will once again showcase its lush, green foliage.
12. Solution 9: Pruning and removing damaged leaves
Pruning and removing damaged leaves is a crucial step in maintaining the health and appearance of your spider plant. Brown leaves can be unsightly and may indicate underlying issues that need to be addressed. By regularly inspecting your plant and taking action to remove damaged foliage, you can promote new growth and ensure the overall vitality of your spider plant.
To begin, carefully examine your spider plant and identify any leaves that have turned completely brown or are severely damaged. These leaves may have been affected by factors such as overwatering, underwatering, nutrient deficiencies, or pest infestations. It’s important to remove these leaves promptly to prevent any potential spread of disease or further damage.
When pruning, make sure to use clean and sharp tools such as pruning shears or scissors. This will minimize the risk of introducing harmful bacteria or causing additional harm to the plant. Cut the damaged leaves as close to the base as possible, without causing any harm to the surrounding healthy foliage.
Once you have removed the damaged leaves, take a moment to assess the overall condition of your spider plant. Consider whether any adjustments need to be made to its care routine, such as adjusting watering frequency or improving nutrient levels. Providing the plant with optimal conditions will help promote healthy growth and prevent future leaf damage.
It’s worth noting that pruning should not be limited to just brown or damaged leaves. Regularly removing any yellowing or wilted leaves can help maintain the plant’s overall appearance and prevent the accumulation of dead foliage. Additionally, removing any excessive growth or leggy stems can encourage a more compact and attractive plant shape.
Remember to dispose of the removed leaves properly, either by composting or placing them in the trash. Avoid leaving them near the plant or in the soil, as they can attract pests or harbor diseases.
By incorporating regular pruning and removing damaged leaves into your spider plant care routine, you can effectively address brown leaves and promote a healthier, more vibrant plant. This simple yet essential solution will contribute to the overall success and enjoyment of your spider plant journey.
13. Solution 10: Overall care and maintenance tips for healthy Spider Plants
To ensure your Spider Plant remains happy and healthy, it’s important to provide proper care and maintenance. Here are some overall tips to keep in mind:
1. Lighting: Spider Plants thrive in bright, indirect light. Place them near a window with filtered sunlight, away from direct sunlight. Too much sun exposure can lead to brown leaves.
2. Watering: Spider Plants prefer slightly moist soil but can be prone to root rot if overwatered. Water the plant thoroughly when the top inch of soil feels dry, and allow excess water to drain away. Avoid letting the plant sit in standing water, as this can also cause brown leaves.
3. Temperature and Humidity: Spider Plants are adaptable to a wide range of temperatures but prefer moderate room temperatures between 60-80°F (15-26°C). They also appreciate a slightly humid environment, so you can mist the leaves occasionally or place a tray of water nearby.
4. Fertilization: Spider Plants don’t require frequent fertilization but benefit from occasional feeding. Use a balanced, water-soluble fertilizer diluted to half strength and apply it once a month during the growing season (spring to summer).
5. Pruning: Regularly remove any brown or yellow leaves to maintain the plant’s aesthetic appeal and prevent the spread of diseases. Use clean and sharp pruning shears to make clean cuts.
6. Proper Potting: Spider Plants prefer to be slightly root-bound, so choose a pot that is just slightly larger than the plant’s root ball. Ensure the pot has drainage holes to prevent waterlogging.
7. Soil: Use a well-draining potting mix that retains moisture without becoming soggy. A mix of peat moss, perlite, and vermiculite or a good-quality commercial potting mix for houseplants will work well.
8. Pest Control: Spider Plants are generally resistant to pests, but occasionally, they may encounter issues with spider mites or mealybugs. Inspect the plant regularly, especially under the leaves, and if you spot any pests, treat them with appropriate organic or chemical insecticides.
9. Repotting: Spider Plants can be repotted every 1-2 years, preferably in spring. This allows for fresh soil and space for new growth. Gently remove the plant from its current pot, loosen the roots, and place it in a new pot with fresh soil.
10. Propagation: Spider Plants are known for their ability to produce offshoots or “spiderettes.” These can be separated from the parent plant and potted individually to create new plants. This not only helps maintain the health of the parent plant but also expands your collection.
By following these care and maintenance tips, you can ensure your Spider Plant remains vibrant and free from brown leaves, allowing it to thrive as a beautiful addition to your indoor garden.
14. Conclusion and final words of advice for Spider Plant owners
In conclusion, owning a Spider Plant can be a rewarding experience, but it is not without its challenges. As we have explored throughout this blog post, brown leaves can be indicative of various issues that need to be addressed promptly. By understanding the potential causes and implementing the appropriate solutions, you can revive your Spider Plant and ensure its continued growth and vitality.
Here are some final words of advice for Spider Plant owners:
1. Regularly inspect your Spider Plant for any signs of stress or damage. This includes checking the leaves for discoloration, brown spots, or wilting.
2. Ensure that your Spider Plant is receiving the right amount of light. While it thrives in bright, indirect light, direct sunlight can scorch its leaves, leading to browning.
3. Maintain a consistent watering schedule. Spider Plants prefer evenly moist soil, but overwatering or underwatering can cause leaf browning. Remember to adjust the watering frequency based on environmental factors like temperature and humidity.
4. Provide adequate humidity levels for your Spider Plant, especially during dry winter months or in environments with low humidity. Misting the leaves or placing a tray of water near the plant can help increase humidity.
5. Avoid exposing your Spider Plant to extreme temperatures or drafts, as these can stress the plant and lead to leaf browning.
6. Regularly dust or clean the leaves of your Spider Plant to ensure optimal light absorption and prevent any buildup of dust or pests.
7. Consider repotting your Spider Plant if it has outgrown its current container. This will provide fresh soil and room for its roots to grow, promoting healthier foliage.
8. Keep your Spider Plant away from any potential sources of toxins or chemicals, such as cleaning products or cigarette smoke, as these can harm the plant and cause leaf browning.
9. If you notice any signs of pest infestation, such as spider mites or mealybugs, take immediate action to eliminate them using appropriate organic or chemical controls.
10. Lastly, don’t get discouraged if your Spider Plant experiences some brown leaves. With patience, care, and the right troubleshooting techniques, you can revive your plant and enjoy its lush, green foliage once again.