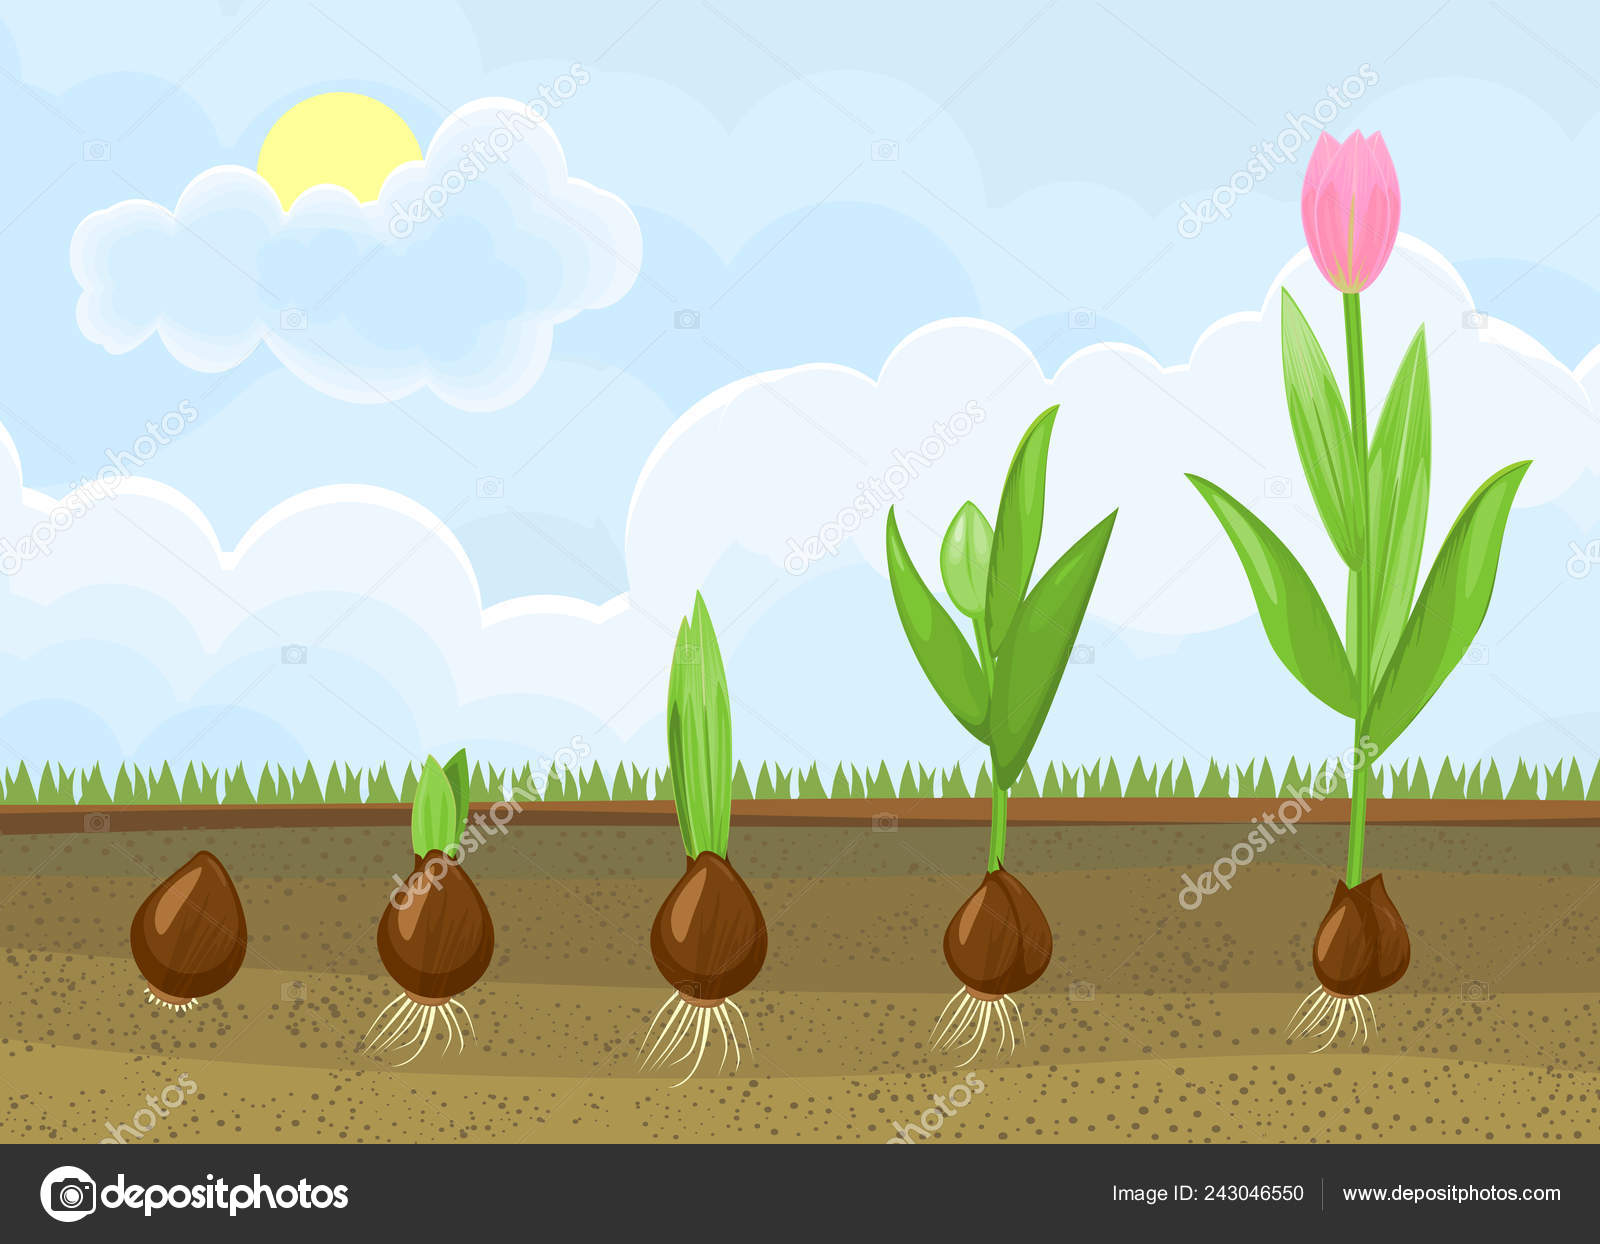
Tulip growth stages can be categorized into four main phases: planting, germination, growth, and flowering. During planting, tulip bulbs are placed in the ground or in containers.
Germination occurs when the bulbs begin to sprout roots and shoots. Growth involves the development of leaves and stems. Finally, the bulbs produce beautiful flowers during the flowering stage. Each stage requires specific care and conditions to ensure successful growth and blooming.
Understanding the growth stages of tulips is essential for effectively nurturing these vibrant spring flowers. Whether you are a gardener or simply appreciate the beauty of tulips, knowing how they progress from bulb to bloom can enhance your enjoyment of these delightful plants. So let’s explore each stage in detail and learn how to cultivate tulips successfully.
Understanding Tulip Bulbs
Tulip Growth Stages
Tulips are one of the most popular and beautiful flowers in the world. From their vibrant colors to their elegant shapes, tulips bring joy and beauty to any garden or bouquet. If you’re thinking about growing tulips, it’s important to understand the growth stages of these plants.
In this blog post, we will explore the anatomy of a tulip bulb, the timing and depth for planting tulip bulbs, and how to choose the right bulbs in terms of varieties, sizes, and quality.
Table of Contents
Anatomy Of A Tulip Bulb
- The tulip bulb consists of several important parts:
- Scales: These are the layers that make up the bulb and provide nutrients for growth.
- Basal plate: The bottom of the bulb where roots emerge.
- Shoot: The growing point of the bulb from which the stem and leaves will develop.
- Tunics: Protective layers that cover the scales of the bulb.
Planting Tulip Bulbs: Timing And Depth
- Timing:
- Tulip bulbs should be planted in the fall, ideally between september and november, before the ground freezes.
- Planting too early may result in premature growth, while planting too late may not allow enough time for root establishment.
- For some colder regions, it may be necessary to use pre-chilled bulbs to simulate winter conditions.
- Depth:
- Tulip bulbs should be planted at a depth of approximately 6-8 inches (15-20 cm).
- The general rule of thumb is to plant bulbs at a depth three times their diameter.
- Planting at the correct depth ensures proper insulation and root development.
Choosing The Right Bulbs: Varieties, Sizes, And Quality
- Varieties:
- Tulips come in various varieties, each with its own unique colors, shapes, and heights.
- Some popular tulip varieties include single early, double early, triumph, parrot, and fringed tulips.
- Consider the bloom time and color palette when selecting tulip varieties.
- Sizes:
- Tulip bulbs are available in different sizes, ranging from small to large.
- Larger bulbs tend to produce bigger and stronger flowers.
- Smaller bulbs are better suited for naturalizing or mass planting.
- Quality:
- Choose bulbs that are firm and free from blemishes or mold.
- Look for healthy and well-developed shoots or roots.
- Avoid bulbs that feel soft or light, as they may be of lower quality.
Now that you understand the anatomy of a tulip bulb, the timing and depth for planting tulip bulbs, and how to choose the right bulbs, you’re ready to embark on your tulip-growing journey. Remember to follow the recommended guidelines for optimal growth and enjoyment of these stunning flowers.
Happy gardening!
Germination And Growth
Tulips are beautiful flowers that go through various stages of growth before they bloom into colorful petals. Understanding the growth process of tulips can help you cultivate them successfully. In this section, we will explore the first phase of tulip growth, known as germination, and the factors that influence this important stage.
The Germination Process: From Root Formation To Shoot Emergence
During germination, tulip seeds start their transformation into plants, eventually emerging as shoots from the soil. This process involves several key steps:
- Seed imbibition: The first step in germination is the absorption of water by the tulip seed. As the seed takes in water, it swells, softening the seed coat and triggering the activation of enzymes within.
- Root formation: As the seed absorbs water, the embryo within starts to grow. A small root emerges from the seed, branching out and anchoring the plant into the soil. This root enables the seedling to absorb nutrients from the ground.
- Shoot emergence: Simultaneously with root growth, the shoot starts pushing its way towards the surface. It elongates and begins to break through the soil, eventually revealing the first pair of leaves known as cotyledons.
The Role Of Temperature And Moisture In Germination
The successful germination of tulips heavily relies on optimal temperature and moisture conditions. Here’s how these factors come into play:
- Temperature: Tulips require a certain range of temperatures for germination to occur. Generally, cool temperatures are preferred for tulip seed germination, typically around 55-65°f (13-18°c). Cooler temperatures stimulate the enzymatic activity necessary for seed growth, while extreme heat can hinder germination.
- Moisture: Adequate moisture is crucial for seed imbibition and subsequent germination. Tulip seeds need consistent moisture levels to soften the seed coat and initiate growth. However, excessive moisture can lead to rotting, so it’s important to strike the right balance. Regular watering during the germination period is key.
Providing Optimal Conditions For Growth: Light Requirements And Soil Quality
Besides temperature and moisture, providing optimal conditions for tulip growth entails addressing light requirements and soil quality. Consider the following factors:
- Light requirements: Tulips thrive in full sun. Place them in an area where they can receive at least 6 hours of direct sunlight per day. Insufficient light can result in weak and floppy stems, as well as poor flower production.
- Soil quality: Tulips prefer well-draining soil with a slightly acidic to neutral ph level. Amend heavy clay soils with organic matter to improve drainage. Good soil structure allows roots to penetrate easily and prevents waterlogging, which could hinder the growth process.
Understanding the germination process and the factors influencing it, such as temperature, moisture, light, and soil conditions, will help you provide the best environment for your tulips to grow and flourish. By following these guidelines, you can increase the chances of successful germination and enjoy the beauty of vibrant tulip blossoms in your garden.
Leaf Development And Vegetative Growth
The Emergence Of True Leaves: From Cotyledons To Adult Foliage
The growth of tulips involves several distinct stages, including leaf development and vegetative growth. Understanding these stages is essential for proper care and maintenance of tulip plants. In this section, we will focus on the emergence of true leaves and the transformation from cotyledons to adult foliage.
- Tulips begin their journey with the emergence of cotyledons, which are the first two leaves that appear above the ground. These initial leaves serve as a temporary source of nutrition for the plant until the true leaves develop.
- As the plant continues to grow, the true leaves gradually emerge. These leaves have a distinct shape and structure, differing from the cotyledons. The transformation from cotyledons to true leaves signifies an important milestone in the tulip’s growth.
- The true leaves of tulips play a crucial role in the plant’s ability to photosynthesize. Photosynthesis is a process in which plants convert sunlight into energy, enabling them to produce their food. The leaves contain chlorophyll, a pigment that captures light energy necessary for photosynthesis.
Photosynthesis And Energy Production In Tulips
Photosynthesis is a complex and crucial process in the life of tulips. Here are some key points regarding this process and energy production in tulips:
- During photosynthesis, tulips absorb sunlight through their leaves and convert it into chemical energy in the form of glucose.
- Glucose serves as a primary source of energy for the tulip plant to carry out various metabolic activities.
- The byproduct of photosynthesis is oxygen, which is released into the atmosphere, contributing to the oxygen balance in the surroundings.
Maintaining Healthy Vegetative Growth: Watering And Fertilization
Once the true leaves have emerged, it is vital to optimize the conditions for healthy vegetative growth. Adequate watering and fertilization are key factors to consider:
- Watering: Tulips require consistent, but not excessive, moisture to thrive. Overwatering can lead to root rot, while underwatering can hinder growth. It is crucial to water the plants when the top inch of soil feels dry. Deep watering promotes strong root development and efficient nutrient absorption.
- Fertilization: Providing the right nutrients is essential for promoting healthy vegetative growth in tulips. Choose a balanced fertilizer with a higher nitrogen content to encourage leaf development. Apply the fertilizer according to the instructions, ensuring a uniform distribution around the plants. Remember to water the plants after fertilization to aid nutrient absorption.
- Regular maintenance practices, such as removing weeds and monitoring for pests, also contribute to maintaining healthy vegetative growth in tulips.
By understanding the emergence of true leaves, the importance of photosynthesis, and practicing proper care techniques, you can ensure healthy leaf development and encourage robust vegetative growth in your tulip plants.
Flowering And Reproduction
Tulip Growth Stages: Flowering And Reproduction
Tulips are one of the most beloved and iconic flowers, known for their vibrant colors and graceful blooms. In this section, we will explore the fascinating journey of a tulip as it goes through its flowering and reproduction stages. From bud formation to understanding pollination, let’s delve into the intricate world of tulip growth.
Bud Formation And Differentiation: Preparing For Blooming
- The journey of a tulip begins with the formation of buds, small and tightly closed structures that hold the promise of a beautiful bloom.
- Buds go through a process called differentiation, where they begin to take on specific roles and structures in preparation for blooming.
- During bud formation, the tulip plant carefully allocates resources to different parts of the flower, ensuring that each component has what it needs to develop fully.
- As the buds continue to grow, they gradually differentiate into petals, stamens, and pistils, each playing a crucial role in the tulip’s reproduction process.
Tulip Flower Anatomy: Petals, Stamens, And Pistils
- Petals: These are the colorful, leaf-like structures that surround the center of the tulip flower. They come in a stunning array of hues, from vibrant reds and yellows to delicate pinks and purples. The petals serve to attract pollinators, such as bees, with their vibrant colors and enticing fragrance.
- Stamens: These are the male reproductive organs of the tulip flower. Each stamen consists of a slender filament topped with an anther that contains pollen grains. When the tulip is ready for pollination, these stamens release pollen to fertilize the ovules.
- Pistils: The pistil is the female reproductive organ of the tulip flower. It consists of three main parts: the stigma, style, and ovary. The stigma is located at the top of the pistil and is responsible for receiving the pollen grains. The style connects the stigma to the ovary, where the fertilized ovules develop into tulip seeds.
Understanding Pollination: Bees, Wind, And Cross-Pollination
- Bees: Bees play a vital role in the pollination of tulips. As they collect nectar from the tulip flower, pollen grains stick to their hairy bodies. When they visit another tulip, the pollen from their bodies is transferred to the new flower, enabling fertilization and seed development.
- Wind: While bees are essential for tulip pollination, wind also plays a significant role, especially in wild tulip populations. As the wind blows, it carries pollen from one tulip to another, facilitating cross-pollination. The lightweight and dry nature of tulip pollen make it highly suitable for wind dispersal.
- Cross-pollination: Tulips possess both male and female reproductive organs, allowing them to self-pollinate. However, cross-pollination between different tulip plants leads to greater genetic diversity and contributes to the creation of new tulip varieties.
Tulips, with their exceptional beauty and intricate reproductive processes, continue to captivate and inspire us. From bud formation to the interplay of petals, stamens, and pistils, these fascinating growth stages invite us to appreciate the wonders of nature’s design. So, the next time you encounter a blooming tulip, take a moment to marvel at the intricate journey it has taken to reach that point.
Post-Flowering Care And Bulb Maturation
Post-flowering care plays a crucial role in ensuring the overall health and vitality of tulips, as well as maximizing bulb development for the following year’s blooms. Once the tulip flowers have faded and withered, it’s important to provide the necessary aftercare to support bulb maturation.
Here are some essential tips and tricks to extend the lifespan of cut tulips, preserve their beauty, and encourage bulb ripening:
Extending The Lifespan Of Cut Tulips: Tips And Tricks
- Start by trimming the stems of the cut tulips at an angle before placing them in a vase filled with fresh water. This helps to improve water uptake.
- Add flower food or a small amount of sugar to the water, as it provides nutrients for the tulips and helps to extend their vase life.
- Keep the vase of tulips away from direct sunlight, drafts, and fruit, as these factors can accelerate wilting.
- Change the water every two days, trimming the stems each time to prevent the buildup of bacteria and to promote water uptake.
- Remove any wilted or decaying flowers promptly to prevent the spread of disease and to maintain the attractiveness of the arrangement.
Seed Production And Collecting Tulip Seeds
- Tulips can produce seeds through both sexual (cross-pollination) and asexual (bulb offsets) reproduction methods.
- Cross-pollination occurs when bees or other pollinators transfer pollen from the stamens of one tulip flower to the stigma of another. This results in the formation of seeds.
- To collect tulip seeds, allow the flowers to wither naturally on the plant, keeping an eye on the flower heads as they turn brown and the seed pods start to mature.
- Once the seed pods are dry and crack open, carefully collect the seeds and store them in a cool and dry place.
- It’s important to note that tulip seeds may take several years to mature into blooming-sized bulbs, so patience is key when growing tulips from seeds.
Allowing Bulbs To Ripen: Aftercare For Successful Naturalization
- After the tulip flowers have withered, resist the temptation to remove the foliage immediately. The green leaves play a crucial role in storing energy reserves in the bulb for future growth.
- Allow the foliage to naturally turn yellow and wither completely before removing it. This typically takes around 6-8 weeks.
- During this period, it’s important to continue watering the bulbs regularly, especially in dry weather conditions, as they are still actively growing and absorbing nutrients.
- Once the foliage has completely withered, carefully lift the bulbs, clean off any soil, and allow them to dry in a well-ventilated location for a few days.
- After drying, store the bulbs in a cool and dry place until the next planting season, ensuring they are kept separate from fruits and vegetables.
By following these post-flowering care practices and allowing bulbs to ripen naturally, you can promote the long-term health and vitality of your tulips. Whether you’re extending the lifespan of cut tulips, collecting seeds for propagation, or preparing bulbs for successful naturalization, proper aftercare is key to maintaining the beauty and vigor of these enchanting spring blooms.
Common Issues And Pests
Tulip growth stages:
Tulips are beautiful and vibrant flowers that go through several growth stages before blooming. Understanding these growth stages is essential for successfully growing and caring for tulips. However, like any plant, tulips can encounter various common issues, pests, and diseases that may hinder their growth.
In this section, we will explore some of the common issues and pests that tulips face and provide helpful tips for identifying, treating, and preventing them to ensure the long-term health of your tulip bulbs.
Identifying And Treating Tulip Diseases: Fungal And Bacterial Infections
Tulips are susceptible to several diseases, including fungal and bacterial infections. These diseases can significantly affect the health and appearance of your tulip plants. Here are some key points to keep in mind when dealing with tulip diseases:
- Fungal infections:
- Gray mold: Gray mold appears as a fuzzy gray growth on the leaves and petals of tulip plants. To treat gray mold, promptly remove infected parts of the plant and ensure good air circulation around the tulips. Applying a fungicide may also help control the spread of the disease.
- Tulip fire: Tulip fire is a fungal disease that causes foliage to turn brown or black, while the flowers become stunted or deformed. Infected plants should be immediately removed, and the surrounding area should be treated with a fungicide to prevent further spread.
- Bacterial infections:
- Soft rot: Soft rot is a bacterial infection that causes mushy, foul-smelling tulip bulbs. It is crucial to maintain proper planting depth and avoid overwatering to prevent soft rot. Infected bulbs should be discarded immediately to prevent the spread of the bacteria.
Dealing With Pests And Critters: Aphids, Slugs, And Squirrels
Alongside diseases, tulips can also attract various pests and critters that feed on their foliage or bulbs. It is important to be vigilant and take necessary measures to keep these garden intruders at bay. Here’s what you need to know about some common tulip pests:
- Aphids:
- Aphids are tiny insects that suck the sap from tulip plants, causing stunted growth and distorted leaves. To control aphids, you can use insecticidal soaps or neem oil, or introduce beneficial predators like ladybugs to your garden.
- Slugs:
- Slugs can devour tender tulip leaves, leaving behind irregular holes and slime trails. To deter slugs, try using barriers such as copper tape around your tulips or apply organic slug repellents like iron phosphate pellets.
- Squirrels:
- Squirrels have a notorious fondness for tulip bulbs and may dig them up or nibble on them. To protect your bulbs from squirrels, consider using wire mesh or planting tulips in containers with secure lids. Alternatively, you can try using squirrel repellents or plant tulip varieties that are less appealing to these critters.
Preventing Bulb Rot And Ensuring Long-Term Health
Tulip bulbs are prone to rotting, which can hinder their growth and overall health. Preventing bulb rot is crucial for the long-term success of your tulip garden. Here are some key points to consider:
- Proper drainage: Ensure that the soil has good drainage to prevent excess moisture around the bulbs, which can lead to rot. Avoid planting tulips in areas prone to waterlogging.
- Location and sunlight: Choose a planting location that receives ample sunlight and is well-ventilated. This helps reduce humidity and promotes healthy bulb development.
- Planting depth: Plant tulip bulbs at the recommended depth to protect them from extreme temperature fluctuations and prevent rot. Follow the specific planting instructions for each tulip variety.
- Soil preparation: Prepare the soil by adding organic matter to improve its structure and drainage. Avoid using overly compacted soil, as it can retain excess moisture around the bulbs.
By being aware of common issues and pests, identifying diseases, and taking preventative measures, you can ensure the long-term health and successful growth of your tulips. Remember to regularly inspect your plants and take appropriate actions to address any concerns promptly.
With proper care, your tulips will flourish and bring joy with their vibrant blooms.
Harvesting And Storing Tulip Bulbs
Tulip Growth Stages
Tulips are beautiful flowers that go through various growth stages before they can be harvested and stored. In this section, we will focus on the important aspects of harvesting and storing tulip bulbs. Read on to learn more!
When To Harvest Tulip Bulbs: Signs Of Maturation
Before harvesting tulip bulbs, it’s essential to ensure they have reached the appropriate level of maturity. Pay attention to the following signs to determine when it’s time to harvest your tulip bulbs:
- Faded petals: Once the flowers have finished blooming, the petals will begin to fade and wilt. This indicates that the plant has completed its flowering stage and is entering the bulb maturation phase.
- Yellowing foliage: As the bulb matures, you’ll notice the leaves starting to yellow and wither. This is an indication that the energy from the foliage has transferred to the bulb, making it ready for harvesting.
- Soft stems: When the stems of the tulip plant start to feel soft and hollow, it signifies that the bulb has absorbed enough nutrients and is prepared to be dug up.
Keep these signs in mind to ensure you harvest your tulip bulbs at the optimal time, guaranteeing successful yields for future plantings.
Proper Drying And Curing Techniques
Once the tulip bulbs have been harvested, they require proper drying and curing techniques to ensure their longevity. Here are some guidelines to follow for drying and curing tulip bulbs:
- Air-drying: Lay the harvested bulbs on a flat surface in a well-ventilated area. Avoid direct sunlight, as it can damage the bulbs. Allow them to dry naturally for around a week or until the outer skins become papery and dry.
- Bulb cleaning: After drying, gently remove any excess soil from the bulbs. Be careful not to damage the protective skin covering the bulbs.
- Curing: To promote further drying and prevent fungal growth, you can place the dried bulbs in a mesh bag or crate and store them in a cool, dry location with good air circulation. This curing process typically takes two to three weeks.
By following these drying and curing techniques, you can ensure that your tulip bulbs remain healthy and ready for future planting.
Storing Bulbs For Future Planting: Temperature And Humidity Considerations
Properly storing tulip bulbs is crucial for their long-term viability. Pay attention to the following temperature and humidity considerations when storing your bulbs for future planting:
- Temperature: Tulip bulbs are best stored in a cool environment with temperatures between 35°f and 45°f (2°c to 7°c). Avoid storing them in areas that are prone to extreme temperature fluctuations.
- Humidity: Bulbs should be stored in a dry environment with humidity levels around 60-70%. Excessive moisture can lead to mold or rotting, while low humidity can cause shriveling.
To maintain these ideal storage conditions, you can store your bulbs in a mesh bag, paper bag, or even layer them with sawdust or vermiculite in a breathable container. Remember to regularly inspect your stored bulbs for any signs of damage or disease.
By adhering to the recommended temperature and humidity considerations, you can preserve the quality of your tulip bulbs and look forward to successful planting seasons in the future.
That’s it for the essential information on harvesting and storing tulip bulbs. With these guidelines in mind, you can successfully navigate the later stages of tulip growth and ensure healthy, vibrant blooms for years to come. Happy gardening!
Frequently Asked Questions For Tulip Growth Stages
What Are The Different Stages Of Tulip Growth?
Tulips go through four main stages of growth: bulb planting, sprouting, flowering, and dormancy. Each stage has specific requirements and characteristics, resulting in the stunning and vibrant tulip blooms we love.
How Long Does It Take For A Tulip To Grow?
The growth period for tulips can vary depending on various factors such as the variety and growing conditions. On average, tulips take about 8 to 12 weeks to fully grow and bloom from the time they are planted as bulbs.
What Is The Best Time To Plant Tulip Bulbs?
Tulip bulbs are best planted in the fall, around late september to early november, before the ground freezes. This allows the bulbs enough time to establish roots before the onset of winter and ensures beautiful blooms in spring.
Conclusion
Understanding the growth stages of tulips is essential for both gardening enthusiasts and professionals. By being aware of these stages – from bulb planting to blooming – one can ensure optimal care for their tulips and promote healthy growth. Remember to choose high-quality bulbs during planting, providing them with adequate sunlight, water, and nutrients.
Recognize the signs of each growth stage, such as the emergence of shoots, the development of buds, and the eventual blooming of the flowers. Regularly monitor and adjust temperature and watering to maintain ideal conditions. By following these steps, you can enjoy the beauty and vibrancy of tulips throughout their growth cycle.
So, don’t miss the opportunity to witness nature’s wonders firsthand and create a stunning display in your garden. Happy gardening!