The leaves of your orchid may be turning yellow due to various reasons. Identifying and addressing these issues promptly is essential for the plant’s health and vitality.
Some possible causes include overwatering, inadequate lighting, nutrient deficiencies, pests, and diseases. Properly adjusting watering habits, ensuring suitable light levels, providing balanced nutrition, and taking necessary pest control measures are some of the effective ways to fix this problem.
Understanding Orchid Leaf Yellowing
Significance Of Yellowing Leaves In Orchids
Orchid leaves turning yellow can be a sign of underlying issues that need attention. As a plant enthusiast, it’s important to understand the significance of this color change in your orchids. The leaves serve as an indicator of the plant’s overall health, so it’s crucial to pay attention to their condition.
Let’s explore the reasons why orchid leaves might turn yellow and how to address this problem effectively.
Common Causes For Orchid Leaf Yellowing
There are several factors that can contribute to orchid leaf yellowing. Identifying the potential causes will help you address the issue promptly and provide appropriate care for your beloved orchids. Here are some common triggers:
Table of Contents
- Overwatering: Excessive moisture can lead to root rot, where the roots are unable to absorb nutrients properly, causing the leaves to turn yellow.
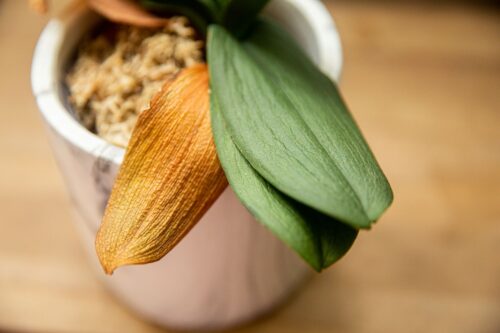
- Underwatering: Conversely, if the orchid isn’t receiving enough water, the leaves may start to yellow and become wrinkled.
- Nutrient deficiency: Orchids require a specific balance of nutrients. Insufficient or imbalanced nutrition can result in yellowing leaves.
- Excessive sunlight: Orchids thrive in indirect or filtered light. Direct sunlight can scorch the leaves, causing them to turn yellow.
- Temperature fluctuations: Drastic temperature changes, whether too hot or too cold, can stress orchids and lead to leaf yellowing.
- Pests and diseases: Insects such as spider mites, aphids, or fungal infections can cause damage to orchid leaves, causing them to yellow and wither.
- Improper potting media: Using the wrong potting mix or failing to repot regularly can hinder root health, resulting in yellowing leaves.
- Ethylene exposure: Orchids are sensitive to ethylene gas emitted by fruits, which can accelerate aging and yellowing of leaves.
- Poor air circulation: Insufficient airflow can create a humid environment that promotes fungal growth, leading to leaf discoloration.
- Natural aging: As orchids age, it’s normal for the lower leaves to yellow and wither. However, new growth should remain healthy.
Also Read : How to Grow And Care for Orchid Flowers
Importance Of Diagnosing The Issue Accurately
Detecting the underlying cause of orchid leaf yellowing is crucial in providing the right care and preventing further damage. It’s not enough to simply observe the yellowing leaves; accurate diagnosis is key to effective treatment. Misdiagnosing the problem may result in ineffective solutions and further stress to the plant.
By identifying the root cause, you’ll be able to implement targeted actions to restore your orchid’s health and vibrant foliage.
Remember, understanding the significance of yellowing leaves, recognizing common causes, and accurately diagnosing the issue are all essential in maintaining thriving orchids. By addressing the underlying problems promptly and providing appropriate care, you can restore your orchids to their natural beauty and keep them healthy for years to come.
Lack Of Sufficient Light
Effects Of Inadequate Light On Orchid Leaves
Orchids are known for their beautiful flowers, but their leaves also play a crucial role in their overall health and appearance. When orchid leaves start turning yellow, it can be a sign of various issues. One of the common reasons behind yellowing leaves is the lack of sufficient light.
Here are some effects inadequate light can have on orchid leaves:
- Stunted growth: Insufficient light can hinder the growth of orchid leaves. Without enough light, the process of photosynthesis, which converts light energy into chemical energy, is limited. As a result, the leaves may not grow to their full potential.
- Pale leaves: Orchid leaves are naturally vibrant green. However, lack of light can cause them to become pale or yellowish in color. This happens because chlorophyll, the pigment responsible for green coloration, is not produced in adequate amounts without proper light exposure.
- Weakened immune system: Orchid leaves need an adequate amount of light to produce the energy required for maintaining a healthy immune system. When they don’t receive enough light, their immune system weakens, making them more susceptible to diseases and pests.
Indicators Of Insufficient Light Levels
Identifying whether your orchid is experiencing insufficient light levels can help you take timely action to restore its health. Here are some indicators to look out for:
- Yellowing leaves: One of the most obvious signs of insufficient light is the yellowing of orchid leaves. If the yellowing occurs primarily at the lower part of the plant, it is likely due to insufficient light reaching those areas.
- Stretching stems: If your orchid’s stems start to stretch or elongate, it is a clear indication that it is reaching out for more light. This phenomenon, known as etiolation, happens when the plant is trying to maximize its light absorption.
- Lack of flowering: Orchids require a certain level of light to initiate and maintain their blooming cycle. If your orchid is not producing flowers or blooming less frequently, it could be due to insufficient light.
Also Read : Droopy Orchid Leaves – 12 Reasons & How to Revive Your Plant
Remedies For Improving Light Conditions
Improving the light conditions for your orchid is essential for its overall health and to prevent further yellowing of the leaves. Here are some effective remedies you can adopt:
- Adjusting placement: Find a suitable location for your orchid where it can receive bright, indirect light for at least 10-12 hours a day. East or west-facing windows are usually good options. Avoid placing your orchid in direct sunlight as it can lead to leaf burn.
- Supplemental lighting: If natural light is not sufficient, you can supplement it with artificial lighting. Led grow lights are an excellent option as they emit the specific spectrum of light needed for photosynthesis. Position the lights above the orchid at a suitable distance to provide adequate coverage.
- Rotate the plant: Regularly rotating your orchid plant can ensure that all sides receive an equal amount of light. This helps prevent uneven growth and yellowing of leaves due to inadequate light exposure.
- Prune and repot: If your orchid has severely yellowed leaves that are unlikely to recover, consider pruning them to redirect energy to healthier parts of the plant. Additionally, repotting your orchid in fresh, well-draining potting medium can stimulate new growth.
By addressing the lack of sufficient light and implementing these remedies, you can help your orchid regain its health and beauty. Remember to monitor the plant closely and make adjustments as needed to ensure it receives the optimal amount of light for its thriving growth.
Also Read : Discover the Top 10 Best Potting Mix for Orchids to Thrive
Overwatering And Poor Drainage
Impact Of Overwatering On Orchid Leaves

Overwatering and poor drainage can have a detrimental impact on the health of your orchid leaves. When orchids receive too much water and have inadequate drainage, their leaves can start turning yellow. This is because the excess moisture leads to root rot, which affects the plant’s ability to absorb nutrients properly.
The lack of oxygen in the root zone further exacerbates the problem, resulting in the yellowing of the leaves.
Signs Of Overwatering And Poor Drainage
Identifying the signs of overwatering and poor drainage is crucial in preventing further damage to your orchid. Keep an eye out for the following indicators:
- Yellowing leaves: Excessive watering can cause the leaves to turn yellow, often starting from the bottom and progressing upwards.
- Soft and mushy roots: Overwatered orchids will develop roots that are squishy or rotten.
- Foul smell: If you notice a pungent odor coming from your orchid’s potting media, it could be a sign of root rot caused by overwatering.
- Wilting or drooping foliage: Overwatering can lead to waterlogged roots, causing the leaves to become floppy and wilted.
Techniques To Prevent Overwatering And Improve Drainage
Preventing overwatering and enhancing the drainage of your orchid’s growing medium is crucial for maintaining its health. Consider the following techniques:
- Use well-draining potting mix: Orchids require a mix that allows excess water to flow freely, such as a combination of bark, sphagnum moss, and perlite.
- Choose suitable pots: Opt for pots with multiple drainage holes to ensure water doesn’t accumulate at the bottom.
- Watering frequency: Allow the potting mix to dry out slightly before watering your orchid again. Stick your finger about an inch into the soil to check for moisture.
- Adjust watering volume: When watering, drench the potting mix thoroughly, ensuring water flows through the drainage holes.
- Elevate the pot: Placing your orchid on a tray or using pot feet can help enhance airflow and prevent water from stagnating at the bottom.
- Consider the humidity levels: Be mindful of the humidity around your plant. High humidity can exacerbate moisture-related issues.
- Monitor temperature and light: Proper lighting and temperature conditions can also affect the water requirements of your orchid.
By implementing these techniques, you can prevent overwatering and improve drainage, ultimately promoting the healthy growth of your orchid and preventing the yellowing of its leaves. Remember, striking the right balance between watering and drainage is key to keeping your orchid thriving.
Also Read : Orchid Leaves Turning Brown: Discover the Simple Solutions
Inadequate Air Circulation
Relationship Between Airflow And Orchid Leaf Health
Insufficient air circulation can have a significant impact on the health of your orchid leaves. Orchids, being tropical plants, thrive in environments with good airflow as it mimics their natural habitat. Here’s what you need to know about the relationship between airflow and orchid leaf health:
- Proper air circulation helps to prevent the buildup of excess moisture around the orchids, reducing the risk of fungal and bacterial infections that can lead to yellowing leaves.
- Adequate airflow aids in the transpiration process, allowing the orchid leaves to release moisture efficiently. Without proper airflow, excess moisture can become trapped, causing the leaves to wilt and turn yellow.
- If the orchid leaves do not receive sufficient airflow, it can also hinder the process of gas exchange, preventing the absorption of carbon dioxide and release of oxygen. This can impact the overall health of the plant.
Symptoms Of Insufficient Air Circulation
Identifying the signs of inadequate air circulation is crucial in addressing the issue promptly. Keep an eye out for the following symptoms:
- Yellowing leaves: One of the most common signs of insufficient airflow is yellowing leaves. This occurs due to the accumulation of excess moisture and the lack of oxygen reaching the leaves.
- Wilting or drooping leaves: When orchids are deprived of proper air circulation, their leaves may start to wilt or droop. This is a result of the buildup of excess moisture, causing the leaves to become limp and lose their turgidity.
- Leaf spots or blemishes: Insufficient airflow can create a favorable environment for the growth of fungal and bacterial infections. These may manifest as dark spots or blemishes on the leaves.
Measures To Enhance Airflow Around Orchids
To improve air circulation around your orchids and prevent yellowing leaves, consider implementing the following measures:
- Strategic placement: Position your orchids in areas with good ventilation, such as near open windows or fans. This will help to keep the air movement consistent and prevent stagnation.
- Use oscillating fans: Placing an oscillating fan near your orchids can aid in air circulation. Set it to a gentle speed and ensure it is not directly blowing on the plants to avoid dehydration.
- Increase spacing: If you have multiple orchids, make sure to provide adequate space between them. This allows air to flow freely between the plants, reducing the risk of moisture buildup.
- Humidity trays: Placing orchids on humidity trays with pebbles and water can help create a microclimate of increased humidity without compromising air circulation. This can be particularly beneficial in dry environments.
- Regular pruning: Trim any overcrowded foliage to improve airflow within the orchid plant. This will help prevent leaves from obstructing each other’s access to light and air.
By addressing inadequate airflow around your orchids, you can maintain the health and vitality of their leaves. Remember, healthy leaves contribute to the overall well-being of your orchids and promote optimal growth and blooming.
Improper Watering Techniques
Importance Of Proper Watering Techniques For Orchids
Improper watering techniques can have a significant impact on the health of your orchid leaves. It is crucial to understand the importance of watering your orchids correctly to ensure their well-being. Here are a few key points to keep in mind:
- Maintaining the right moisture balance: Orchids require a delicate balance of moisture to thrive. Proper watering techniques help maintain the ideal moisture level in the potting medium, allowing the roots to absorb water effectively.
- Preventing root rot: Overwatering can lead to root rot, a serious condition that damages the roots and prevents them from absorbing nutrients properly. By watering your orchids correctly, you can prevent root rot and keep your plants healthy.
- Promoting healthy growth: Adequate watering not only keeps the leaves hydrated but also encourages healthy growth. Water is essential for photosynthesis, a process that enables plants to produce energy and oxygen. Proper watering techniques support this crucial process, allowing your orchids to grow and flourish.
Effects Of Underwatering And Irregular Watering On Leaves
Improper watering techniques, such as underwatering or irregular watering, can cause visible changes in your orchid leaves. Here are some effects you may observe:
- Yellowing leaves: Underwatering deprives the leaves of sufficient moisture, causing them to turn yellow. This is a sign that your orchid is experiencing water stress and requires more hydration.
- Wrinkled or shriveled leaves: When a plant does not receive enough water, its leaves may appear wrinkled or shriveled. This is a clear indicator that your orchid is not getting the required moisture, and immediate action is needed.
- Leaf drop: Irregular watering can lead to leaf drop, where the leaves of your orchid start falling off prematurely. This can weaken the overall health of the plant and hinder its ability to produce beautiful flowers.
Correct Watering Methods To Maintain Leaf Health
To maintain the health and vibrancy of your orchid leaves, it is essential to follow correct watering methods. Here are a few tips to ensure proper watering:
- Observe the potting medium: Before watering, check the potting medium to determine if it is dry. Stick your finger about an inch into the soil, and if it feels dry at that depth, it’s time to water your orchid.
- Water deeply: When watering, make sure to thoroughly saturate the potting medium. Allow water to flow through the drainage holes, ensuring the roots receive enough hydration. However, avoid leaving the orchid sitting in standing water, as it can lead to root rot.
- Establish a watering routine: Orchids generally prefer a consistent watering routine. Depending on the specific orchid species, you may need to water once every week or every two weeks. Find a routine that works best for your orchid’s needs and stick to it.
- Consider humidity levels: Orchids thrive in environments with moderate humidity. If your home is particularly dry, you can increase humidity around the plant by using a humidifier or placing a water-filled tray nearby. This helps prevent the leaves from drying out.
By paying attention to proper watering techniques, you can maintain the health and beauty of your orchid’s leaves. Remember, an adequately hydrated orchid is a happy orchid.
Now you have the knowledge and tips to prevent yellowing orchid leaves caused by improper watering techniques. Stay tuned for the other reasons and fixes in our upcoming blog posts, as we unravel the fascinating world of orchid care.
Nutrient Deficiencies And Imbalances
Impact Of Nutrient Deficiencies On Orchid Leaves
When it comes to the health of your orchids, maintaining the right balance of nutrients is crucial. Nutrient deficiencies and imbalances can manifest through various symptoms, including yellowing leaves. To better understand the impact of nutrient deficiencies on orchid leaves, let’s delve into the key points:
- Orchid leaves are a reflection of their overall health, and any nutrient deficiencies can directly affect their appearance.
- Yellowing leaves are typically a sign of nutrient deficiencies, as the lack of essential minerals hinders the plant’s ability to carry out crucial processes.
- Deficiencies in key nutrients such as nitrogen, phosphorus, potassium, iron, magnesium, and calcium can lead to yellowing leaves and overall poor growth.
- Inadequate nitrogen levels can cause leaves to turn uniformly yellow, while deficiencies in phosphorus and potassium can result in yellowing at leaf margins or tips.
- A lack of iron may lead to interveinal chlorosis, with yellowing occurring between the leaf veins.
- Deficiencies in magnesium and calcium can also cause yellowing, but they tend to affect older leaves first.
Identifying Common Nutrient Deficiencies
Detecting nutrient deficiencies in orchids may seem challenging, but with a keen eye, you can spot the signs. Here’s what to look out for:
- Nitrogen deficiency:
- Yellowing of older leaves from the base upward
- Reduced plant growth and smaller leaves
- Phosphorus deficiency:
- Dark green foliage but with purple or reddish pigmentation
- Stunted growth and delayed flowering
- Potassium deficiency:
- Yellowing on leaf margins or tips
- Weak stems and reduced flower production
- Iron deficiency:
- Interveinal chlorosis, with yellowing between the veins
- Decreased growth and weakened roots
- Magnesium deficiency:
- Yellowing between the veins while the veins remain green
- Reduced growth and deformed leaves
- Calcium deficiency:
- Young leaves may display distorted growth or necrotic areas
- Stunted plant growth and blossom-end rot
Balancing Fertilizer Applications For Optimal Leaf Health
Maintaining a proper fertilizer application routine is vital for promoting optimal leaf health in your orchids. Consider the following factors:
- Understand your orchid’s specific nutrient requirements, as different species may have varying needs.
- Use a balanced orchid fertilizer formulated with the right ratio of nitrogen, phosphorus, and potassium (e.g., 20-20-20 or 20-10-10).
- Fertilize your orchids regularly during the active growth period, typically every two weeks, but adjust according to specific plant and fertilizer instructions.
- Avoid over-fertilization, as this can lead to nutrient imbalances and toxicities, causing additional harm to your orchid.
- Implement a thorough watering routine to flush out excess salts from the growing medium, preventing nutrient buildup.
- Monitor your orchid’s response to the fertilizer and make adjustments accordingly to maintain healthy foliage.
Remember, a well-nourished orchid will display vibrant and lush leaves, so investing time in understanding and addressing nutrient deficiencies is crucial for their overall health and beauty.
Pests And Diseases
*orchids are beautiful and delicate plants that require proper care to thrive. If you’ve noticed that your orchid leaves are turning yellow, it’s essential to identify the underlying cause so you can take appropriate action. Pests and diseases are common culprits behind yellowing orchid leaves, but don’t fret! In this section, we’ll delve into the different pests that affect orchid leaves, how to recognize symptoms of pest infestations, and effective treatments for pests and diseases.
*
Common Pests Affecting Orchid Leaves
Some of the most common pests that can wreak havoc on your orchid leaves include:
- Aphids: These small, soft-bodied insects feed on plant sap and can cause yellowing, curling, and distortion of orchid leaves.
- Spider mites: These tiny arachnids leave fine webbing on orchid leaves and cause yellow spots or stippling, eventually leading to leaf yellowing and death.
- Scale insects: These pests attach themselves to orchid leaves and secrete a protective shell, appearing as small, round bumps. They can cause scale-like yellow patches on leaves.
- Thrips: These slender, winged insects cause silvery streaks and small scars on orchid leaves, leading to yellowing and distortion.
- Mealybugs: These pests resemble tiny cotton balls and can cluster on orchid leaves, causing yellowing, stunted growth, and honeydew secretion.
- Fungus gnats: Although not harmful to orchid leaves directly, the larvae of these flying insects feed on rotting plant material, making orchid roots vulnerable to rot and leaf yellowing.
By knowing which pests commonly affect orchids, you can be vigilant in preventing and managing infestations.
Recognizing Symptoms Of Pest Infestations
It’s crucial to be able to identify the signs of a pest infestation on your orchid leaves. Look out for the following symptoms:
- Yellowing: Yellow patches, spots, or overall yellowing of leaves can signal the presence of pests.
- Curling or distortion: Pests such as aphids and thrips can cause the leaves to curl or become deformed.
- Stippling or silver streaks: Spider mite infestations often leave behind these telltale signs on orchid leaves.
- Fine webbing: Presence of webbing indicates a spider mite infestation.
- Bumps or scales: Scale insects disguise themselves as small bumps on the leaves, damaging them in the process.
- Mealy white residue: Mealybugs can leave behind a powdery, white residue on orchid leaves.
Effective Treatments For Pests And Diseases
Dealing with pests and diseases affecting your orchid leaves requires prompt action. Here are some effective treatments to consider:
- Isolation: Immediately isolate any infected orchids to prevent the spread of pests to healthy plants.
- Mechanical removal: For larger pests, such as scale insects and mealybugs, manually remove them using a cotton swab dipped in rubbing alcohol or a gentle brush.
- Insecticidal soap: Consider using insecticidal soap, carefully following the package instructions to control pests like aphids and thrips.
- Neem oil: Neem oil is an organic and effective treatment for a wide range of pests. Dilute it according to the instructions and spray it on the orchid leaves.
- Systemic insecticides: In severe infestations, systemic insecticides can be used, but caution must be exercised to ensure they are safe for orchids.
- Proper cultural care: Maintain a healthy growing environment for your orchids by providing adequate light, proper watering, and good air circulation. Healthy plants are less susceptible to pests.
- Prevention: Regularly inspect your orchids for signs of pests, practice good hygiene, and avoid overwatering to prevent pest infestations.
Remember, identifying and addressing the underlying cause of yellowing orchid leaves promptly will greatly increase the chances of restoring their health and beauty. By understanding the common pests that affect orchid leaves, recognizing their symptoms, and implementing effective treatments, you’ll be well-equipped to keep your orchids thriving and free from pesky pests.
Temperature And Humidity Fluctuations
Effects Of Extreme Temperature Changes On Orchid Leaves
Orchids are highly sensitive to changes in temperature and humidity, and these fluctuations can have a significant impact on the health of their leaves. Understanding the effects of extreme temperature changes is crucial for maintaining vibrant and healthy orchid plants.
Here are some key points to consider:
- Leaf discoloration: One of the most noticeable effects of extreme temperature changes is the yellowing of orchid leaves. When subjected to cold temperatures, the leaves may turn pale yellow or even white. On the other hand, exposure to excessively high temperatures can result in dark yellow or brown spots on the leaves.
- Leaf damage: Rapid temperature fluctuations can cause physical damage to the leaves of orchid plants. Extreme cold can lead to frost damage, causing the leaves to become discolored and shriveled. On the contrary, excessive heat can cause sunburn, resulting in scorched or curled leaves.
- Stunted growth: Orchids experiencing frequent temperature changes may exhibit slowed or stunted growth. Fluctuating temperatures disrupt the normal metabolic processes of the plant, hindering its ability to absorb nutrients and develop new leaves.
Indications Of Temperature And Humidity Stress
Identifying signs of temperature and humidity stress in orchid plants is essential for timely intervention and appropriate care. Here are some indicators to watch out for:
- Yellowing leaves: Yellowing or wilting of orchid leaves, especially when accompanied by other symptoms, can indicate stress caused by temperature and humidity fluctuations.
- Leaf drop: Excessive temperature changes can cause orchids to shed their leaves prematurely. If you notice a sudden increase in leaf drop, it may be a sign that your orchid is struggling with unfavorable temperature conditions.
- Bud or flower damage: Orchid blooms are delicate and vulnerable to temperature extremes. If your orchid flowers are developing spots, wilting, or dropping prematurely, it could be a result of temperature and humidity stress.
- Root rot: Inconsistent temperature and humidity levels can create conditions ideal for the development of root rot. If you observe black, mushy roots or a foul odor emanating from the potting medium, it may indicate a problem with excessive moisture caused by temperature fluctuations.
Creating Suitable Environments For Orchid Growth
Providing an appropriate and consistent environment is crucial for ensuring the well-being and thriving growth of orchids. Here are some steps you can take to create suitable conditions:
- Temperature control: Maintain a stable temperature range for your orchids. Most orchids prefer temperatures between 60-80°f (15-27°c). Avoid exposing them to sudden temperature changes, such as drafts or direct sunlight.
- Humidity management: Orchids thrive in environments with high humidity levels. To increase humidity, you can use a humidity tray, place the orchid pot on a layer of pebbles, or use a humidifier. Mist the leaves occasionally, especially during dry periods.
- Proper ventilation: While high humidity is important, proper air circulation is equally vital. Orchids should not be kept in stagnant air, as it can lead to fungal and bacterial diseases. Place fans nearby to ensure gentle air movement and prevent excessive moisture buildup.
- Shade and light exposure: Orchids require the right balance of light intensity. Avoid subjecting them to direct sunlight, as it can cause heat stress and leaf burn. Instead, provide bright, indirect light by placing them near a north- or east-facing window or using artificial grow lights.
- Consistent watering: Orchids need a well-regulated watering routine. Avoid overwatering, as it can contribute to temperature and humidity fluctuations, resulting in root rot and other issues. Water your orchids when the top layer of the potting medium feels dry to the touch.
By taking these measures to maintain suitable temperature and humidity conditions, you can ensure that your orchids thrive and display healthy, vibrant foliage and blooms. Remember to monitor your plants closely, making adjustments as needed to optimize their growth and well-being.
Improper Potting Or Repotting Techniques
Orchids are beautiful and delicate flowers that require specific care to thrive. If you’ve noticed your orchid leaves turning yellow, it could be a sign of underlying issues. One common cause is improper potting or repotting techniques. In this section, we’ll discuss the importance of proper potting and repotting practices, signs of issues related to the potting medium, and provide step-by-step instructions for successful potting and repotting.
Importance Of Proper Potting And Repotting Practices
It’s essential to understand the significance of proper potting and repotting for your orchids. Here are some key points to keep in mind:
- Orchids have unique root systems that require adequate airflow. Proper potting ensures that the roots receive enough oxygen and prevents them from suffocating.
- Using the right potting medium is crucial. Orchids prefer a mix that retains moisture while allowing good drainage, such as a combination of bark, sphagnum moss, and perlite.
- Repotting allows you to refresh the potting medium and remove any decaying material or pests that may have taken hold. It also provides an opportunity to inspect the roots’ health and make adjustments if necessary.
Signs Of Issues Related To The Potting Medium
When it comes to spotting problems with the potting medium, keep an eye out for the following signs:
- Yellowing leaves can indicate a lack of airflow or improper drainage due to compacted or broken-down potting medium.
- Excessive moisture retention in the potting medium can lead to root rot, causing yellowing leaves and a foul smell.
- Mold or fungus growing on the potting medium is another indication of excessive moisture and poor ventilation.
Step-By-Step Instructions For Successful Potting And Repotting
Proper potting and repotting techniques are essential for maintaining the health of your orchid. Follow these steps for successful potting and repotting:
- Prepare the new pot: Select a clean pot with drainage holes that comfortably accommodates the orchid’s roots.
- Choose the right potting medium: Use a well-draining and moisture-retaining mix suitable for orchids, such as a combination of bark, sphagnum moss, and perlite.
- Carefully remove the orchid: Gently loosen the plant from its current pot by tapping the sides or squeezing it lightly. Be mindful not to damage the fragile orchid roots.
- Inspect the roots: Take this opportunity to examine the roots for signs of rot or damage. Trim any decaying or dead roots using sterilized pruning shears.
- Repot the orchid: Place a layer of the new potting medium at the bottom of the new pot. Carefully position the orchid in the center and fill the remaining space with the potting mix until the roots are covered.
- Secure the orchid: Firmly press down the potting medium to provide stability for the orchid. Avoid burying the plant too deeply, as this can suffocate the roots.
- Water the orchid: Once repotted, give your orchid a thorough watering. Allow any excess water to drain out of the pot, ensuring proper drainage.
- Provide suitable light and humidity: After repotting, place the orchid in a well-lit area without direct sunlight. Maintain the ideal humidity level by misting or using a humidity tray.
- Monitor and adjust as needed: Regularly check the orchid to ensure the potting medium is providing the right conditions. Adjust watering and lighting accordingly based on the orchid’s needs.
- Repot when necessary: Repot your orchid every one to two years or when you notice root overcrowding or deterioration of the potting medium.
By following these proper potting and repotting practices, your orchid will have the best chance of thriving and producing vibrant, lush foliage. Remember to observe your orchid’s specific needs and make adjustments accordingly. With a little care and attention, your yellowing orchid leaves will soon be a thing of the past.
Aging And Natural Leaf Shedding
Understanding The Natural Aging Process Of Orchid Leaves
Orchids, like any other living organism, go through an aging process. As orchid leaves age, they naturally turn yellow and eventually fall off. Understanding this natural process is essential for orchid enthusiasts to differentiate between normal leaf shedding and abnormal yellowing.
Here are a few key points to help you understand the natural aging process of orchid leaves:
- Orchid leaves have a lifespan of about one to two years. As they approach the end of their lifespan, their color starts to fade, and they may turn yellow.
- Yellowing leaves usually begin from the bottom of the plant, gradually moving upwards. This is a normal process, and new leaves will replace the old ones.
- During the aging process, orchid leaves may also develop small spots or blemishes. This is generally nothing to worry about, as long as the spots are not spreading rapidly or accompanied by other signs of stress.
- Orchids may shed leaves throughout the year, depending on their individual growth cycle. This is particularly common after the plant has finished flowering.
- It’s important to remember that leaf shedding is a part of the orchid’s natural growth and development. It’s not necessarily a sign of poor health or improper care.
Differentiating Between Aging And Abnormal Yellowing
While yellowing leaves can be a normal part of the orchid’s aging process, it’s crucial to distinguish between natural leaf shedding and abnormal yellowing caused by underlying issues. Here’s what you need to know to tell the difference:
- Abnormally yellow leaves often exhibit other signs of stress, such as wilting, spotting, or discoloration on the veins.
- Yellowing leaves caused by nutrient deficiencies or improper care tend to occur throughout the plant, rather than starting from the bottom.
- Abnormal yellowing can be a sign of root rot, overwatering, underwatering, exposure to extreme temperatures, or a pest infestation.
- To determine if the yellowing is abnormal, examine the overall health of your orchid. If the plant looks weak, dehydrated, or shows signs of disease, it’s important to investigate further and address the underlying issue.
Proper care during leaf shedding:
- Avoid prematurely removing yellowing leaves, as they may still be providing nutrients to the plant. Allow them to naturally detach or gently trim them off when they are fully dry and ready to be shed.
- Maintain a consistent watering schedule for your orchid to prevent underwatering or overwatering, which can cause stress and lead to abnormal yellowing.
- Provide adequate air circulation around your orchid to prevent the buildup of moisture and the growth of fungi, which can cause leaf rot.
- Regularly inspect your orchid for signs of pests, such as tiny insects or webs, and take immediate action to address any infestation.
- Ensure your orchid receives appropriate light exposure. Insufficient light can result in weak, yellowing leaves, while excessive light can cause burning or sunscald.
- Maintaining proper humidity levels can also contribute to healthy leaf growth, as excessively dry or humid conditions can stress the plant.
Remember, while aging and natural leaf shedding are normal processes for orchids, it’s crucial to be attentive to any signs of abnormal yellowing. By understanding the natural aging process and providing proper care, you can help your orchid thrive and maintain its vibrant foliage.
Chemical Exposure And Environmental Factors
Impact Of Chemicals On Orchid Leaf Health
Chemical exposure and environmental factors can greatly affect the health and appearance of your orchid leaves. Understanding how these factors impact your orchids can help you take proactive measures to ensure their well-being. Here are some key points to consider:
- Certain chemicals, such as pesticides, fungicides, and herbicides, can be harmful to orchids. These chemicals may be present in the water you use to irrigate your plants or in the products you use for pest control. The accumulation of these toxic substances can lead to yellowing and discoloration of the leaves.
- Chemical burns can occur when orchids come into direct contact with harsh substances. This can happen if you accidentally spill cleaning agents, fertilizers, or even acidic substances like lemon juice on the leaves. These burns can cause yellowing, brown spots, or even tissue death on the affected leaves.
- Fumes from household chemicals, such as those released by cleaning products, paint, or varnish, can also harm your orchids. These volatile toxins can be absorbed through the stomata on the leaves, leading to discoloration and leaf damage.
- Air pollution, including smog and industrial emissions, can have a negative impact on orchid leaf health. The chemicals and pollutants present in the air can settle on the leaves and hinder their ability to photosynthesize properly, resulting in yellowing and reduced growth.
- Excessive exposure to direct sunlight can also cause leaf yellowing. While sunlight is important for orchids, prolonged exposure can lead to sunburn, which manifests as yellow or white patches on the leaves.
Identifying Environmental Factors That Cause Yellowing
Identifying the underlying environmental factors causing yellowing in your orchid leaves is crucial for implementing the appropriate corrective measures. Consider the following:
- Assess the water quality: High levels of minerals in tap water, such as calcium and salts, can cause leaf yellowing. Filtered or distilled water is recommended to minimize chemical content and maintain water quality.
- Examine the growing medium: Soil or potting mix that retains too much moisture can lead to root rot and nutrient imbalance. This can result in yellowing leaves. Ensure proper drainage and aeration to prevent waterlogged conditions.
- Evaluate temperature and humidity: Sudden temperature fluctuations or excessively dry air can stress orchids, leading to leaf yellowing. Maintain a stable temperature range and moderate humidity levels to ensure optimal growth conditions.
- Monitor nutrient levels: Orchids require specific nutrients for healthy growth. Imbalanced fertilization or deficiencies in key nutrients, such as nitrogen and magnesium, can cause yellowing of leaves. Regularly analyze and adjust your fertilization regime accordingly.
Protective Measures To Minimize Chemical Exposure
Taking proactive steps to reduce chemical exposure can safeguard your orchids and promote their overall leaf health. Here’s what you can do:
- Use organic or natural pest control methods whenever possible. This reduces the need for harsh chemicals that can harm your orchids.
- When spraying pesticides, fungicides, or other chemicals, carefully follow the instructions on the product label. Use the recommended dosage and avoid dripping or spraying directly onto the leaves.
- Keep your orchids away from areas where household chemicals, paints, or varnishes are being used. This minimizes the risk of fumes and spills affecting their leaf health.
- Place your orchids in well-ventilated areas to reduce the potential buildup of indoor air pollutants that can negatively impact their leaf health.
- Shield your orchids from excessive direct sunlight by using sheer curtains, blinds, or moving them to a spot with filtered light. This helps prevent sunburn and leaf damage.
By understanding the impact of chemicals and environmental factors on orchid leaf health, you can make informed decisions to protect your plants and keep them thriving. Taking preventive measures and promptly addressing any issues will ensure your orchids display vibrant, healthy leaves.
Genetic Or Physiological Factors
Orchids are known for their stunning beauty and delicate nature. However, it can be quite concerning when you notice that your orchid leaves are turning yellow. This discoloration can indicate underlying issues that need to be addressed to ensure the health and longevity of your orchid.
In this section of the blog post, we will explore the genetic or physiological factors that can lead to yellowing in orchid leaves, how to differentiate these causes from other issues, and strategies to manage and prevent genetic or physiological yellowing.
Inherent Factors Leading To Yellowing In Orchid Leaves
Yellowing in orchid leaves can sometimes be attributed to genetic or physiological factors inherent to the plant itself. Here are some key points to consider:
- Different orchid species have varying levels of susceptibility to genetic or physiological yellowing. Some species are more prone to these issues than others.
- Genetic factors can result in certain orchid hybrids or cultivars being more likely to exhibit yellowing in their leaves.
- Physiological factors, such as aging or natural leaf shedding, can also cause yellowing in orchid leaves. This is a normal process that occurs as older leaves die off to make way for new growth.
- Nutrient deficiencies or imbalances, which can stem from the genetic makeup of the orchid, may contribute to yellowing leaves. Paying attention to the specific nutrient requirements of your orchid can help address these issues.
Differentiating Genetic Or Physiological Causes From Other Issues
It is essential to distinguish genetic or physiological yellowing from other potential causes. Here are some guidelines to help you differentiate:
- Observe the pattern of yellowing in the leaves. Genetic or physiological yellowing often affects the lower or older leaves first, whereas yellowing caused by other factors might appear randomly on various leaves.
- Assess the overall health of the plant. Orchids suffering from genetic or physiological yellowing will generally exhibit otherwise good health, with green and vibrant new growth.
- Rule out environmental factors, such as excessive sunlight exposure, extreme temperatures, or improper watering practices, as these can also cause leaf yellowing but are not genetically or physiologically related.
Strategies To Manage And Prevent Genetic Or Physiological Yellowing
While it may not be possible to entirely eliminate genetic or physiological yellowing in orchid leaves, there are strategies you can employ to manage and minimize the impact. Consider the following points:
- Provide optimal lighting conditions for your orchid, ensuring it receives the right balance of sunlight and shade.
- Follow a regular watering regimen, taking care not to overwater or underwater the plant. Proper drainage is crucial to prevent waterlogged roots.
- Use a well-balanced orchid fertilizer to provide essential nutrients to the plant. Regularly monitor and adjust the feeding schedule based on the specific requirements of your orchid species.
- Consider repotting your orchid every few years to refresh the growing medium and provide better drainage. Use a suitable orchid potting mix for optimal results.
- Maintain good air circulation around the orchid to prevent damp conditions that can lead to fungal or bacterial infections, further exacerbating yellowing issues.
By understanding the genetic and physiological factors that can contribute to yellowing in orchid leaves, distinguishing them from other causes, and implementing appropriate strategies, you can help your orchid thrive and display its breathtaking beauty for years to come.
Reviving Yellow Orchid Leaves: Tips And Tricks
Orchids are known for their elegant beauty, but nothing can be more disheartening than seeing their leaves turn yellow. If you’re wondering why your orchid leaves are changing color, fear not! In this section, we will explore tips and tricks to revive those yellow leaves and ensure your orchid’s long-term leaf health.
Let’s dive in!
General Steps To Revive Yellow Orchid Leaves
Reviving yellow orchid leaves requires a systematic approach. Here are some general steps to follow:
- Assess the watering routine: Check if you are over or under-watering your orchid. Yellow leaves can be a result of improper watering. Adjust the frequency and amount of water accordingly.
- Inspect the roots: Healthy roots are crucial for leaf health. Gently remove your orchid from its pot and examine the roots. Healthy roots are firm, white, and plump. If you notice rotting or damaged roots, you may need to repot your orchid.
- Provide proper lighting: Orchids love bright, indirect light. Insufficient light can lead to yellow leaves. Assess the lighting conditions in your orchid’s vicinity and make any necessary adjustments.
- Check humidity levels: Orchids thrive in environments with moderate to high humidity. Low humidity levels can cause leaves to turn yellow. Consider using a humidifier or placing your orchid on a tray filled with water and pebbles to increase humidity.
- Fertilize wisely: Orchids need nutrients to thrive. However, over-fertilizing can cause leaf damage. Follow the recommended dosage and frequency for orchid-specific fertilizers.
- Maintain proper air circulation: Good air circulation helps prevent moisture-related issues such as fungal infections. Ensure adequate ventilation around your orchid.
Tailoring Remedies Based On The Specific Cause Of Yellowing
Different causes can lead to yellow orchid leaves. Tailoring remedies based on the specific cause is essential. Let’s explore a few common scenarios:
- Overwatering: If overwatering is the cause, adjust your watering routine. Allow the orchid’s roots to dry between waterings and ensure proper drainage in the pot.
- Underwatering: Underwatering can also result in yellow leaves. Increase the frequency and amount of water, ensuring the roots receive adequate hydration.
- Root rot: If your orchid has root rot, trim away the affected roots, and repot the plant in fresh, well-draining orchid potting mix.
- Light deficiency: Position your orchid in a location with brighter, indirect light. Consider using artificial grow lights if natural light is insufficient.
- Nutrient deficiency: If yellowing is due to nutrient deficiency, adjust your fertilization routine. Use a balanced orchid fertilizer to provide the necessary nutrients.
- Pests or diseases: Inspect your orchid for any signs of pests or diseases. Treat accordingly using appropriate insecticides or fungicides.
Preventative Measures For Long-Term Leaf Health
Ensuring long-term leaf health is just as important as reviving yellow orchid leaves. Implement these preventative measures to keep your orchid’s leaves vibrant and healthy:
- Proper watering: Stick to a consistent watering routine and avoid fluctuations. Water your orchid when the top inch of the potting mix feels dry.
- Use suitable potting mix: Orchids require a well-draining potting mix that allows airflow to the roots. Use specialized orchid potting mix instead of regular potting soil.
- Maintain ideal humidity: Orchids thrive in environments with 40-60% humidity. Use a humidity tray, humidifier, or mist your orchid regularly to maintain optimal humidity levels.
- Provide adequate air circulation: Good air circulation prevents the buildup of moisture and reduces the risk of fungal infections. Place your orchid in an area with proper ventilation.
- Monitor light exposure: Orchids require a balance of light and shade. Avoid exposing them to direct sunlight, as it can scorch the leaves. Find a spot with bright, indirect light.
- Avoid temperature extremes: Orchids prefer temperatures between 60-80°f (15-27°c). Protect them from drafts and extreme temperature fluctuations.
- Regular pest and disease checks: Routinely inspect your orchid for signs of pests or diseases. Early detection allows for prompt treatment and prevents leaf damage.
By following these tips and tricks, you can revive yellow orchid leaves and ensure the long-term health of your beloved plants. Remember to tailor your remedies to the specific cause of yellowing and implement preventative measures for ongoing leaf health.
Let your orchids flourish with their vibrant, green foliage once again!
Frequently Asked Questions For Why Are My Orchid Leaves Turning Yellow? (12 Reasons & Fix)
Why Are My Orchid Leaves Turning Yellow?
Orchid leaves may turn yellow due to overwatering, insufficient light, temperature stress, nutrient deficiencies, pests, or diseases. Check the watering schedule, provide adequate sunlight, maintain appropriate temperature, feed with balanced fertilizer, and inspect for pests or diseases to fix the issue.
Conclusion
To recap, there are several reasons why your orchid leaves may be turning yellow. It could be due to age, overwatering, underwatering, insufficient light, improper temperature, nutrient deficiencies, pest infestation, fungal or bacterial diseases, potting mix issues, root problems, stress, or natural leaf shedding.
Identifying the specific cause is crucial in determining the appropriate fix for your yellowing orchid leaves. By addressing the root of the problem, such as adjusting watering routines, improving lighting conditions, providing proper nutrients, or addressing pest issues, you can help your orchid regain its health and vibrancy.
Remember to always observe your orchid’s individual needs and adjust accordingly. With proper care and attention, your orchid can thrive and showcase its stunning flowers for years to come. Happy growing!