The elephant ear plant, also known as Alocasia or Colocasia in science, is a magnificent and distinctive tropical plant distinguished by its enormous, heart-shaped leaves that resemble an elephant’s ears. Due to its alluring appeal, this plant is a favorite among both indoor and outdoor gardeners. In this comprehensive guide, we will explore the various aspects of growing, caring for, and propagating the Elephant Ear plant.
About Elephant Ears
The majestic tropical plants known as elephant ears, or Colocasia, are noted for their striking leaves and a host of health advantages. These tropical Asian perennials with tuberous leaves that are sensitive to cold do well under conditions that resemble their original surroundings.
Table of Contents
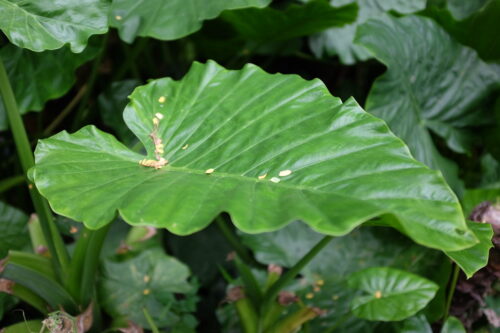
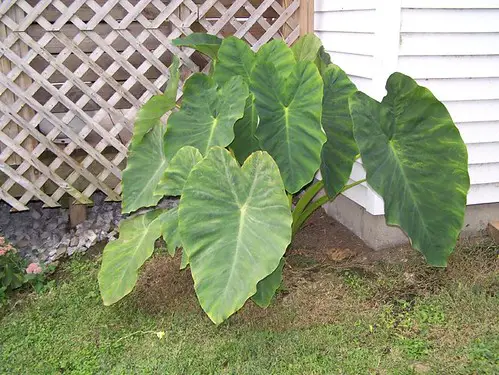
Elephant ear plants have a beautiful appearance, which is one of the main reasons people decide to grow them in their homes. Large, heart-shaped leaves that often resemble elephant ears provide a spectacular and dramatic display that brings a sense of the exotic within. They are a popular option for interior decorating because of their distinctive leaf patterns and deep green tones, which improve the aesthetic attractiveness of living areas.
These herbaceous perennials, which are members of the Alocasia and Colocasia plant families, have impressively enormous, luxuriant leaves. The plants may grow as annuals, bulbs, or perennials, and they do best in soils that are consistently wet and rich in organic matter. Elephant ears like soil with a pH between 5.5 and 7.0 that is slightly acidic to neutral. While they demand wet, well-drained soil, it is crucial not to let the soil to get too dry, particularly during the summer.
| Specification | Description |
|---|---|
| Scientific Name | Alocasia spp. or Colocasia |
| Common Names | Elephant Ear Plant, African Mask Plant, Elephant Ear |
| Family | Araceae |
| Native to | Tropical regions of Asia and the Pacific Islands |
| Plant type | Herbaceous perennial |
| Size | Varies depending on the species; can be large |
| Growth Habit | Herbaceous perennial with rhizomatous growth |
| Leaf Shape | Heart-shaped or arrow-shaped leaves |
| Leaf Size | Varies, commonly ranges from 12 to 35 inches (30-90 cm) in length |
| Leaf Color | Rich green with prominent veins, some varieties have colored veins or markings |
| Petiole (Leaf Stem) Length | Can be several inches to a few feet long |
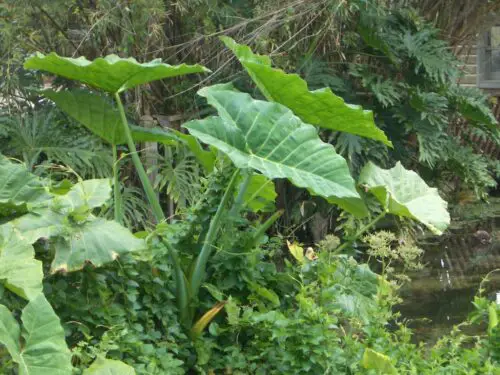
| Plant Height | Typically between 2 to 6 feet (60-180 cm) in height, but some species can reach 10 feet (3 meters) or more |
| Growing care | Easy |
| Flowering | Mature plants may produce inflorescences, but flowers are usually inconspicuous |
| Flower color | White, cream, or yellow |
| Bloom time | Spring or summer |
| Light Requirements | Bright indirect light to partial shade |
| Temperature Tolerance | Prefers warm temperatures, not frost-tolerant |
| Soil | Well-draining, fertile soil with good moisture retention |
| Watering | Keep soil evenly moist, but not waterlogged |
| Humidity | Thrives in high humidity; mist leaves regularly |
| Fertilization | Feed during the growing season with balanced liquid fertilizer |
| Propagation | Division of rhizomes or stem cuttings |
| Pests and diseases | Aphids, spider mites, mealybugs, scale |
| Toxicity | All parts of the plant are toxic if ingested; keep away from pets and children |
| Common Varieties | Alocasia Amazonica (Polly), Alocasia Zebrina, Alocasia Stingray, Alocasia Odora |
How to Grow Elephant Ears
Elephant ears are often grown both inside and outdoors, although warm, humid climates are the ideal for them. Here’s a step-by-step guide on how to grow elephant ears:
Selecting the Best Variety:
There are many different kinds of elephant ears, each with its own special traits. The two major genera are colocasia and alocasia, and there are several species and cultivars of each. Large green leaves are characteristic of Colocasia esculenta, whereas the remarkable dark green foliage of Alocasia amazonica contrast with white veins. The leaves of Colocasia ‘Black Magic’ are dark, nearly black. Find a variety that fits your interests and the environment in your garden or home by researching its growth patterns, mature size, and maintenance needs.
Making a Location Choice:
Elephant ears love bright, indirect light or some shade and thrive best in warm, humid settings. Select an area that gets filtered sunshine all day if you’re growing them outside. The best amount of shade may be provided by positioning them under the canopies of larger plants or trees. Place the plant next to a window with bright, indirect light if you’re growing it inside, but keep it out of direct sunlight’s path since it might cause leaf blistering.
Planting Period
Wait until after the last frost if you live in a temperate region with different seasons before planting your elephant ears outside. Frost and cold weather may harm or destroy the delicate leaves. You may plant them whenever you want in areas with warm weather all year round. But because of the shorter days and colder temperatures throughout the winter, they could develop more slowly.
Getting the soil ready
Elephant ears like damp but well-draining soil that doesn’t grow saturated. An excellent growth medium is created by amending sandy loam soil with organic material, such as compost or well-rotted manure. In addition to enhancing drainage, the additional organic matter also supplies vital nutrients to promote healthy development. Test the pH of the soil before planting, aiming for a slightly acidic to neutral range, preferably between 6.0 and 7.0.
Planting the Rhizomes or Bulbs
Elephant ears often sprout from subterranean stems called rhizomes or bulbs. With the pointed end facing up and the rounded side down, plant the bulbs or rhizomes 2 to 4 inches deep. When you plant them, be careful not to bury them too deeply or you risk damaging them and stunting their development. Depending on the mature size of the type, provide ample space between plants, usually 1 to 3 feet. By giving them ample space, you can be sure they have enough area to expand and flourish.
Bear in mind that elephant ears may expand and get fairly huge, so make sure they have adequate room to develop. Elephant ears should repay you with their gorgeous leaves if you take good care of them, providing a touch of the tropics to your yard or house.
Also Read : 7 Steps to Fixing an Elephant Ear Plant Broken Stem.
How to Care for Elephant Ears
Now we will talk about how you can successfully care about elephant ear plant:
Sunlight Requirements
For elephant ears to be healthy and happy, sun exposure is essential. Despite the fact that they like bright light, direct sunlight may cause leaf burn and harm the leaves. They should ideally be situated in an area with some shade or filtered sunlight. Place them in a bright area with indirect light if you’re cultivating indoors. This will keep them looking lush without damaging the foliage.
Fertilizing and Watering
Elephant ears need just modest amounts of watering, however the frequency might change according to the season. It’s essential to maintain the soil’s constant moisture during the growth season, which normally lasts from early spring until late autumn. Regular irrigation is essential, particularly in drier climates. However, it’s advised to cut down on watering throughout the winter when plants fall dormant since at this time they prefer drier soil.
Also Read : How Often Do You Water Elephant Ears?
Consider feeding elephant ears with a balanced liquid fertilizer that is high in nitrogen to encourage healthy development and lush foliage. During the growth season, fertilizing once a month will provide them the vital nutrients they need to prosper.
Propagation
Dividing the tubers in the spring is one of the greatest methods to spread elephant ears. You may carefully divide the several tubers as the plants mature, making sure that each split has enough roots and shoots to grow into a new plant. You may foster healthy development and avoid overpopulation in the planting area by carrying out this division each year.
Growing Indoors
It is feasible to cultivate elephant ears as houseplants for individuals who want to appreciate their beauty inside. However, it’s important to remember a few crucial care guidelines. As previously indicated, make sure the inside site gets enough of strong, indirect light to avoid leaf burn. Additionally, constantly spraying the plant will help to keep a constant humidity level. For indoor growing, maintaining a wet soil is essential since it mimics their natural environment.
Invasive Issues and Solutions
Elephant ears have the potential to become invasive in certain areas, where they proliferate quickly and threaten local species. If their propensity for invasiveness worries you, think about selecting substitutes that have a similarly lush and tropical look without the danger of uncontrolled spreading.
The banana plant is one such option, with its magnificent leaves and exotic appearance resembling elephant ears. Since banana trees are non-toxic, they might be a secure and appealing option for gardeners looking for elephant ears.
How to Plant Elephant Ears
Preparing Your Elephant Ear Bulbs for Planting
Open the box right away after receiving your elephant ear bulbs to take them out. This keeps the bulbs from being enclosed in the packaging for an extended period of time. Check every bulb carefully before planting to make sure it is sound and unharmed by shipping. Squeeze them lightly to test their hardness and search for any obvious indications of damage.
For effective planting, it is essential to determine the bulb’s proper orientation. Recognize the ancient stem stocks, which serve as a guide to the proper alignment. Old stem stocks should point upward at one end, while other growth should point downward at the other.
Planting Elephant Ear Bulbs
The first step in planting bulbs, whether in the ground or in containers, is to arrange the bulbs. When deciding where to put elephant ears, take into account the two to four-foot distance they demand. Time to start digging the hole now. To obtain the correct depth, use a trowel or a horihori knife with depth indications. Planting depth for elephant ear bulbs should be between four and six inches. For the sake of our experiment, we’ll use a five-inch depth.
To provide enough room for root growth, the hole should be three to four times bigger than the bulb. When the hole is finished, gently insert the bulb in the proper direction. Backfill the soil gently, being careful not to move or disturb the bulb. To make sure the bulb is stable in its new location, softly compact the dirt around it.
Put a sticker or marker on the bulb to record its position. This is very helpful when burying many bulbs at once.
Watering and Caring for Elephant Ear Bulbs
It’s important to give the elephant ear bulbs plenty of water after planting. This stage turns on the bulbs and lets them know it’s time to start growing. For balanced hydration, make sure the water touches the bulb on all sides.
Warm soil is ideal for elephant ear bulbs. Plant them once the risk of frost has gone and the soil temperature reaches 65 degrees Fahrenheit or above. Elephant ear bulbs are resilient and can survive in the ground in cooler climates (zones 8 to 11). If you live outside of these zones, you must store the bulbs throughout the winter and plant them the following spring when the weather is right.
How to Grow Elephant Ears From Seed
Here are the steps to grow elephant ears from seeds:
- Scarifying your seeds can improve the germination process if they have a hard outer covering. Apply a little knife or sandpaper to the outer coat and gently file or nick it. Water may now enter the seed more easily, promoting germination.
- Pre-soaking the Seeds: Overnight soaking the seeds in deionized water may help increase germination rates. Although tap water may be used, distilled water is safer since it lacks contaminants that might prevent germination.
- When the seeds are ready, plant them on the soil’s surface. Sprinkle a little amount of the growth medium over the seeds, taking care to avoid covering them completely. Avoid excessively covering elephant ear seeds since they need some light to grow.
- Spray the top of the soil lightly with a misting bottle to moisten it. Avoid making the growth media soggy by keeping it gently wet. Rot and other issues for seedlings might result from overwatering.
Varieties of Elephant Ears
1. Taro (Colocasia esculenta)
This elephant ear type, often known as taro, is one of the most frequently grown food crops in the world, feeding millions of people. Taro stands out in any garden with its huge five to six-foot leaves. It is a great option for wet regions with inadequate drainage since it grows well in bright light and moist soil. Taro provides a variety of possibilities for home gardeners, from classic forms to unusual cultivars like “Black Magic” with its deep violet leaves or the variegated “Mojito.”
2. Alocasia Kris (Alocasia sanderiana)
The Kris plant is a tiny alocasia that is often cultivated inside and stands out for its distinctively wavy leaf margins and high-contrast stripes. It should stay out of direct sunshine but enjoys warm, humid environments. It must have enough humidity to keep from drying out. The Kris plant is an eye-catching addition to any collection of indoor plants because to its distinctive look.
3. Alocasia African Mask (Alocasia amazonica)
African Mask plants, thought to be a commercial hybrid, with striking, two-foot-long leaves. Particularly well-liked cultivars are “Polly” and “Bambino,” with the latter being ideal for small-space gardening. These plants are flexible and may thrive in USDA Hardiness Zones 10 to 11 outside while thriving in moist, loamy soil with regular warmth inside.
4. Alocasia Black Velvet (Alocasia reginula)
The Black Velvet is a popular option for those who like indoor gardening. It offers an attention-grabbing element to any interior environment with its small stature and gorgeous leaves that range in color from deep black to rich green. These plants demand rich, wet soil, a moderate to high humidity level, and bright, indirect light. Your tropical collection’s Alocasia Black Velvet is guaranteed to be a show-stopper.
5. Alocasia Frydek (Alocasia micholitziana)
The medium-sized elephant ear cultivar Alocasia Frydek is perfect for growing inside. It makes a great feature plant because of its luxurious and elegant deep green, velvety-textured leaves. Frydek needs plenty of warmth and humidity to thrive, so tropical arrangements or locations near humidifiers are ideal.
6. Dragon Scale (Alocasia baginda)
The Dragon Scale is a fierce-looking plant with leaves that shimmer from silver to black. It’s difficult for it to thrive indoors since it prefers the hot, muggy conditions of the Borneo rainforest. But because of its small size, it works well in terrariums or beneath cloches, where it may provide a very striking focal point.
7. Alocasia zebrina
The medium-sized elephant ear, Alocasia zebrina, has arrow-shaped leaves and striped stalks below them. It takes up to five years for it to develop to its full five-foot height, which is aesthetically stunning despite its slow growth. Although it is threatened in the wild, it thrives in pots and is a wonderful addition to any collection with a tropical theme. It prefers moderate humidity and fairly mild temperatures, much like other Alocasias.
8. Giant Taro (Alocasia macrorhiza)
The behemoth Taro is an outdoor behemoth that can grow up to 15 feet tall and has enormous leaves that are two to three feet broad for individuals who like the huge and the bold. It thrives in warm temperatures (USDA Hardiness Zones 9–11) in sunny, swampy sections of the garden. With its black stalks, varieties like the Black Stem increase aesthetic attractiveness.
Potting and Repotting Elephant Ears
When potting elephant ears, follow these steps:
- Prepare the Pot: Add the well-draining soil mixture to the selected pot, giving room for the plant’s tuber.
- Place the elephant ear tuber (bulb) gently on top of the soil, making sure that the top of the tuber is just visible above the earth’s surface. The bulb won’t decay as a result of this.
- Add extra dirt around the tuber and gently press it down to give it support.
- Watering: After potting, give the plant a good, thorough watering, making sure the soil is equally wet but not soggy.
- Placement: Pick a spot with plenty of bright, indirect light for your indoor elephant ear plants. It’s best to partially shade outside plants, particularly during the warmest times of the day.
Repotting your elephant ear plant is essential to provide it with fresh nutrients and adequate space for continued growth. Follow these steps for successful repotting:
- Choosing the Right Time: In the spring, when the plant is actively developing, is the optimum time to repot an elephant ear.
- Plant Removal: Carefully remove the plant from its present container while being careful not to harm the roots.
- Examining the Roots: Look for any rot or disease symptoms in the root system. Remove any diseased or damaged roots.
- Selecting a New Pot: Choose a new pot that is one size bigger than the old one, allowing for ample room for the plant to grow.
- Fill the new pot with clean, well-draining soil to prepare it.
- Repotting: After setting the plant in the new container, cover the roots with dirt to keep them at the same height as previously.
- Watering: Water the plant well after repotting to let the dirt surrounding the roots settle.
Propagating Elephant Ears
Method 1: Dividing Tubers
The division method is one of the most popular and successful ways to propagate elephant ear plants. This process involves separating healthy tubers from a mature parent plant and replanting them to establish new growth. Follow these steps for a successful division:
- Timing is Everything: The optimal time to divide the plants is in the autumn when the parent plant begins to become dormant. Minimize harm to the tubers when you carefully remove the parent plant from the ground or its container.
- Clean Your equipment: Soak your pruning knife and other cutting equipment in a solution of 1 part bleach to 9 parts water before beginning the division. This lessens the likelihood of diseases spreading from one plant to another.
- Choose Healthy Tubers: Examine the tubers and choose the ones that are firm, ripe, and devoid of any damage or illness symptoms.
- Make sure each split of the tuber still has some roots connected before gently separating it from the parent plant.
- Replant the Tubers: Place the broken tubers in a well-draining potting soil or garden soil, making sure that the tops of the tubers are barely visible above the earth. Give the freshly planted tubers plenty of water.
- Care Instructions for Newly Divided Plants: Put the potted tubers in a warm, well-lit area. Maintain a constant moisture level in the soil that is not wet. Give the young branches the same attention as mature elephant ear plants as soon as they appear.
Method 2: Sowing Seeds
While dividing tubers is the preferred method for propagating elephant ear plants, some gardeners enjoy the process of starting from seeds. Keep in mind that growing elephant ear plants from seeds may require more time and patience compared to division. Here’s how you can sow and grow elephant ear plants from seeds:
- Choose a dependable supply of high-quality elephant ear seeds, or gather them from ripe seed pods.
- Before planting, soak the seeds in water for around 24 hours. The seed coat will become softer as a result, increasing germination rates.
- Planting: Sprinkle the moistened seeds over a potting mix that drains well before covering them with a thin layer of soil. To keep the soil surface wet, mist it with water.
- Elephant ear seeds need warmth and light in order to effectively germinate. Place the seed tray in a warm area with some light from the side.
- Germination Time: Depending on the species and growth circumstances, germination might take a few weeks to many months. During this time, be patient and continuously moisten the soil.
- Transplant the seedlings into individual pots or the appropriate outdoor site as soon as they have a few leaves and are big enough to handle.
- Young seedling care involves giving the seedlings frequent waterings and shielding them from bad weather. Follow the maintenance instructions for mature elephant ear plants as they develop.
Tips for Successful Propagation
- Parent Plants in Good Health: Make sure the parent plant you utilize for propagation is in good health and free from illness. Successful propagation is more likely to result from parent plants that are robust and strong.
- Environment: Elephant ear plants do well in warm, humid environments. Maintaining an appropriate environment is essential for effective development whether you are propagating by seeds or division.
- Elephant ear plants demand well-draining soil to avoid having their roots flooded by water. An optimal planting medium may be made by using premium potting soil or adding organic matter to garden soil.
- Propagation may be time-consuming, particularly when starting from seeds. Keep trying and be persistent; the wait will be well worth it when you have a healthy new plant.
Elephant ear plant indoor Benefits
The Elephant Ear Plant is a great addition to any interior space because of its wide range of benefits, which include air purification, mood enhancement, and stress reduction.
here are some benefits of elephant ears:
1. Purification of the air and better air quality
Elephant ear plants have extraordinary air-purifying powers, which is one of its many noteworthy advantages. These plants are skilled in removing pollutants from the air, off-gassing, and airborne allergens, restoring the quality of the air in enclosed places. These magnificent plants provide a cleaner, fresher environment for people to breathe by absorbing dangerous chemicals and contaminants from the air. Better respiratory health may result from improved air quality, which also creates a more relaxing and delightful living environment.
2. Improved Mood and Added Energy
Elephant ear plants have also been discovered to have effects on people’s mental wellbeing in addition to their ability to filter the air. Studies have shown that being near greenery and other natural components may improve mood, productivity, attention, and creativity. The Elephant Ear Plant’s thick green foliage gives interior areas a tranquil and pleasant atmosphere that makes them seem more welcome and invigorating. A more peaceful living environment may result from feeling more a part of nature inside by lowering emotions of tension, worry, and exhaustion.
3. Relaxation and Stress Reduction
Living in crowded cities and metropolitan environs may often result in higher stress levels. Fortunately, Elephant Ear Plants may reduce tension and encourage relaxation. People may relax and find consolation among the stress of everyday life when they are in the presence of these gorgeous plants, which can have a relaxing impact on the psyche. Elephant Ear Plants may help you create a peaceful environment inside that promotes tranquility and tranquillity, making it simpler to manage stress and strike a better work-life balance.
4. Homeopathic Treatment for Minor Illnesses
The Elephant Ear Plant has been utilized in traditional medicine for a number of reasons in addition to its ornamental and air-purifying capabilities. The stem leaf has been used to cure insect stings, while the macerated leaves have been used as a poultice for infected wounds. The herb has also traditionally been used to treat ailments including high blood pressure, diabetes, respiratory infections, coughs, fevers, and coughing. Knowing about these ancient applications of the plant adds a fascinating layer of fascination to its already amazing profile, even if contemporary medicine should always be the primary option for treating medical ailments.
5. Attractiveness and Dramatic Center
Beyond its useful advantages, Elephant Ear Plants are unquestionably beautiful and startling to the eye. They provide a striking focal point to any interior area with their huge, stunning foliage. They are a great option for adding a touch of elegance to the décor of the house and workplace because of their dramatic appeal, which brings a sense of grandeur and refinement. Elephant Ear Plants immediately improve the attractiveness of their surroundings, whether they are used as single plants or as a component of a larger indoor garden.
6. Flexible and simple to maintain
Elephant ear plants are well-liked for interior areas because of their adaptability and simplicity of maintenance. These resilient plants may flourish in a variety of interior settings and just need a little sunshine and routine care. They also need very little care and can tolerate brief periods of neglect, which makes them the perfect choice for time-constrained people or novice plant owners.
Also Read : Are Elephant Ears Edible? (Know there Toxicity Before Eating)
Overwintering Elephant Ears
Now let me tell you about the process of getting your elephant ear ready for winter and storing it properly to ensure its health and vigor for the next growing season.
Step 1: Pruning the Leaves
It’s time to get your elephant ear ready for the impending winter as the days get shorter and colder. Start by meticulously removing all of the leaves. Cutting off healthy, green leaves may seem contradictory, but doing so is essential to shield the plant from possible frost damage. The procedure will grow messier and more difficult if you wait until the leaves turn brown after a chilly night.
Step 2: Digging Out the Bulb
It’s time to pull out the bulb once the leaves have been taken off. Mark the location of the elephant ear before you begin digging to protect the garden and make sure you can easily locate it. If there are any wood chips covering the bulb, gently push them away so they don’t become too mingled with the soil.
Remove the bulb from the ground with care, taking careful not to harm it. The bulb has probably become bigger since you planted it, as you can see. Leave just a tiny stubble after removing the majority of the dirt and all the roots. This will lessen the chance of storage-related deterioration.
Step 3: Trimming and Drying the Bulb
Trim any extra organic materials from the bulb to encourage optimal storage. While a certain amount of green growth is desirable, too much might cause rot. For a few days, let the bulb dry out, keeping an eye out for any symptoms of rot or mold. Cut off any visible rot as soon as possible and apply sulfur to the area.
Step 4: Storing the Elephant Ear Bulb
Elephant ear bulb storage requires keeping the bulbs dormant and keeping them from freezing. After the drying process is complete, decide where to store the items. To continue the drying process in the autumn, you may put the bulb in a sunroom that isn’t heated. Remove the old leaves carefully when they have dried.
As winter draws near, relocate the lightbulb to a cold, dark area, such a basement or a fruit cellar, where the temperature is roughly 5 degrees Celsius (41 degrees Fahrenheit). These circumstances will keep the bulb dormant and stop it from sprouting before it should. During storage, avoid watering the bulb or adding peat moss; instead, let it open and dry.
Step 5: Preparing for Spring
It’s time to get your elephant ear ready for the next growth season as early spring approaches and the weather starts to warm up. Start warming up the bulb in a brighter spot around three to four weeks before to the final day of frost in your region. To promote growth, give it a little dampness.
Put the plant in a container and maintain it in a warm place if you wish to start it inside. Be patient; it can take a few weeks before the elephant ear begins to develop. Keep in mind that elephant ear plants are sensitive to cold, so wait to transfer them outdoors until any chance of frost has completely gone.
By doing these things and giving your elephant ear plant the attention it needs, it will thrive year after year and grace your landscape with its regal presence. With the right planning and care, you may enjoy these lovely plants all year long, giving your outside area a hint of exotic enchantment. Enjoy your garden!
Common Pests & Plant Diseases
Now I tell you about the most common pests and plant diseases that can afflict elephant ears and discuss effective management strategies to keep these majestic plants thriving.
1. Fungal Leaf Blight: A Widespread Threat
Fungal leaf blight is one of the most common illnesses that affect elephant ears. On the ornamental leaves affected by this fungal illness, small, circular lesions typically contain oozing fluid. The afflicted leaves become yellow as the illness worsens and may finally wither away. During rainy and humid weather, fungal leaf blight is especially problematic because the moisture encourages its development.
Early detection of this condition is crucial for treatment. Check your plants often, and remove any affected leaves right once to stop the spread of the disease. Additionally, as a preventative step, you may spray copper fungicide on healthy plants’ leaves. Maintain good ventilation and refrain from overwatering to lower humidity levels, which will hinder the development of fungi.
check full article on – Fungal Leaf Blight Elephant Ear Treatment.
2. Rust: The Culprit Behind Brown Spots
Rust, a different fungus-related illness, may be the cause of the brown patches that have started to form on elephant ear plants’ leaves. Stressed plants exposed to harsh circumstances, such as high temperatures and poor care, are the ones most often affected by rust. One distinctive sign of this illness is the appearance of rusty-colored spores on the undersides of the leaves.
You must address the underlying stresses that cause the plant to be susceptible if you want to combat rust. The plant’s resistance may be increased by providing it with appropriate sunshine, water, and a soil mixture that drains effectively. Pruning and swiftly removing affected leaves will aid in slowing the spread of rust. Another tool for controlling the illness is the use of fungicides designed to fight rust.
Also Read : Elephant Ear Plant Turning Yellow – What To Do & Fix Overwatering
3. Pythium Rot: A Serious Threat
Pythium rot stands out as one of the most serious illnesses that afflict elephant ears. Pythium, a water mold that flourishes in poorly draining soils, particularly during the winter, is the culprit behind this deadly illness. The plant becomes more vulnerable as a result of pythium rot, finally dying.
Pythium rot may be difficult to cure after the plant has been infected, thus prevention is essential. Make sure your elephant ear plants are in pots with well-draining soil, and steer clear of overwatering to reduce the chance of this illness. It is better to remove the diseased plant from close proximity to healthy ones as soon as you see indications of pythium rot.
4. Bacterial Leaf Spot: Watch Out for Brown Spots
Another issue for owners of elephant ear plants is bacterial leaf spot. Brown patches on the leaves may progressively enlarge and impact bigger areas of the foliage as this illness progresses. This disease’s causing bacteria may spread quickly, particularly in humid environments.
Maintaining excellent air circulation around your plants and avoiding overhead watering can help you control bacterial leaf spot. If you see any damaged leaves, take immediate action to remove them and dispose of them far from the plant. Applying bactericides with copper active ingredients may aid in limiting bacterial development.
5. Mealybugs, Spider Mites, Scale, and Thrips: Troublesome Pests
Elephant ears are susceptible to several pests that may harm their development and health in addition to illnesses. The most frequent pests that attack these plants are mealybugs, spider mites, scale insects, and thrips. These pests weaken the plant overall and impede its development as they feed on the sap of the plant.
In order to control pest infestations, you must first identify the particular insect that is harming your plant. Wash mealybugs and spider mites away with a powerful water jet. With a cotton swab coated in alcohol, physically remove scale insects from surfaces. Effective treatments for thrips and other soft-bodied pests include neem oil and insecticidal detergents.
Also Read about Elephant Ear Plant Drooping – Why & How to Save(13 Reasons).
How to Get Elephant Ears to Bloom
Elephant ears need damp, rich, and fertile soil to promote flowering. By using a lot of organic materials, such as chopped leaves, peat, or composted manure, you may make a growth medium that is well-balanced. This increases the soil’s ability to retain water while also increasing the amount of nutrients present.
The right fertilizer is necessary to promote blossoming. To encourage the growth of flowers, use a balanced, water-soluble fertilizer with a higher middle number (phosphorus concentration). Over the course of the growth season, which normally lasts from late spring to early autumn, apply the fertilizer every two to three weeks.
For elephant ears, regular, adequate watering is essential. Maintain a constant moisture level in the soil that is not wet. Root rot may result from overwatering, and stress from underwatering may prevent blossoming. The optimum time to water is in the morning, when the extra moisture can evaporate and fungus problems are less likely.
You should think about propagation techniques if you want additional elephant ear blossoms. You may plant offsets individually or split elephant ear bulbs. Carefully divide the bulbs and plant each one separately to proliferate by division. This promotes the growth of new branches, which leads to additional flowers. Additionally, it enables you to increase your collection and enhance the attractiveness of your interior sanctuary.
When elephant ears are mature, which might take four to five months, they will blossom. Temperatures between 60°F and 85°F (15°C to 29°C) are essential for the plant to bloom at its best. The warmer months of the year, when the plant is growing at its fastest rate, are when blooming is most likely to take place.
Elephant ear species that spread readily have the potential to become invasive if unmanaged. Instead, choose for clumping variants to avoid overgrowth. The likelihood of clumping types spreading uncontrolled is lower since they develop in close clusters. Consider planting a spreading variety in a large container if you still want to cultivate one to control its rate of expansion.
Elephant Ear Plant: Deer and Rabbit Resistant
One of the many advantages of planting elephant ears is that they are deer and rabbit resistant. This means that these creatures are less likely to munch on these plants, sparing your precious garden from potential destruction.
Gardening Uses of Elephant Ear Plants
One of the many appealing aspects of the elephant ear plant is its versatility in garden design. With a wide range of colors and sizes available, these plants can fulfill multiple roles in your garden’s aesthetics. Here are some popular uses:
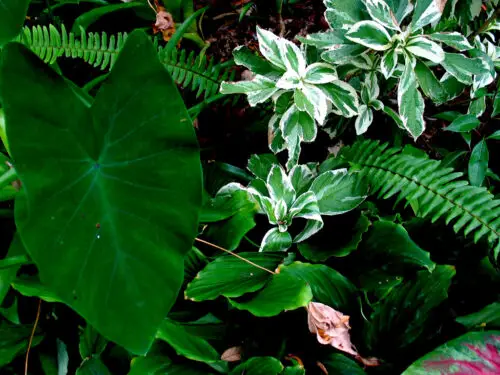
- Background Plants: Due to their impressive size and attractive foliage, elephant ear plants make excellent background plants, providing a lush green canvas for other flowers and shrubs to stand out.
- Ground Covers: Planting elephant ears in groups can create beautiful ground covers that add a touch of drama to your landscape.
- Edging: Their elegant appearance makes them perfect for edging purposes, especially around ponds, walkways, and patio enclosures, adding a touch of the tropics to these areas.
- Accent or Focal Points: Elephant ear plants are often used as striking accent plants, capturing the attention of anyone who lays eyes on them. They can serve as eye-catching focal points in various parts of your garden.
- Container Gardening: Many varieties of elephant ear plants are well-suited for growing in containers, allowing you to bring a touch of the tropics to your patio, deck, or balcony.
Conclusion
With its impressive leaves and captivating look, the Elephant Ear plant is a seductive addition to any garden or interior setting. You may grow a robust and beautiful Elephant Ear garden by learning about the propagation, maintenance, and lifetime of these wonderful plants. Whether you decide to grow new plants or overwinter the ones you already have, the Elephant Ear plant will certainly wow you with its beauty and grace. Enjoy your garden!