If you are searching for problem such as Root Bound Peace Lily Before that let me tell you these plants need repotting once every few years to make it healthy and to keep its foliage green. Sometimes due to Inadequate watering your peace lily it starts to wilt, same way if it is root bound then what to do at that time it’s important to know how and when you should do that to protect your plant. Lets now find out about Does peace lilies like to be root bound?
Peace Lily Root Bound – If Peace lily become root bound then Immediately change the pot to bigger size, also replace the soil with the new one. This way you save the plant from root rot. A root bound peace lily have low soil which drains most of the water resulting in drying condition while the plant requires moist soil all the time. This may lead to brown and crisp leaves which invites pests that infects plant more which is life threating to the plant. You can also solve this by repotting your peace lily into a large size pot and this way you can save your plant.
If your plants are really giving symptoms then you should go with the bigger pot otherwise it is beneficial for plants to get water easily, absorb in time and it helps the blooms come early.
How do I know if my peace lily is root bound?
You can sometimes easily guess whether to repot a peace lily when it is root bound or have symptoms like excessive yellowing in leaves. Root bound peace lily needs a bigger pot so that it can expand its roots in the larger pot. You also need fresh soil and pruning of damaged leaves so whenever you finish repotting your plant is free from all the diseases.
Spring can be a great season for repotting peace lilies, although it is advisable to when you get a bad symptom on your plant, if the roots turned dark and conditions of those roots are not good then only repot it with fresh soil. If you are someone who just wants to upgrade the pot size then spring can be a great advantage because it will overcome the repotting shock that peace lily gets and it can immediately start growing very well spring onward due to the warm climate.
I do not recommend repotting a peace lily in winters due to the peace lily which goes dormant at that time and doesn’t grow or stop growing in cold climates.
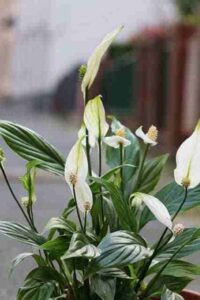
Do peace lilies like to be root bound?
When to repot a peace lily?
Here are some of the signs that will tell you when to repot a root bound peace lily:
Roots are shown above the soil surface
One of the reasons you may see signs like root emerging from the soil surface. This means that your aloe vera is overcrowded and doesn’t have space left in soil which is making its root growing from above the soil surface.
Most of the time roots can be grown inside of the soil then move forward to the bottom, once the bottom part is filled you will notice roots coming to the surface of the soil and let the owner know what is happening to it.
The solution is simple as a new bigger pot is needed for your aloe vera. You are also required to cut off some of the roots to minimize its overgrowth.
I know many newbies who used to throw water on the soil which makes the roots visible as the soil layer gets wiped from there. This makes the root don’t get proper water and nutrients which lead to more serious problems.
Although if you ever see a plant pot having roots above the soil then it indicates root bound problem and to solve this you either transplant it into the garden or use a larger pot for your aloe vera plant.
When repotting, some of the roots may be growing upward, making uneven growth. This needs to be freed by moving them downwards. Then after this you will see you will get downward growth of your aloe plant roots in future.
Roots are visible in the bottom hole.
Another sign of aloe Vera becoming root bound is due to the roots growing from the bottom hole where the plant drains water. Roots are visible as they are popping out from the drainage hole which is generally used to drain water and now the roots have trapped it to go out from there.
Once the roots are overcrowded the aloe plant may not receive water supply, nutrients as there may be less soil to support it. If you do not repot it at that time then the plant may not grow and the condition could be harsh.
I suggest you better change the pot to a big size and take out your plant from the existing pot and put it into the new pot. The plant may need a few days to recover once it has established that your plant may start to grow again.
Water is draining too fast
Whenever any plant not just aloe vera gets root bound then it will show lots of signs like roots growing from above soil, from drainage hole but if it is not the case in your aloe plant then check the soil if 90% of the soil is covered with roots then the drainage may have become extremely fast. When pot drains too quickly it will drain out nutrients as well as there would be no time for your plant roots to get water or nutrients. Then it will be deficient in nutrients which result in degradation of quality of aloe vera and soon it may not grow back.
You can immediately check the soil and if needed add more soil to it. This will increase the space for roots and it will grow from there.
Roots are all over the bottom soil
Sometimes when your aloe vera is overcrowded with roots it may end up growing from the bottom soil, from drainage hole. some of the roots may emerge by making a hole into the plastic pot and solving it.
Solution is to change the pot to a larger one.
How to Repot a peace lily?
There are multiple steps you need to follow if you want to repot a root bound peace lily. Repotting peace lily is done due to various reasons like root bound, overwatering, excessive fertilizing, pest infestation and diseases.
Here I will tell you about the root bound peace lily and how to repot it with the below steps.
1 . Remove the peace lily from the pot.
First of all, you need to remove the peace lily plant from the pot. Just gently slap on the sides of the pot to loosen it, or you can squeeze the sides of the pot. It will definitely do the magic.
Other options if your peace lily is really root bound & stuck then using a sharp tool to open the inner corners of the pot. Move the sharp tool in a circle on the corners to separate out the stucked roots on the soil.
After successfully removing your whole plant from the pot, it looks like it is tightly packed with bulky roots all over the soil. You may find that there is less soil left while the roots covered all the soil from the bottom to the sides.
You should be careful while removing plant from the pot because I know if it is not done correctly then your plant may not grow and it end up dying. This happened to me when i was younger and don’t know much about repotting.
I did it incorrectly and the plant is getting dry after a few days and when I again check the pot from the bottom part it shows that the roots have become dark and brown. I feel like the plant may be dying due to shock. So then after that a few years later I again had the chance to repot this beautiful peace lily and this time did it gently.
2 . Loosen the tighten roots.
So to loosen the tightness of roots you need to be extra careful and to do that first separate out the soil from the roots. If it is glued together then you can use a tab of water and let your plant sit there for a few minutes. The soil may break down and let the roots come out of it.
Another method you can use is by washing the jammed roots in the water, slowly the soil will separate out. That way you can avoid any damage to your roots.
3 . Cut off Bad roots that have disease.
Once you separate the soil from roots, You can now clearly find that some of the roots are too long and entangled. So to resolve this you can cut some of the long roots to 1 inch, also get rid of those roots which are dark and diseased. They only form more disease so better to cut them off and make your plant healthy.
4 . Use A Bigger Size Pot In Case of Root Bound.
The next step is to choose a correct pot. If you previously used a pot with 2 inch diameter then now use a 4 inch diameter pot. Now that your plant is big enough it needs a larger pot to be comfortable while growing. Do not use a much bigger size pot because that will take more soil so when soil is more than it takes too much time to dry this increases the chances of overwatering and then root rot.
I use either a cheap pot used in a nursery or any plastic ones then move it to ceramic pots which are more good looking and attractive.
Always remember do not use a pot without a drainage hole because your peace lily doesn’t like to be overwatered or soggy so better it drains water and lets the plant grow.
Below are my recommended pots for your plant.
Best pot for peace lily –
4 inch pots – Buy .
6 inch pots – Buy .
5.5, 6.5, 8 inch pots – Buy .
5 . Now Use Fresh Potting Mix For your peace lily.
Use a fresh potting soil for peace lily. First drop some of the soil at the bottom half inch then place your root bound peace lily and fill all the soil into the sides of the peace lily. The soil must be filled until you do not see any roots. Once you properly provided fresh soil to your plant now tap on the soil surface to make it flat and remove any excess soil.
Use a good fertile potting mix that drains water correctly. Below I have given a link to the potting mix I used to grow these plants.
Best Potting Soil For Peace lily – Buy
6 . Water it Again to Help it.
Now that everything is settled, you need to pour water to your peace lily plant until it drains water out from the drainage hole.
That’s how you repot a root bound peace lily.
How Much Water Does a Peace Lily Need? – Often, Without, Mist
7 . Move it in Indirect Light Area
Now you should place your peace lily in an indirect light area, do not give full sun or filtered sunlight. Let it grow a few leaves then move it to an area which has indirect light. We want to provide moisture through watering on its soil for some days(do not overwater it only get its top soil to moist). Once the plant again starts growing, you can move it to its previous location for better growth.
How Much Sun Does a Peace Lily Need? – Place, Shade, Hours
Wrap Up
I hope you get the answer on “do peace lilies like to be root bound” and if you like to read more such article check below.
Peace Lily Meaning – Symbolism(Spiritual benefits, Feng Shui)